background image

14

GB

D:\_SONY TV\KP\SY17_KP_RU3_RG_E22\4689560E22_GB\030ADD_GB.fm

masterpage: Left

KD-75XE94xx / 65XE93xx / 55XE93xx

4-689-560-

E2

(2)

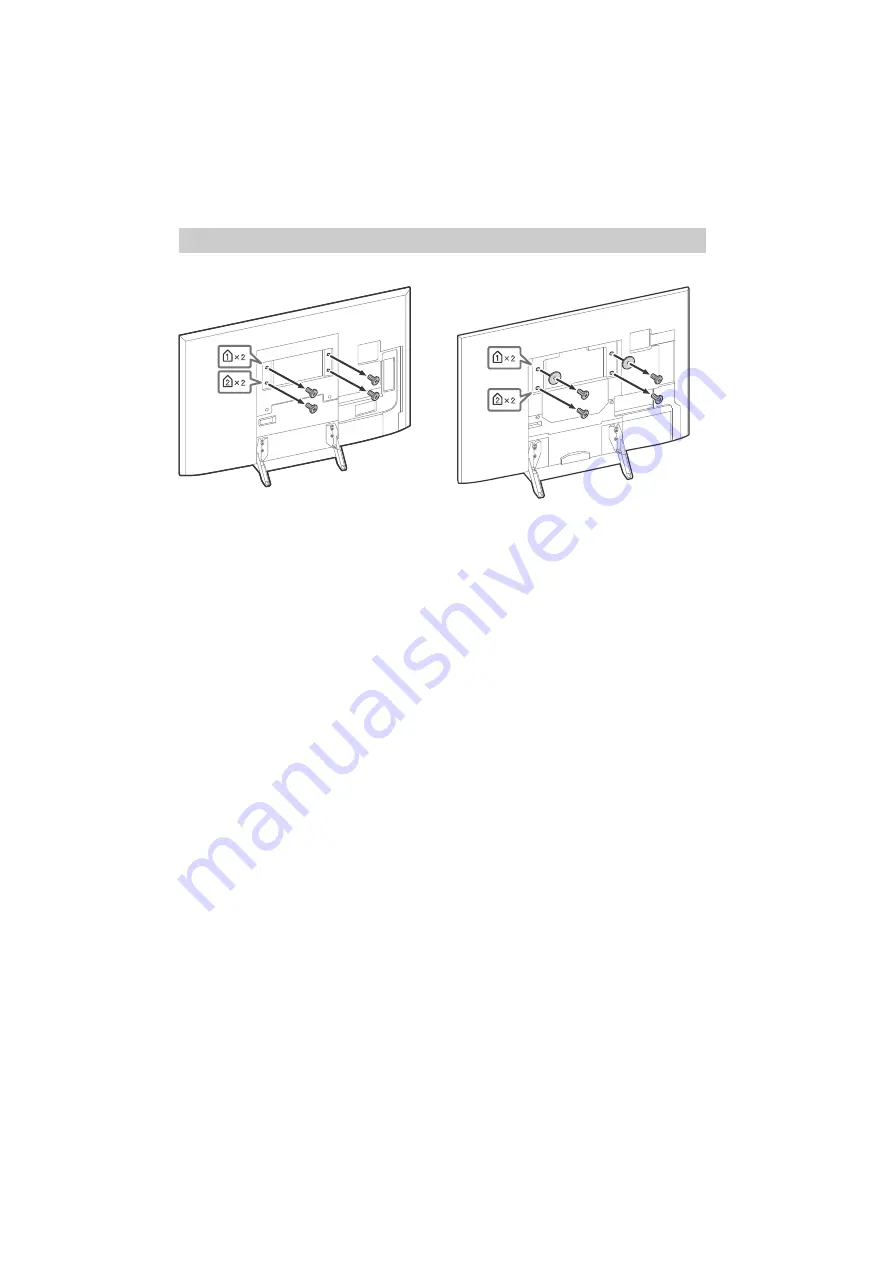
Remove the screws from the rear of the TV.

SU-WL845 (KD-75XE94xx, KD-65XE93xx), SU-WL840 (KD-55XE93xx)

KD-75XE94xx

KD-65/55XE93xx

Содержание BRAVIA 55XE93 Series

Страница 1: ...D _SONY TV KP SY17_KP_RU3_RG_E22 4689560E22_GB 010COV fm masterpage Cover KD 75XE94xx 65XE93xx 55XE93xx 4 689 560 E2 2 KD 75XE94xx 65XE93xx 55XE93xx 4 689 560 E2 2 Television Reference Guide ...

Страница 2: ...If you connect your TV to the internet the Help feature and information will be updated Location of the identification label Labels for the TV Model No Production Date year month and Power Supply rating are located on the rear of the TV or package They can be found by removing the stand cover and center cover For models with supplied mains adaptor Labels for the mains adaptor Model No and Serial N...

Страница 3: ...ння постанова КМУ від 16 12 2015 1077 Технічного регламенту низьковольтного електричного обладнання постанова КМУ від 16 12 2015 1067 Справжнім Соні Корпорейшн заявляє що телевізори моделей KD 75XE9405 KD 65XE9305 KD 55XE9305 відповідають Технічному регламенту радіообладнання і телекомунікаційного кінцевого термінального обладнання Повний текст декларації про відповідність доступний в Інтернеті за...

Страница 4: ...5 55XE93xx only Be sure to use the screws supplied with the Wall Mount Bracket when attaching the Wall Mount Bracket to the TV set The supplied screws are designed as indicated by illustration when measured from the attaching surface of the Wall Mount Bracket The diameter and length of the screws differ depending on the Wall Mount Bracket model Use of screws other than those supplied may result in...

Страница 5: ...end or twist the mains lead excessively The core conductors may be exposed or broken Do not modify the mains lead Do not put anything heavy on the mains lead Do not pull on the mains lead itself when disconnecting the mains lead Do not connect too many appliances to the same mains socket Do not use a poor fitting mains socket NOTE ON MAINS ADAPTOR models with supplied mains adaptor only Warning To...

Страница 6: ...akenly swallowed If the following problems occur Turn off the TV set and unplug the mains lead immediately if any of the following problems occur Ask your dealer or Sony service centre to have it checked by qualified service personnel When Mains lead is damaged Poor fitting of mains socket TV set is damaged by being dropped hit or having something thrown at it Any liquid or solid object falls thro...

Страница 7: ...cal authority Handle the remote control with care Do not drop or step on it or spill liquid of any kind onto it Do not place the remote control in a location near a heat source a place subject to direct sunlight or a damp room Утилизация телевизора Утилизация отслужившего электрического и электронного оборудования директива применяется в странах Евросоюза и других европейских странах где действуют...

Страница 8: ...is on Press and hold to power off Press repeatedly to change the function then press or button to Adjust the volume Select the channel Select the input source of TV Remote Control sensor Light sensor Illumination LED The illumination LED lights up or blinks according to the status of the TV For more information refer to the Help Guide Do not place anything near the sensor Controls and Indicators ȩ...

Страница 9: ...xt mode Hold the current page Microphone Use Voice Function e g Search various content by voice TV standby Turn on or turn off the TV standby mode DIGITAL ANALOG Switch between digital and analogue mode TV RADIO Switch between TV or RADIO broadcasts SYNC MENU Display the BRAVIA Sync Menu EXIT Return to the previous screen or exit from the menu When an Interactive Application service is available p...

Страница 10: ...Menu DISCOVER Bring up the Content Bar to search for content Item select Enter Volume Adjust the volume Jump Jump back and forth between two channels or inputs The TV alternates between the current channel or input and the last channel or input that was selected Muting Mute the sound Press again to restore the sound PROG In TV mode Select the channel In Text mode Select the next or previous page A...

Страница 11: ...Headphone Home Audio System Subwoofer Digital still camera Camcorder USB storage media Home Audio System with ARC HDMI Device Cable Antenna Set Top Box DVD player with component output Router VCR Video game equipment DVD player Camcorder VCR Video game equipment DVD player Camcorder Set Top Box 2 Digital still camera Camcorder USB storage media HDMI Device HDMI Device Home Audio System with Optica...

Страница 12: ... AUDIO OUT OPTICAL is necessary Satellite input RF input Connections for terrestrial cable and satellite Connection steps SUB t Antenna t MAIN For SUB jack connect only when you are using twin tuner mode except for Single Cable Distribution EN50494 CAM Conditional Access Module Provides access to pay TV services For details refer to the instruction manual supplied with your CAM Do not insert the s...

Страница 13: ...acket also refer to the Operating Instructions and Installation Guide supplied with the Wall Mount Bracket Note Be sure to store the removed screws in a safe place keeping them away from children Make sure that the wall has enough space for the TV and is capable of supporting a weight of at least six times that of the TV For instructions on Wall Mount Bracket installation of your TV model refer to...

Страница 14: ..._KP_RU3_RG_E22 4689560E22_GB 030ADD_GB fm masterpage Left KD 75XE94xx 65XE93xx 55XE93xx 4 689 560 E2 2 Remove the screws from the rear of the TV SU WL845 KD 75XE94xx KD 65XE93xx SU WL840 KD 55XE93xx KD 75XE94xx KD 65 55XE93xx ...

Страница 15: ... rear of the TV to make it parallel with the wall Note If using an electric screwdriver set the torque at approximately 1 5 N m 15 kgf cm Be sure to fasten the Wall Mount Attachment when attaching them to the TV Use only a flat head screwdriver to install the Wall Mount Attachment Use of another tool might result in over torqueing the Wall Mount Attachment and damaging the TV SU WL450 KD 65 55XE93...

Страница 16: ...ntil you are ready to attach the Table Top Stand Keep the screws away from small children Make sure that the wall has enough space for the TV and is capable of supporting a weight of at least six times that of the TV 1 Remove the stand cover and terminal covers 2 Remove the screws from the rear of the TV KD 75XE94xx KD 55XE93xx only This product should only be installed by a professional installer...

Страница 17: ...x 4 689 560 E2 2 3 Attach the Wall Mount Attachment supplied with the TV to the rear of the TV to make it parallel with the wall KD 55XE93xx only 4 Attach the Wall Mount Bracket not supplied using the screws not supplied KD 75XE94xx VS L VS S 1 5 N m 15 kgf cm Wall Mount Bracket not supplied Screw not supplied ...

Страница 18: ...t approximately 1 5 N m 15 kgf cm Be sure to fasten the Wall Mount Attachment when attaching them to the TV Use only a flat head screwdriver to install the Wall Mount Attachment Use of another tool might result in over torqueing the Wall Mount Attachment and damaging the TV You cannot use some of the cable holders on the rear of the TV when using a Wall Mount Bracket not supplied Wall Mount Bracke...

Страница 19: ... time to initialize the system Wait for about one minute then operate it again Troubles and Solutions When the illumination LED is flashing in red Count how many times it flashes interval time is three seconds Reboot the TV by disconnecting the mains lead for two minutes then turn on the TV If the problem persists disconnect the mains lead and contact your dealer or Sony service centre with the nu...

Страница 20: ...720p 50 60 Hz 576p 576i 480p 480i Audio input phono jacks t AV IN 2 Video input common phono pin with Y input HDMI IN 1 2 3 4 support 4K resolution HDCP 2 2 compatible Video 4096 2160p 50 60 Hz 1 2 4096 2160p 24 Hz 1 3840 2160p 50 60 Hz 2 3840 2160p 24 25 30 Hz 1080p 30 50 60 Hz 1080 24p 1080i 50 60 Hz 720p 30 50 60 Hz 720 24p 576p 576i 480p 480i PC Formats 1 3840 2160p is displayed when 4096 2160...

Страница 21: ...uq toza havo aylanishi yaxshi bo lgan kartonda hamda kislota va ishqorlar saqlanadigan binolardan xoli joyda saqlanishi lozim Saqlash joyidagi harorat 20 ºC dan 60 ºC gacha Saqlash joyidagi namlik 80 nisbiy namlik kondensatsiyasiz Eslatma Har ikkala parametr uchun ham maksimal qiymatga bir vaqtda erishish mumkin Ishlatish joyidagi harorat 0 ºC dan 40 ºC gacha Ishlatish joyidagi namlik 10 80 nisbiy...

Страница 22: ...y charge a fee for their services This TV supports digital broadcasting using MPEG 2 H 264 MPEG 4 AVC and H 265 HEVC codecs but compatibility with all operator service signals which may change over time cannot be guaranteed Trademark information The terms HDMI and HDMI High Definition Multimedia Interface and the HDMI Logo are trademarks or registered trademarks of HDMI Licensing LLC in the United...

Страница 23: ...D _SONY TV KP SY17_KP_RU3_RG_E22 4689560E22_GB 040TRO_GB fm masterpage Blank R KD 75XE94xx 65XE93xx 55XE93xx 4 689 560 E2 2 ...

Страница 24: ...560 E2 2 Actual resolution 3840 x 2160 pixels Для получения полезной информации о продукции Сони Для отримання корисної інформації щодо виробів компанії Sony Sony өнімдерінің пайдалы ақпараттары Sony mahsulotlari haqida foydali ma lumotlar uchun http rd1 sony net help tv eaep1 h_eu Справочное руководство Довідка Көмекші нұсқаулық ...

Отзывы: