background image

59

GB

Ta
ble
 of
 

co
nt

e

n

ts

Sa
mp
le

 pho

to

Me
nu

In

dex

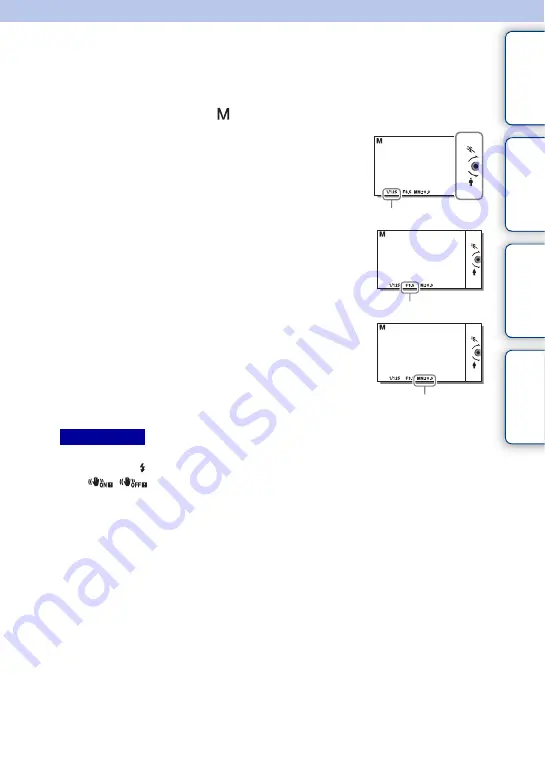
Manual Exposure

You can shoot with the desired exposure setting by adjusting both the shutter speed and 
aperture.

• You cannot select [Flash Off] and [Autoflash] in [Flash Mode]. When you want to fire the flash, raise the 

flash by pressing   (Flash pop-up) button. When you do not fire the flash, push down the flash.

• The 


 (SteadyShot warning) indicator does not appear in manual exposure mode.

• The ISO setting [ISO AUTO] is set to [ISO 100] in manual exposure mode. Set the ISO sensitivity as 

necessary.

• The brightness of the image on the LCD screen may differ from the actual image being shot.
• When using an A-mount lens (sold separately), you can adjust the shutter speed and aperture when 

focusing manually during movie recording.

• If you shoot an image using the camera’s fastest shutter speed, the screen may display uneven exposure, 

depending on the shooting conditions. To avoid uneven exposure, change the shooting conditions (shift 
the shutter speed one step lower, etc.) before shooting.

1

Set the shooting mode to 

 (Manual Exposure).

2

Select the shutter speed or aperture value 
by pressing the bottom of the control wheel.

Each time you press the bottom of the control wheel, it 
switches between the shutter speed and aperture value.

Shutter speed

3

Turn the control wheel to select shutter 
speed/aperture value.

Check the exposure value at “MM” (metered manual).
: Images become brighter.
Toward –: Images become darker.
0: Appropriate exposure analyzed by the camera

Aperture (F-value)

4

Adjust the focus and shoot the subject.

You can adjust the shutter speed and aperture value also 
during movie recording.

Metered manual

Notes

Continued 

r

Содержание alpha ILCE-3000

Страница 1: ...4 469 855 11 1 GB 2013 Sony Corporation ILCE 3000 Interchangeable Lens Digital Camera α Handbook E mount Table of contents Sample photo Menu Index ...

Страница 2: ...arch for information in a listing of menu items Search for information by keyword Marks and notations used in this handbook In this handbook the sequence of operations is shown by arrows t Operate the camera in the order indicated The default setting is indicated by Indicates cautions and limitations relevant to the correct operation of the camera The zmark indicates information that is useful to ...

Страница 3: ...Sample photo 6 Identifying parts 12 List of icons on the screen 16 Basic operations Operating the camera 19 Menu 22 Shooting images 27 Playing back images 29 Deleting images 31 Using the Photo Creativity function Photo Creativity 32 Bkground Defocus 33 Brightness 34 Color 35 Vividness 36 Picture Effect 37 Continued r ...

Страница 4: ...ram Auto 63 Using functions with the control wheel DISP Display Contents 39 Exposure Comp 42 Drive Mode 43 ISO ISO 49 Image Index 50 Using functions in the menu Camera 22 Image Size 23 Brightness Color 23 Playback 24 Setup 24 Connecting with other equipment Using with your computer 160 Installing the software 162 Connecting the camera to the computer 165 Creating a movie disc 167 Printing still im...

Страница 5: ...o Menu Index Troubleshooting Troubleshooting 172 Warning messages 179 Others Using the camera abroad 182 Memory card 183 InfoLITHIUM battery packs 185 Battery charging 187 Mount Adaptor 188 AVCHD format 190 Cleaning 191 Index Index 192 ...

Страница 6: ...ople page 7 Shooting macro photos page 8 Shooting landscapes page 9 Shooting sunset night scenes page 10 Shooting fast moving subjects page 11 If you click on a photo the screen will jump to the page describing the function recommended for shooting that kind of photo Refer to those descriptions in addition to the shooting tips displayed on the screen of the camera See the pages in parentheses for ...

Страница 7: ...backgrounds blurred away 33 The same scene with different brightness 48 A happy smile 74 A person in candle light 56 A person in front of night view 55 A moving person 49 A group photo 46 47 A person lit from behind 64 A person with soft skin tones 77 33 48 74 56 55 49 46 64 77 Continued r ...

Страница 8: ... the background 33 Adjusting the color to indoor light 87 Flowers 55 Lowering the amount of flash light 91 Focusing manually 65 Shooting subjects in better brightness 42 Preventing camera shake for indoor shots 49 Making food look appealing 42 33 87 55 91 65 42 49 42 Continued r ...

Страница 9: ... vivid colors 42 Running water 61 Vivid green colors 96 Colored leaves 96 Panoramic photos 57 Scenery with a wide range of brightness 92 Light outdoors shot from a dark interior 92 Defocusing the background 33 Keeping your shot level 111 42 61 96 96 57 92 92 33 111 Continued r ...

Страница 10: ...sunset night scenes Holding the camera by hand 56 Shooting the red of the sunset beautifully 55 Fireworks 60 Trail of light 64 The same scene in different brightness 48 Defocusing the background 33 Preventing camera shake 46 56 55 60 64 48 33 46 Continued r ...

Страница 11: ...of contents Sample photo Menu Index Shooting fast moving subjects Following a moving subject 68 Expressing vigorous action 61 Shooting the subject approaching the camera 65 Capturing the best moment 45 68 61 65 45 ...

Страница 12: ...on 27 C AF illuminator Self timer lamp Smile Shutter lamp D Microphone1 E Flash 64 F Hook for shoulder strap Attach the shoulder strap to prevent damage caused by dropping the camera G Lens release button H Lens I Mount J Image sensor2 K Lens contacts2 1 Do not cover this part during movie recording 2 Do not touch this part directly When the lens is removed Continued r ...

Страница 13: ... of the Multi Interface Shoe visit the Sony web site in your area or consult your Sony dealer or local authorized Sony service facility Accessories for the Accessory Shoe can also be used Operations with other manufactures accessories are not guaranteed 2 Accessories for the Auto lock Accessory Shoe can also be attached using a Shoe Adaptor sold separately A Flash pop up button 64 B Diopter adjust...

Страница 14: ...he cord through the connection plate cover as shown below Make sure that the cord is not pinched when you close the cover B Tripod socket hole Use a tripod with a screw length of less than 5 5 mm 7 32 inch You will be unable to firmly secure the camera to tripods using screws longer than 5 5 mm 7 32 inch and may damage the camera C Speaker D Battery cover E Battery compartment F Lock lever Continu...

Страница 15: ...contents Sample photo Menu Index E 18 55 mm F3 5 5 6 OSS A Hood index B Focusing ring C Zooming ring D Focal length scale E Focal length index F Lens contacts1 G Mounting index 1 Do not touch this part directly Lens ...

Страница 16: ...Movie recording Playback A 4 Display Indication P A S M Shoot Mode Scene Selection Scene Recognition icon Memory card Upload 100 Number of recordable still images 123Min Recordable time of movies Aspect ratio of still images 20M 17M 10M 8 4M 5 0M 4 2M Image size of still images RAW J FINE STD Image quality of still images 60i 50i 60i 50i 24p 25p 24p 25p Recording mode of movies 100 Remaining batte...

Страница 17: ...t keys Display Indication Flash Mode Red Eye Reduction 0 0 Flash compensation Drive Mode Metering Mode Focus mode Focus area mode Face Detection Display Indication AWB 7500K A7 G7 White Balance Soft Skin Effect DRO Auto HDR Auto Object Framing Creative Style Smile Shutter Picture Effect Smile detection sensitivity indicator Display Indication z Focus status 1 125 Shutter speed F3 5 Aperture value ...

Страница 18: ...Menu Index 2013 1 1 9 30AM Recorded date time of the image 12 12 Image number Number of images in the view mode Appears when HDR did not work on the image Appears when Picture Effect did not work on the image Histogram Display Indication ...

Страница 19: ...s allow you to use various functions of the camera When shooting DISP Display Contents Exposure Comp Drive Mode and ISO ISO functions are assigned to the control wheel When playing back DISP Display Contents and Image Index functions are assigned to the control wheel Control wheel Soft keys Control wheel Continued r ...

Страница 20: ...A To use the function shown at the lower right corner of the screen press soft key B To use the function shown at the center press the center of the control wheel soft key C You can assign the functions to the soft key B page 132 In this handbook the soft keys are indicated by the icon or the function shown on the screen Soft keys The arrow means you can turn the control wheel When options are dis...

Страница 21: ... evaluates the subject and makes the proper settings You can enjoy automatic shooting with the appropriate settings Scene Selection Shoots with preset settings according to the subject or condition Sweep Panorama Shoots with panoramic size Manual Exposure Adjusts the aperture and shutter speed Shutter Priority Adjusts the shutter speed to express the movement of the subject Aperture Priority Shoot...

Страница 22: ...our choice Camera Drive Mode Selects the drive mode such as continuous shooting self timer or bracket shooting Flash Mode Selects the method used to fire the flash AF MF Select Selects auto focusing or manual focusing Autofocus Area Selects the area to be focused on Autofocus Mode Selects the autofocus method Tracking Focus Keeps the focus on a subject while tracking it Zoom Sets the zoom scale of...

Страница 23: ...played on the LCD screen when you press the DISP button Image Size Still Image Size Selects the image size Aspect Ratio Selects the aspect ratio Quality Selects the compression format Panorama Image Size Selects the image size of panoramic images Panorama Direction Selects the direction to pan the camera when shooting panoramic images Movie File Format Selects AVCHD or MP4 Record Setting Selects t...

Страница 24: ... in dim places Red Eye Reduction Provides pre flash before shooting when using the flash to prevent eyes from being shot in red Live View Display Allows you to choose whether or not to show the value of exposure compensation etc on the screen display Auto Review Sets the display time of the image right after shooting Grid Line Turns on the grid line that helps you to adjust the composition of imag...

Страница 25: ...tom Key Settings Assigns functions to the soft key or the right side of the control wheel Beep Selects the sound produced when you operate the camera Language Selects the language used on the screen Date Time Setup Sets the date and time Area Setting Selects the area where you are using the camera Help Guide Display Turns the Help Guide on or off Power Save Sets the level of the power saving featu...

Страница 26: ... which the still image is stored Select Shoot Folder Selects the recording folder to which still images and MP4 movies are recorded New Folder Creates a new folder to which still images and MP4 movies are recorded Recover Image DB Repairs the image database file when inconsistencies are found Display Card Space Displays the remaining recording time of movies and the recordable number of still imag...

Страница 27: ...on halfway down to focus on your subject and press it fully down to shoot When shooting faces close up macro subjects or subjects tracked by Tracking Focus the camera analyzes the scene and automatically trims the captured image into a suitable composition Both the original and the trimmed images are saved page 76 To record movies press the MOVIE button to start recording Press the MOVIE button ag...

Страница 28: ...ject is seen through glass The subject is moving quickly The subject reflects light such as mirror or has shiny surfaces The subject is flashing The subject is backlit Focus indicator Status z lit Focus is locked lit Focus is confirmed Focal point moves following a moving subject lit Focusing in progress z flashing Cannot focus When the camera cannot focus on the subject automatically the focus in...

Страница 29: ... center of the control wheel Fast forward Press the right or turn the control wheel clockwise Fast rewind Press the left or turn the control wheel counterclockwise Forward slow playback Turn clockwise during pause Reverse slow playback Turn counterclockwise during pause Adjust sound volume Press the bottom then press top bottom Notes z Displaying a desired folder To select a desired folder select ...

Страница 30: ...arge panoramic images pause the playback first and then press Enlarge Image Enlarged playback 1 Display the image you want to enlarge and then select Enlarge Image 2 Adjust the scaling by turning the control wheel 3 Select the portion you want to enlarge by pressing the top bottom right left of the control wheel 4 To cancel the enlarged playback select Notes Enlarge Image z Scaling range The scali...

Страница 31: ... you have deleted an image you cannot restore it Be sure that you want to delete the image before proceeding 1 While displaying the image you want to delete select Delete 2 Select OK Select to quit the operation Notes Delete OK z Deleting several images Select MENU t Playback t Delete to select and delete several images at the same time ...

Страница 32: ...ring recording movies with the Photo Creativity function If you turn on the Photo Creativity function while Superior Auto is activated the camera does not make a composite image 1 Set the shooting mode to Intelligent Auto or Superior Auto 2 Press the bottom of the control wheel and select Photo Creativity 3 Select the item you want to set from the items displayed at the bottom of the screen You ca...

Страница 33: ...ior Auto 2 Select Photo Creativity 3 Select Bkground Defocus 4 Defocus the background You can focus on both the subject and the background You can defocus the background Select AUTO to restore to the original status The defocusing range available depends on the lens used The defocusing effect may not be noticeable depending on the lens or the distance between the subject and the background Notes z...

Страница 34: ...brightness easily in Photo Creativity 1 Set the shooting mode to Intelligent Auto or Superior Auto 2 Select Photo Creativity 3 Select Brightness 4 Select the desired brightness You can make images brighter You can make images darker Select AUTO to restore to the original status ...

Страница 35: ... the color easily in Photo Creativity 1 Set the shooting mode to Intelligent Auto or Superior Auto 2 Select Photo Creativity 3 Select Color 4 Select the desired color You can make the color warm You can make the color cool Select AUTO to restore to the original status ...

Страница 36: ...he vividness easily in Photo Creativity 1 Set the shooting mode to Intelligent Auto or Superior Auto 2 Select Photo Creativity 3 Select Vividness 4 Select the desired vividness You can make images vivid You can make images faint Select AUTO to restore to the original status ...

Страница 37: ...ginal status Off Disables the Picture Effect function Toy Camera Creates the look of a Toy Camera photo with shaded corners and pronounced colors Pop Color Creates a vivid look by emphasizing color tones Posterization Color Creates a high contrast abstract look by heavily emphasizing primary colors Posterization B W Creates a high contrast abstract look in black and white Retro Photo Creates the l...

Страница 38: ...tness Color t Picture Effect page 94 Partial Color Red Creates an image which retains the color red but converts others to black and white Partial Color Green Creates an image which retains the color green but converts others to black and white Partial Color Blue Creates an image which retains the color blue but converts others to black and white Partial Color Yellow Creates an image which retains...

Страница 39: ...Playback t Display Contents 2 Select the desired mode Histogram is not displayed during following operations Movie recording playback Panorama recording playback Slide Show Notes During shooting LCD Display DISP Graphic Display Shows basic shooting information Graphically shows the shutter speed and aperture value except for when Shoot Mode is set to Sweep Panorama Display All Info Shows recording...

Страница 40: ...the luminance distribution graphically During playback Display Info Shows recording information Histogram Displays the luminance distribution graphically in addition to recording information No Disp Info Does not show recording information z Setting the screen display modes to be available You can select which LCD screen display modes can be selected in shooting mode with DISP Button Monitor page ...

Страница 41: ...xels of a particular brightness exist in the picture Brighter image will make the entire histogram shift to the right side and darker image to the left side If the image has a loss of details in highlights and shadows these parts flash on the histogram display during playback Luminance limit warning Flashing R red Luminance G green B blue ...

Страница 42: ...ust the exposure between 3 0 EV and 3 0 EV only a value between 2 0 EV and 2 0 EV with the equivalent image brightness appears on the screen when shooting If you set an exposure beyond this range the image brightness on the screen does not show the effect but it will be reflected on the recorded image Notes z Adjusting the exposure for better looking images To shoot subjects in brighter tones set ...

Страница 43: ...Soft Focus HDR Painting Rich tone Mono Miniature in Picture Effect Single Shooting Shoots 1 still image Normal shooting mode Cont Shooting Shoots images continuously while you keep pressing the shutter button page 44 Spd Priority Cont Shoots images continuously at high speed while you keep pressing the shutter button page 45 Self timer Shoots an image after 10 or 2 seconds page 46 Self timer Cont ...

Страница 44: ...wing functions Scene Selection excluding Sports Action Sweep Panorama Smile Shutter Auto HDR Soft Focus HDR Painting Rich tone Mono Miniature in Picture Effect Notes z Continuing to adjust the focus and exposure during continuous shooting Set Autofocus Mode to Continuous AF page 68 Set AEL w shutter to Off page 106 The exposure for the first image is set when you press the shutter button halfway d...

Страница 45: ... Drive Mode t Spd Priority Cont You cannot use Spd Priority Cont with the following functions Scene Selection excluding Sports Action Sweep Panorama Smile Shutter Auto HDR Soft Focus HDR Painting Rich tone Mono Miniature in Picture Effect The speed of continuous shooting is estimated using our criteria The speed of continuous shooting may be slower depending on shooting conditions Image size ISO s...

Страница 46: ... held Twilight Anti Motion Blur in Scene Selection Sweep Panorama Smile Shutter Auto HDR Soft Focus HDR Painting Rich tone Mono Miniature in Picture Effect Self timer 10 Sec Sets the 10 second delay self timer When you press the shutter button the self timer lamp flashes and beeps until the shutter operates To cancel the self timer press Drive Mode on the control wheel Self timer 2 Sec Sets the 2 ...

Страница 47: ...ve Mode t Self timer Cont When you press the shutter button the self timer lamp flashes and the audible signal sounds until the shutter operates To cancel the self timer press Drive Mode on the control wheel You cannot use Self timer Cont with the following functions Hand held Twilight Anti Motion Blur in Scene Selection Sweep Panorama Smile Shutter Auto HDR Soft Focus HDR Painting Rich tone Mono ...

Страница 48: ...racket press Drive Mode and select Single Shooting You cannot use Bracket Cont with the following functions Intelligent Auto Superior Auto Scene Selection Sweep Panorama Smile Shutter Auto HDR Soft Focus HDR Painting Rich tone Mono Miniature in Picture Effect The last shot is shown on the auto review In Manual Exposure the exposure is shifted by adjusting the shutter speed When you adjust the expo...

Страница 49: ...g it is switched to ISO 100 Set the ISO according to your shooting conditions ISO AUTO Sets the ISO sensitivity automatically 100 200 400 800 1600 3200 6400 12800 16000 Sets the sensitivity to light of the imaging sensor You can reduce image blurring in dark locations or with moving subjects by increasing the ISO sensitivity select a large number Notes z Adjusting ISO Sensitivity Recommended Expos...

Страница 50: ...itch to 12 image index MENU t Playback t Image Index 3 To return to the single image playback select the desired image and press the center of the control wheel z Displaying a desired folder To select a desired folder select the bar on the left of the image index screen and then press the top bottom parts of the control wheel You can switch between still image playback and movie playback by pressi...

Страница 51: ...nger since the camera makes a composite image The camera records one composite image 1 Set the shooting mode to Intelligent Auto 2 Point the camera to the subject When the camera recognizes the scene the icon for recognized scene appears on the screen The camera recognizes Night Scene Tripod Night Scene Night Portrait Backlight Backlight Portrait Portrait Landscape Macro Spotlight Low Brightness o...

Страница 52: ...ult in the following situations It is dark and the subject is distant The contrast between the subject and the background is poor The subject is seen through glass The subject is moving quickly The subject reflects light such as mirror or has shiny surfaces The subject is flashing The subject is backlit Focus indicator Status z lit Focus is locked lit Focus is confirmed Focal point moves following...

Страница 53: ...scene appropriate shooting function the number of times the shutter is released Recognized scene Night Scene Tripod Night Scene Hand held Twilight Night Portrait Backlight Backlight Portrait Portrait Landscape Macro Spotlight Low Brightness or Baby Shooting function Auto HDR Slow Sync Daylight Sync Slow Shutter Icon for recognized scene The number of times the shutter is released 3 Adjust the focu...

Страница 54: ...tivity You can access the Photo Creativity menu by pressing the bottom part of the control wheel in Intelligent Auto or Superior Auto mode Using the Photo Creativity menu you can change the settings with easy operations and achieve creative photography page 32 ...

Страница 55: ...sharpens the subject Accentuate the skin tones softly Landscape Shoots the entire range of scenery in sharp focus with vivid colors Macro Shoots close ups of the subjects such as flowers insects food or small items Sports Action Shoots a moving subject at a fast shutter speed so that the subject looks as if it is standing still The camera shoots images continuously while the shutter button is pres...

Страница 56: ... sandy beach or lawn Subjects with constant change such as waves or water falls In the case of Hand held Twilight or Anti Motion Blur block noise may occur when using a light source that flickers such as fluorescent lighting The minimum distance that you can come close to a subject does not change even if you select Macro For the minimum in focus range refer to the minimum distance of the lens att...

Страница 57: ...nder low light conditions panoramic images may be blurred Under flickering lights such as fluorescent light the brightness or color of the combined image is not always the same When the panoramic shot overall and the angle in which you fixed the focus and exposure with AE AF lock are extremely different in brightness color and focus the shooting will not be successful If this happens change the lo...

Страница 58: ...es When using a zoom lens it is recommended that you use it with W side Determine the scene and press the shutter button halfway so that you can lock the focus and exposure Then press the shutter button fully down and pan the camera If greatly varied shapes or scenery are concentrated along a screen edge the image composition may fail In such case adjust the frame composition so that the section i...

Страница 59: ...ually during movie recording If you shoot an image using the camera s fastest shutter speed the screen may display uneven exposure depending on the shooting conditions To avoid uneven exposure change the shooting conditions shift the shutter speed one step lower etc before shooting 1 Set the shooting mode to Manual Exposure 2 Select the shutter speed or aperture value by pressing the bottom of the...

Страница 60: ...reduction When the Smile Shutter or Auto HDR function is activated you cannot set the shutter speed to BULB If the Smile Shutter or Auto HDR function is used with the shutter speed set to BULB the shutter speed is temporarily set to 30 seconds We recommend that you start BULB shooting while the temperature of the camera is moderate to prevent the quality of the image from deteriorating BULB 1 Set ...

Страница 61: ... of time that the shutter was open You cannot shoot any more while noise reduction is in progress If proper exposure cannot be obtained after setup the aperture value on the shooting screen blinks Although you can shoot as it is resetting is recommended The brightness of the image on the LCD screen may differ from the actual image being shot When using an A mount lens sold separately you can adjus...

Страница 62: ...e When you want to fire the flash raise the flash by pressing Flash pop up button When you do not fire the flash push down the flash If proper exposure cannot be obtained after setup the shutter speed on the shooting screen blinks Although you can shoot as it is resetting is recommended The brightness of the image on the LCD screen may differ from the actual image being shot When using an A mount ...

Страница 63: ...ings 3 Adjust the focus and shoot the subject You cannot select Flash Off and Autoflash in Flash Mode When you want to fire the flash raise the flash by pressing Flash pop up button When you do not fire the flash push down the flash Notes z Program Shift You can change the shutter speed and aperture F value combination without changing the exposure you set when you do not use the flash Turn the co...

Страница 64: ...oe Adaptor sold separately 1 MENU t Camera t Flash Mode t desired mode 2 When you want to fire the flash press the Flash pop up button to pop up the flash Flash pop up button Flash Off Does not fire even if the flash is raised Autoflash Fires in dark environments or when shooting towards bright light Fill flash Fires every time you trigger the shutter Slow Sync Fires every time you trigger the shu...

Страница 65: ...learer Notes z Using manual focusing effectively Focus fixing is convenient when you can predict the distance to the subject With Focus fixing you can fix the focus in advance to the distance at which the subject is to pass z Measuring the exact distance to the subject The mark shows the location of the image sensor When you measure the exact distance between the camera and the subject refer to th...

Страница 66: ...ra t AF MF Select t DMF 2 Press the shutter button halfway down to focus automatically 3 Keep the shutter button halfway down rotate the focusing ring of the lens to achieve a sharper focus Autofocus Mode is fixed to Single shot AF DMF Direct Manual Focus Notes ...

Страница 67: ...fore you started recording is used for focusing When the AF illuminator is used the setting of Autofocus Area is invalid and the AF area is indicated with a dotted line AF operates with priority on and around the center area Multi The camera determines which of the 25 AF areas is used for focusing When you press the shutter button halfway down in still image shooting mode a green frame is displaye...

Страница 68: ...ion Sweep Panorama Smile Shutter Continuous AF is selected when the shooting mode is set to Sports Action in Scene Selection In Continuous AF mode the audible signals will not sound when the subject is in focus Single shot AF The camera focuses and the focus is locked when you press the shutter button halfway down Use this mode when the subject is motionless Continuous AF The camera continues to f...

Страница 69: ...he target frame with the subject to be tracked and select OK The camera starts tracking the subject To cancel the tracking feature select 3 Press the shutter button fully down Target frame Notes z Tracking the face you want to shoot The camera stops tracking a subject when the subject moves off of the screen When Face Detection is set to On and the subject to be tracked is a face if the face disap...

Страница 70: ...zoom ring 2 MENU t Camera t Zoom t desired value The zoom features available with this camera The zoom feature of the camera provides a higher magnification zoom by combining various zoom features The icon displayed on the LCD screen changes as follows according to the selected zoom feature 1 Smart Zoom You can magnify images by trimming them partially Available only when Image Size is set to M or...

Страница 71: ...area is indicated with a dotted line AF operates with priority on and around the center area Also Metering Mode is fixed to Multi The zoom speed differs depending on which lens with power zoom you use Confirm the operation of the lens before shooting Your purpose Clear Image Zoom Digital Zoom Image Size Zoom scale with optical zoom Zooming images by trimming them in the available range without det...

Страница 72: ...tter shooting Face Detection is automatically set to On Regist Faces even if it is set to Off On Regist Faces Focuses on faces registered so as to have priority On Selects the face which the camera is to automatically focus on Off Does not use the Face Detection function Notes Face Detection frame white When the camera detects more than 1 subject the camera will judge which is the main subject and...

Страница 73: ...cured by a hat a mask sunglasses etc Even if you execute Reset Default registered faces are not deleted When you execute Factory Reset all the registered faces are deleted Even if you execute Delete the data for registered face will remain in the camera To delete the data for registered faces from the camera select Delete All New Registration Registers a new face Order Exchanging Changes the prior...

Страница 74: ...ive Mode turns to Single Shooting automatically 1 MENU t Camera t Smile Shutter t On 2 To set the sensitivity to detect a smile OPTION t desired setting 3 Wait for a smile to be detected When the smile level exceeds the b point on the indicator the camera records images automatically If you press the shutter button during Smile Shutter shooting the camera shoots the image and then returns to Smile...

Страница 75: ...istered face the camera detects the smile of that face only If a smile is not detected set the sensitivity with OPTION 1 Do not cover the eyes with the front hair Do not obscure the face by a hat masks sunglasses etc 2 Try to orient the face in front of the camera and be as level as possible Keep the eyes narrowed 3 Give a clear smile with an open mouth The smile is easier to be detected when the ...

Страница 76: ...r the shot a frame showing the trimmed area is displayed on the auto review screen You cannot use Auto Object Framing with the following functions Hand held Twilight Sports Action Anti Motion Blur in Scene Selection Sweep Panorama Cont Shooting Spd Priority Cont Bracket Cont Manual Focus Soft Focus HDR Painting Rich tone Mono Miniature in Picture Effect RAW JPEG in Quality Auto HDR The zoom featur...

Страница 77: ...ntensity of the Soft Skin Effect with OPTION You cannot use Soft Skin Effect with the following functions Movie recording Cont Shooting Spd Priority Cont Bracket Cont Self timer Cont Sports Action in Scene Selection Sweep Panorama This function may not work depending on your subject On Uses the Soft Skin Effect function Off Does not use the Soft Skin Effect function High Sets Soft Skin Effect to h...

Страница 78: ...ple photo Menu Index Shooting Tip List Allows you to search through all shooting tips in the camera 1 MENU t Camera t Shooting Tip List 2 Search for the desired shooting tip Turn the control wheel to scroll the text up and down ...

Страница 79: ...lect the desired mode The items marked with are available Graphic Display Shows basic shooting information Graphically shows the shutter speed and aperture value except for when Shoot Mode is set to Sweep Panorama Display All Info Shows recording information Big Font Size Disp Shows only major items in a larger size No Disp Info Does not show recording information Histogram Displays the luminance ...

Страница 80: ...pending on the Panorama Direction setting When you print panoramic images both edges may be cut off Still Image size when Aspect Ratio is 3 2 Usage guidelines L 20M 5456 3632 pixels For prints up to A3 size M 10M 3872 2576 pixels For prints up to A4 size S 5 0M 2736 1824 pixels For prints L 2L size Image size when Aspect Ratio is 16 9 Usage guidelines L 17M 5456 3064 pixels For viewing on a high d...

Страница 81: ... contents Sample photo Menu Index z Tips for selecting the image size The images appear differently depending on the mode selected The images are scrolled when you press the center of the control wheel Standard Wide ...

Страница 82: ...ect Ratio Sets the aspect ratio of still images 1 MENU t Image Size t Aspect Ratio t desired mode You cannot set this item when shooting in Sweep Panorama mode 3 2 Standard aspect ratio Suitable for prints 16 9 For viewing on a high definition TV Notes ...

Страница 83: ...e JPEG format when recorded Since the compression rate of Standard is higher than that of Fine the file size of Standard is smaller than that of Fine This will allow more files to be recorded on 1 memory card but the image quality will be lower When images are not going to be modified using your computer we recommend that you select Fine or Standard STD Standard Notes z RAW images A RAW format fil...

Страница 84: ...ple photo Menu Index Panorama Direction Sets the direction to pan the camera when you shoot Sweep Panorama images 1 MENU t Image Size t Panorama Direction t desired mode Right Pan the camera in the direction you set Left Up Down ...

Страница 85: ...oads e mail attachments etc Movies are recorded in MPEG 4 format at about 30 frames second utilizing the progressive scanning system AAC audio and the mp4 format You cannot create a disc from the movies recorded in this format using the software PlayMemories Home z Checking 60i or 50i To check if your camera is a 1080 60i compatible device or 1080 50i compatible device check for the following mark...

Страница 86: ...ry If your TV is not compatible with 24p 25p the movies are output as 60i 50i File Format AVCHD Bit rate Recording 60i 24M FX 50i 24M FX Maximum 24 Mbps Records high image quality movies of 1920 1080 60i 50i 60i 17M FH 50i 17M FH Average 17 Mbps Records standard image quality movies of 1920 1080 60i 50i 24p 24M FX 25p 24M FX Maximum 24 Mbps Records high image quality movies of 1920 1080 24p 25p Th...

Страница 87: ...ted when using the following functions Intelligent Auto Superior Auto Scene Selection AWB Auto WB The camera automatically detects the light source and adjusts the color tones Daylight When you select an option to suit a specific light source the color tones are adjusted for that light source preset white balance Shade Cloudy Incandescent Fluor Warm White Fluor Cool White Fluor Day White Fluor Day...

Страница 88: ...the control wheel The higher the number the more reddish the image and the lower the number the more bluish the image 3 Adjust the color tones by pressing the top bottom right left parts of the control wheel Fine adjusting the color tones C Temp Filter z Effects of lighting conditions The apparent color of the subject is affected by the lighting conditions The color tones are adjusted automaticall...

Страница 89: ... with OPTION If the flash is used when the shutter button is pressed a custom white balance is registered with the flash light taken into account Take pictures with the flash in later shootings The message Custom WB Error indicates that the value is beyond the expected range when the flash is used on a subject in close proximity or a subject with a bright color is in the frame In such cases the va...

Страница 90: ...erior Auto Scene Selection The zoom feature of the camera Smile Shutter Multi Measures light on each area after dividing the total area into multiple areas and determines the proper exposure of the entire screen Multi pattern metering Center Measures the average brightness of the entire screen while emphasizing the central area of the screen Center weighted metering Spot Measures only the central ...

Страница 91: ... level lower and images darker You cannot use Flash Comp with the following functions Intelligent Auto Superior Auto Scene Selection Sweep Panorama Bracket Cont The higher flash effect may not be visible due to the limited amount of flash light available if the subject is outside the maximum range of the flash If the subject is very close the lower flash effect may not be visible Notes z Tips to a...

Страница 92: ... noisy Select the proper level by checking the recorded image especially when you enhance the effect Off Does not use DRO Auto HDR D Range Opt By dividing the image into small areas the camera analyzes the contrast of light and shadow between the subject and the background producing the image with the optimal brightness and gradation Auto HDR Shoots 3 images with different exposures and then overl...

Страница 93: ...t change the composition before shooting You may not obtain a desired effect depending on the luminance difference of a subject and the shooting conditions When the flash is used this function has little effect When the contrast of the scene is low or when significant camera shake or subject blur has occurred you may not be able to obtain good HDR images If the camera detects such situation is dis...

Страница 94: ...hasizing color tones Posterization Creates a high contrast abstract look by heavily emphasizing primary colors or in black and white You can select primary colors or black and white with OPTION Retro Photo Creates the look of an aged photo with sepia color tones and faded contrast Soft High key Creates an image with the indicated atmosphere bright transparent ethereal tender soft Partial Color Cre...

Страница 95: ...blink Do not change the composition before shooting When the contrast of the scene is low or when significant camera shake or subject blur has occurred you may not be able to obtain good HDR images If the camera detects such situation appear on the recorded image to inform you of this situation If necessary change the composition or otherwise adjust the settings be careful of blurring and shoot ag...

Страница 96: ...he saturation and contrast are heightened for shooting striking images of colorful scenes and subjects such as flowers spring greenery blue sky or ocean views Portrait For shooting the skin color in a soft tone ideally suited for shooting portraits Landscape The saturation contrast and sharpness are heightened for shooting vivid and crisp scenery Distant landscapes also stand out more Sunset For s...

Страница 97: ...de You can select up to 100 images Multiple Img Deletes the selected images Press the center of the control wheel to select OK All in Folder Deletes all images in the selected folder or all AVCHD movies All AVCHD view files Notes z Deleting an image It is easier to delete an image displayed on the screen by selecting Delete of soft key page 31 ...

Страница 98: ... Still Movie Select Selects the unit of images to be played back 1 MENU t Playback t Still Movie Select t desired mode Folder View Still Displays still images by folder Folder View MP4 Displays MP4 movies by folder AVCHD View Displays AVCHD movies ...

Страница 99: ... You can play back images in Slide Show when Still Movie Select is set to Folder View Still only A panoramic image is displayed in full image To scroll a panoramic image press the center of the control wheel when the image is displayed Repeat On Plays back images in a continuous loop Off After all the images have been played back the Slide Show ends Interval 1 Sec Sets the display interval of imag...

Страница 100: ...ou can add the DPOF mark to up to 999 images DPOF registration is not cleared after printing It is recommended that you clear the DPOF registration after you print the still images You can select up to 100 images at a time DPOF Setup Multiple Img Selects images to order printing 1Select an image and press the center of the control wheel To cancel the selection select the marked image again 2Repeat...

Страница 101: ...dex t desired mode 6 Images Displays 6 images 12 Images Displays 12 images z Displaying a desired folder To select a desired folder select the bar to the left of the image index screen and then press the top bottom parts of the control wheel You can switch between still image playback and movie playback by pressing the center of the control wheel ...

Страница 102: ...ontrol wheel 3 Select the portion you want to see by pressing the top bottom right left side of the control wheel 4 To cancel the enlarged playback select You cannot enlarge the movies During playing back panoramic images pause first and then enlarge the image Notes z Scaling range The scaling range depends on the image size Image size Scaling range L Approx 1 0 15 1 M Approx 1 0 10 7 S Approx 1 0...

Страница 103: ...tated position even if you turn off the power 1 MENU t Playback t Rotate 2 Press the center of the control wheel The image rotates counter clockwise The image rotates as you press the center You cannot rotate the following files Movies Protected images You may not be able to rotate images shot with other cameras When viewing images on a computer the image rotation information may not be reflected ...

Страница 104: ...t desired mode You can protect up to 100 images at a time Multiple Img Applies or cancels the protection of the selected images Press the center of the control wheel to select OK Cancel All Images Cancels the protection of all still images Cancel All Movies MP4 Cancels the protection of all movies MP4 Cancel All AVCHD view files Cancels the protection of all AVCHD movies Notes ...

Страница 105: ...lume of movies in 8 steps 1 MENU t Playback t Volume Settings t desired value z Adjusting the volume during playback The Volume Settings screen appears when you press the bottom of the control wheel while playing back movies You can adjust the volume while listening to the actual sound ...

Страница 106: ...ay down In Cont Shooting or Spd Priority Cont mode the camera keeps adjusting the exposure for the remaining images When AEL toggle is assigned to soft key B using Custom Key Settings operation using soft key B will be given priority over the AEL w shutter settings On Fixes the exposure when you press the shutter button halfway down Off Does not fix the exposure when you press the shutter button h...

Страница 107: ... Illuminator t desired setting You cannot use the AF illuminator in the following situations Autofocus Mode is set to Continuous AF Landscape Night Scene Sports Action in Scene Selection Sweep Panorama Movie recording Using an A mount lens sold separately When the AF illuminator is used the setting of Autofocus Area is invalid and the AF area is indicated with a dotted line AF operates with priori...

Страница 108: ...ync in Flash Mode Smile Shutter Sweep Panorama Red Eye Reduction may not produce the desired effects It depends on individual differences and conditions such as distance to the subject or if the subject does not look at the pre strobe On The flash is always fired to reduce the red eye phenomenon Off Does not use Red Eye Reduction Notes z What causes the red eye phenomenon Pupils become dilated in ...

Страница 109: ...ity Program Auto When setting Live View Display to Setting Effect ON you may have difficulty checking the composition as the Live View Display may seem too dark or too bright If such a phenomenon occurs set Live View Display to Setting Effect OFF Setting Effect ON Shows the images with effects applied Setting Effect OFF Does not show the images with effects applied This setting will allow you to c...

Страница 110: ...n the vertical position even if Playback Display is set to Auto Rotate Even if Grid Line is set to a setting other than Off the grid line does not appear in auto review Before the image is displayed an unprocessed image may be displayed temporarily depending on the setting such as DRO Auto HDR Soft Skin Effect Lens Comp Distortion 10 Sec Displays for the set time Selecting Enlarge Image allows you...

Страница 111: ...uare grids make it easier to confirm the horizontal level of your composition This is suitable to determine the quality of the composition when shooting landscape close up or duplicated images Diag Square Grid Place a subject on the diagonal line to express uplifting and powerful feeling Off Does not display the grid line z Checking the frame for movie recording Frame for movie The frame that appe...

Страница 112: ...hooting that requires fine focus adjustments 1 MENU t Setup t Peaking Level t desired setting Since the camera judges that sharp areas are in focus the peaking level differs depending on the subject the shooting situation or the lens used High Sets the peaking level to high Mid Sets the peaking level to middle Low Sets the peaking level to low Off Does not use the peaking function Notes ...

Страница 113: ...the color used for the peaking function in manual focus 1 MENU t Setup t Peaking Color t desired setting This function cannot be set when Peaking Level is set to Off White Enhances outlines in white Red Enhances outlines in red Yellow Enhances outlines in yellow Notes ...

Страница 114: ...esired setting You cannot use Clear Image Zoom with the following functions Sweep Panorama Smile Shutter RAW JPEG in Quality During movie recording Clear Image Zoom is not available You cannot use Clear Image Zoom when Drive Mode is set to Cont Shooting or Bracket Cont Even if Clear Image Zoom is set to On the camera automatically shifts the zoom feature to Digital Zoom On Uses the Clear Image Zoo...

Страница 115: ...ge quality deteriorates compared to Clear Image Zoom This feature can be also available in movie recording 1 MENU t Setup t Digital Zoom t desired setting You cannot use Digital Zoom with the following functions Sweep Panorama Smile Shutter RAW JPEG in Quality On Uses the Digital Zoom feature If you want to use higher magnification regardless of the deterioration of the image set it to On Off Does...

Страница 116: ...p t S Auto Image Extract t desired setting Even when you set S Auto Image Extract to Off with Hand held Twilight selected from recognized scene mode 1 combined image is saved When the Auto Object Framing function is activated 2 images are saved even if you set S Auto Image Extract to Auto Auto Saves 1 appropriate image selected by the camera Off Saves all of the images Notes ...

Страница 117: ...rged by 6 8 times You can enlarge the image also by 13 6 times In DMF Direct Manual Focus adjust the focus using autofocus and then turn the focusing ring with the shutter button pressed halfway down You cannot use MF Assist during movie recording When an A mount lens sold separately is attached pressing soft key will enlarge the image On Enlarges the image You can set the enlarging duration with ...

Страница 118: ...ded form for the MF Assist function 1 MENU t Setup t MF Assist Time t desired setting This function cannot be set when MF Assist is set to Off This item is available only with an E mount lens No Limit Enlarges the display until is selected 5 Sec Enlarges the image for 5 seconds 2 Sec Enlarges the image for 2 seconds Notes ...

Страница 119: ...be printed or viewed in the correct colors if you use applications or printers that do not support Adobe RGB When displaying images that were recorded with Adobe RGB on the camera or non Adobe RGB compliant devices the images are displayed with low saturation sRGB This is the standard color space of the digital camera Use sRGB in normal shooting such as when you intend to print out the images with...

Страница 120: ...ing On is selected when using the following functions Hand held Twilight Anti Motion Blur in Scene Selection You cannot set SteadyShot when the name of the lens attached does not contain OSS such as E16 mm F2 8 or when you are using an A mount lens sold separately On Uses SteadyShot Off Does not use SteadyShot This setting is recommended when you use a tripod Notes ...

Страница 121: ...tering cannot be achieved when you use lenses that do not provide a lens contact such as the lens of an astronomical telescope In such cases adjust the exposure manually by checking it on the recorded image Enable Releases the shutter when no lens is attached Select this option when you attach the camera on an astronomical telescope etc Disable Releases the shutter only when a lens is attached Not...

Страница 122: ... in effect a message may appear and you cannot take another picture 1 MENU t Setup t High ISO NR t desired setting Noise reduction is not available in the following modes Intelligent Auto Superior Auto Scene Selection Sweep Panorama RAW JPEG in Quality Normal Activates high ISO noise reduction normally Low Activates high ISO noise reduction moderately Select this to give priority to the timing of ...

Страница 123: ...lens characteristics 1 MENU t Setup t Lens Comp Shading t desired setting This item is available only with an E mount lens The amount of light around the edges may not be corrected depending on the lens type Auto Compensates for darker corners of the screen automatically Off Does not compensate for darker corners of the screen Notes ...

Страница 124: ...or deviation at the corners of the screen caused by certain lens characteristics 1 MENU t Setup t Lens Comp Chro Aber t desired setting This item is available only with an E mount lens Auto Reduces the color deviation automatically Off Does not compensate for the color deviation Notes ...

Страница 125: ...characteristics 1 MENU t Setup t Lens Comp Distortion t desired setting This item is available only with an E mount lens With some attached lenses the setting will be fixed to Auto and you will not be able to select Off Auto Compensates for distortion of the screen automatically Off Does not compensate for distortion of the screen Notes ...

Страница 126: ...the LCD screen the camera tracks the body but when the face is visible the camera tracks the face If the targeted person disappears from the screen while the camera is tracking him her and then returns to the screen the camera tracks on that face again Off Does not preferentially track the face If you set the detected face as a target even when Face Priority Tracking is set to Off the camera track...

Страница 127: ...c Sets whether or not you record the sound during movie recording 1 MENU t Setup t Movie Audio Rec t desired setting The sound of the lens and the camera in operation will also be recorded when On is selected On Records sound stereo Off Does not record sound Notes ...

Страница 128: ...ot to reduce wind noise during movie recording 1 MENU t Setup t Wind Noise Reduct t desired setting Setting this item to On where wind is not blowing sufficiently hard may cause normal sound to be recorded with too low volume On Reduces wind noise Off Does not reduce wind noise Notes ...

Страница 129: ...n be registered To register a new lens attach a lens for which the registration can be erased and set its value to 0 or reset the values of all the lenses using Clear Use AF Micro Adj with Sony Minolta and Konika Minolta lenses only If you use AF Micro Adj with other brands of lenses the registered value may be affected Do not perform AF Micro Adj with an unsupported lens You cannot set AF Micro A...

Страница 130: ...isplay the first screen of the menu or to display the screen of the item you set the last time 1 MENU t Setup t Menu start t desired setting Top Always displays the first screen of the menu Previous Displays the last item set This will make it easier to quickly reset the last item you set previously ...

Страница 131: ...le of contents Sample photo Menu Index MOVIE Button Sets whether or not to activate the MOVIE button 1 MENU t Setup t MOVIE Button t desired setting On Activates the MOVIE button Off Deactivates the MOVIE button ...

Страница 132: ... Soft key B Setting Shoot Tips White Balance Autofocus Mode Metering Mode Tracking Focus DRO Auto HDR Zoom Picture Effect Face Detection Creative Style Smile Shutter Flash Mode Auto Object Framing Flash Comp Soft Skin Effect MF Assist Quality AEL toggle page 134 ISO Not set Right Key Setting ISO Sets the ISO sensitivity Function Menu Calls a function assigned to Custom 1 Custom 2 Custom 3 Custom 4...

Страница 133: ...ng cannot be used in the following situations Tracking Focus function is activated Autofocus Area is set to Flexible Spot You don t have to set all Custom 1 Custom 2 Custom 3 Custom 4 Custom 5 and Custom 6 items Custom 1 to 6 The default setting of each Custom item Available functions Custom 1 AF MF Select Custom 2 Autofocus Mode Custom 3 Autofocus Area Face Detection Smile Shutter Auto Object Fra...

Страница 134: ...ey B becomes the AEL button 3 Aim the camera at an area to which you want to match the exposure The exposure is set 4 Press the AEL button The exposure is locked and AE lock lights up 5 Focus on your subject and press the shutter button 6 To cancel the exposure lock press the AEL button again The setting of Soft key B Setting cannot be used in the following situations Tracking Focus function is ac...

Страница 135: ...ample photo Menu Index Beep Selects the sound produced when you operate the camera 1 MENU t Setup t Beep t desired setting On Sound will be emitted when you press the control wheel or soft keys Off Turns off the audible signal ...

Страница 136: ...136GB Table of contents Sample photo Menu Index Language Selects the language to be used in the menu items warnings and messages 1 MENU t Setup t Language t desired language ...

Страница 137: ...ates on images By using PlayMemories Home you can print or save images with the date 1 MENU t Setup t Date Time Setup 2 Press the right or left of the control wheel to select an item and press the top or bottom of it to select the desired setting 3 Select OK Daylight Svg Selects ON or OFF Date Format Selects the date and time display format Notes ...

Страница 138: ...ndex Area Setting Sets the area where you are using the camera This allows you to set the local area when you use the camera abroad 1 MENU t Setup t Area Setting t desired setting 2 Press the right or left of the control wheel to select an area ...

Страница 139: ...le photo Menu Index Help Guide Display You can set whether to display the help guide when you operate the camera 1 MENU t Setup t Help Guide Display t desired setting On Displays the help guide Off Does not display the help guide ...

Страница 140: ...from being consumed 1 MENU t Setup t Power Save t desired setting When the AC PW20 AC Adaptor sold separately is used this function cannot be set to Max Max Power Saving Start Time is automatically set to 10 Sec If you do not operate the camera for a given period of time the brightness of the LCD screen is reduced Standard Follows the setting of Power Saving Start Time Notes ...

Страница 141: ...ower save mode To return to shooting mode perform an operation such as pressing the shutter button halfway down 1 MENU t Setup t Power Saving Start Time t desired setting Turn off the camera when you do not use it for a long time 30 Min Switches to power save mode after the set time 5 Min 1 Min 20 Sec 10 Sec Notes ...

Страница 142: ...CD Brightness You can adjust the brightness of the LCD screen 1 MENU t Setup t LCD Brightness t desired setting Manual Allows you to adjust the brightness within the range of 2 to 2 Sunny Weather Sets the brightness appropriately for shooting outdoors ...

Страница 143: ...her to adjust the brightness automatically or manually 1 Press the FINDER LCD button to switch the screen display to the viewfinder 2 MENU t Setup t Viewfinder Bright 3 Look through the viewfinder and select the desired setting Auto Adjusts the brightness automatically Manual Allows you to adjust the brightness within the range of 1 to 1 ...

Страница 144: ...144GB Table of contents Sample photo Menu Index Display Color Selects the color of the LCD screen 1 MENU t Setup t Display Color t desired setting Black Turns to the selected color White Blue Pink ...

Страница 145: ...x Wide Image Selects the method used for displaying the wide images 1 MENU t Setup t Wide Image t desired setting Full Screen Displays the wide images on the entire screen Normal Displays the wide images and the operation information on the screen ...

Страница 146: ...layback Display Selects the orientation when playing back still images recorded in the portrait position 1 MENU t Setup t Playback Display t desired setting Auto Rotate Displays in the portrait position Manual Rotate Displays in the landscape position ...

Страница 147: ... with a computer or other USB devices to be connected Windows 7 or Windows 8 computers are connected in MTP and its unique functions are enabled to use Mass Storage Establishes a Mass Storage connection between the camera a computer and other USB devices MTP Establishes an MTP connection between the camera and a computer or other USB device Computers running Windows 7 or Windows 8 are connected in...

Страница 148: ...Menu Index USB LUN Setting Enhances compatibility by limiting of USB connection functions 1 MENU t Setup t USB LUN Setting t desired setting Multi Normally use Multi Single Set USB LUN Setting to Single only if you cannot make a connection ...

Страница 149: ...a and lens Confirm the version when a firmware update is released 1 MENU t Setup t Version An update can be performed only when the battery level is 3 remaining battery icons or more We recommend that you use a sufficiently charged battery pack or the AC PW20 AC Adaptor sold separately Notes ...

Страница 150: ... item only when the camera is powered by the AC PW20 AC Adaptor sold separately Even if On is selected the camera does not start a demonstration when there is no movie recorded on the memory card When On is selected the camera does not switch to power save mode On The demonstration begins automatically when the camera is not operated for about 1 minute Only protected AVCHD movies are available Sel...

Страница 151: ...ses nothing may appear on the screen for about 10 seconds after you execute Initialize Reset Default Initializes the main setting to the default settings The following settings are not reset Date Time Setup Area Setting Faces registered with Face Registration Settings registered with AF Micro Adj File number Factory Reset Initializes the settings to the default settings Even settings that are not ...

Страница 152: ...a on the memory card and is unrecoverable Save precious data on a computer etc 1 MENU t Setup t Format t OK Formatting permanently erases all data including even protected images During the format the access lamp lights up Do not eject the memory card while the lamp is lit Format the memory card using the camera If you format the memory card on a computer it may not be usable with the camera depen...

Страница 153: ...p t File Number t desired setting Series The camera does not reset numbers and assigns numbers to files in sequence until the number reaches 9999 Reset The camera resets numbers when a file is recorded in a new folder and assigns numbers to files from 0001 When the recording folder contains a file a number one higher than the largest number is assigned ...

Страница 154: ...can change the folder name form 1 MENU t Setup t Folder Name t desired setting The movie folder form is fixed as folder number ANV01 You cannot change this name Standard Form The folder name form is as follows folder number MSDCF Example 100MSDCF Date Form The folder name form is as follows folder number Y the last digit MM DD Example 10030405 Folder number 100 date 04 05 2013 Notes ...

Страница 155: ...r more folders you can select the recording folder to which still images and MP4 movies are recorded 1 MENU t Setup t Select Shoot Folder t desired folder You cannot select the folder when you select the Date Form setting Movie MP4 files are recorded in a folder for movies that has the same number as the selected folder for still images Notes ...

Страница 156: ... a folder number one greater than the largest folder number currently used A folder for still images and a folder for MP4 movies that have the same number are created at the same time When you insert a memory card that was used with other equipment into the camera and shoot images a new folder may be automatically created Up to 4 000 images in total can be stored in the folders for still images or...

Страница 157: ...ges on the memory card will not be played back on this camera If these inconsistencies happen the camera repairs the file 1 MENU t Setup t Recover Image DB t OK The Recover Image DB screen is displayed and the camera repairs the file Wait until repairs are complete Use a sufficiently charged battery Low battery power during repairing can cause damage to data Notes ...

Страница 158: ...e of contents Sample photo Menu Index Display Card Space Displays the remaining recording time of movies on the memory card Number of recordable still images is also displayed 1 MENU t Setup t Display Card Space ...

Страница 159: ...atically via the Wi Fi network When you use a brand new Eye Fi card for the first time copy the install file of Eye Fi manager recorded on the card to your computer before formatting the card Use an Eye Fi card after updating the firmware to the latest version For details refer to the operating instructions that comes with the Eye Fi card The power save function of the camera does not work while i...

Страница 160: ...pplied with the Mac computer The following computer environment is recommended when using the software and importing images via a USB connection 64 bit editions and Starter Edition are not supported Windows Image Mastering API IMAPI Ver 2 0 or later is required to use the function for creating discs Starter Edition is not supported Notes Recommended computer environment Windows OS pre installed Mi...

Страница 161: ... camera using a USB interface that is compatible with Hi Speed USB USB 2 0 allows advanced transfer high speed transfer as the camera is compatible with Hi Speed USB USB 2 0 When your computer resumes activity from suspend or sleep mode communication between the camera and your computer may not recover at the same time Recommended computer environment Mac OS pre installed USB Connection Mac OS X v...

Страница 162: ...e Windows 1 Using the Internet browser on your computer go to the following URL then click Install t Run www sony net pm 2 Follow the instructions on the screen to complete the installation When the message to connect the camera to a computer is displayed connect the camera and computer using the micro USB cable supplied Installing Image Data Converter Windows Mac 1 Using the Internet browser on y...

Страница 163: ...with Mac computers When you play back images on Mac computers use the appropriate application software supplied with the Mac computer Movies recorded with the 60i 24M FX 50i 24M FX 24p 24M FX 25p 24M FX setting in Record Setting are converted by PlayMemories Home in order to create an AVCHD recording disc This conversion can take a long time Also you cannot create a disc in the original image qual...

Страница 164: ...eral file format You can display and compare the RAW images and JPEG images recorded by this camera You can rank images in 5 grades You can apply color labels Using Image Data Converter z Using Image Data Converter For Windows Start t All Programs t Image Data Converter t Help t Image Data Converter Ver 4 For Mac Finder t Applications t Image Data Converter t Image Data Converter Ver 4 t Help in t...

Страница 165: ...hen the camera is connected to the computer if you operate AVCHD movies or folders from the connected computer images may be damaged or cannot be played Do not delete or copy AVCHD movies on the memory card from the computer Sony is not held liable for consequences resulting from such operations via the computer 1 Insert a sufficiently charged battery pack into the camera or connect the camera to ...

Страница 166: ...g and drop the icon of the memory card or the drive icon to the Trash icon beforehand when you use a Mac computer and the camera is disconnected from the computer With Windows 7 or Windows 8 the disconnect icon may not be displayed In such cases you can disconnect without following the above procedure Do not disconnect the USB cable when the access lamp is lit The data may be damaged Importing ima...

Страница 167: ...ou can create a disc if you reduce the image quality using PlayMemories Home Disc type usage Record setting available Player FX FH You can keep high definition image quality HD Blu ray Disc playback devices Sony Blu ray Disc player PlayStation 3 etc You can keep high definition image quality HD AVCHD recording disc AVCHD format playback devices Sony Blu ray Disc player PlayStation 3 etc You can ke...

Страница 168: ... such as a Sony Blu ray Disc player and a PlayStation 3 You cannot play the disc on ordinary DVD players Standard definition image quality STD Standard definition image quality STD movie converted from high definition image quality HD movie can be recorded on DVD media such as DVD R discs and a standard image quality STD disc is created z Discs you can use with PlayMemories Home You can use 12 cm ...

Страница 169: ... If you want to keep the original image quality store your movies on a Blu ray Disc Creating a Blu ray Disc You can create a Blu ray Disc with AVCHD movies previously imported to a computer Your computer must support the creation of a Blu ray Disc BD R non rewritable and BD RE rewritable media can be used to create a Blu ray Disc You cannot add contents to either type of disc once it has been crea...

Страница 170: ...ies are converted to standard definition image quality STD movies An Internet connection environment is required when creating a DVD Video STD disc for the first time You can create a disc with a Blu ray Disc recorder etc The disc type you can create depends on the device used For details on creating a disc refer to the operating instructions that comes with the device used Creating a standard def...

Страница 171: ...rts photo printing services conforming to DPOF you can make a Print order mark on images in advance in the playback mode so that you do not have to reselect the images when you print them out at the shop You cannot print RAW images When you print images shot in 16 9 mode both edges may be cut off You cannot print panoramic images depending on the printer When you print at a shop note the following...

Страница 172: ...be turned on Install the battery pack correctly The battery pack is discharged Install a charged battery pack The battery pack is dead Replace the battery pack with a new one The screen display is set to the viewfinder Press the FINDER LCD button to switch the display to the LCD screen The power turns off suddenly When the camera or battery pack is too hot the camera displays a warning message and...

Страница 173: ...FF while charging the battery When the battery pack is not charged the charge lamp does not light even if you follow the proper charging procedure remove the battery pack and re insert the same battery pack securely or disconnect and reconnect the USB cable Nothing is displayed on the LCD screen when the power is turned on If you do not operate the camera for given period of time the camera turns ...

Страница 174: ...he area selected with Area Setting is different from the actual area Set the actual area by selecting MENU t Setup t Area Setting The aperture value and or shutter speed flashes The subject is too bright or too dark and the camera s adjustable range for the aperture value and or shutter speed is exceeded Adjust the setting again The image is whitish Flare Blurring of light appears on the image Gho...

Страница 175: ...e cannot be deleted Cancel the protection page 104 The image was deleted by mistake Once you have deleted an image you cannot restore it We recommend that you protect images that you do not want to delete page 104 A DPOF mark cannot be put You cannot place DPOF marks on RAW images Not sure if the OS of the computer is compatible with the camera Check Recommended computer environment page 160 The c...

Страница 176: ... sound are interrupted by noise when viewing a movie on a computer You are playing back the movie directly from the memory card Import the movie to your computer using PlayMemories Home and play it back After making a USB connection PlayMemories Home does not start automatically Make the USB connection after the computer is turned on page 165 Cannot insert a memory card Insertion direction of the ...

Страница 177: ...ou can print images with the date superimposed if the printer or the software can recognize Exif information For compatibility with Exif information consult the manufacturer of the printer or the software When you print images at a shop images can be printed with the date if you ask them to do so The lens gets fogged Moisture condensation has occurred Turn off the camera and leave it for about an ...

Страница 178: ...is corrective procedure If an AC PW20 AC Adaptor sold separately is used disconnect the power cord Connect the power cord and turn on the camera again If the camera does not work after trying these solutions consult your Sony dealer or local authorized Sony service facility E appears on the screen Remove the memory card and insert it again If the problem persists even after performing this procedu...

Страница 179: ...rd may not be capable of recording and playing normally The inserted memory card cannot be used in the camera Processing Noise reduction is being carried out You cannot do any further shooting during this reduction process Unable to display Images recorded with other cameras or images modified with a computer may not be displayed Cannot recognize lens Attach it properly The lens is not attached pr...

Страница 180: ...PlayMemories Home and recover the memory card Camera Error Turn power off then on Turn the power off remove the battery pack and then re insert it If the message appears frequently consult your Sony dealer or local authorized Sony service facility Image DataBase File error There is something wrong occurred in the Image Database File Select Setup t Recover Image DB Image Database File error Recover...

Страница 181: ...181GB Table of contents Sample photo Menu Index Cannot create more folders The folder with a name beginning with 999 exists on the memory card You cannot create any folders if this is the case ...

Страница 182: ... you are using the camera NTSC system Bahama Islands Bolivia Canada Central America Chile Colombia Ecuador Jamaica Japan Korea Mexico Peru Surinam Taiwan the Philippines the U S A Venezuela etc PAL system Australia Austria Belgium China Croatia Czech Republic Denmark Finland Germany Holland Hong Kong Hungary Indonesia Italy Kuwait Malaysia New Zealand Norway Poland Portugal Rumania Singapore Slova...

Страница 183: ...ing conditions High temperature locations such as in a car parked under the sun Locations exposed to direct sunlight Humid locations or locations with corrosive substances present Images recorded on Memory Stick XC HG Duo media or an SDXC memory card cannot be imported to or played on computers or AV devices that are not compatible with exFAT Make sure that the device is compatible with exFAT befo...

Страница 184: ...ro media To use a Memory Stick Micro media with the camera be sure to insert the Memory Stick Micro media into an M2 Adaptor as large as Duo size If you insert a Memory Stick Micro media into the camera without an M2 Adaptor as large as Duo size you might not be able to remove it from the camera Do not leave the Memory Stick Micro media within the reach of small children They might accidentally sw...

Страница 185: ...battery pack in your pocket close to your body to warm it up and insert it in the camera immediately before you start shooting The battery pack will run out quickly if you use the flash or record movies frequently We recommend preparing spare battery packs and taking trial shots before taking the actual shots Do not expose the battery pack to water The battery pack is not water resistant Do not le...

Страница 186: ...wer goes off To prevent staining the terminal short circuiting etc be sure to use a plastic bag to keep away from metal materials when carrying or storing the battery pack On battery life The battery life is limited Battery capacity decreases over time and through repeated use If the available time of the battery is shortened significantly it is probably time to replace the battery pack with a new...

Страница 187: ...er than the specified type has been inserted or that there is something wrong with the AC Adaptor or USB cable Check that the battery pack is of the specified type and that the AC Adaptor or USB cable is not damaged If the battery pack is the specified type remove the battery pack replace it with a new one or another one and check if the battery pack is charged properly If the battery pack is char...

Страница 188: ...ens is attached the autofocus speed will be about 2 seconds to 7 seconds when shooting under Sony measurement condition The speed may vary depending on the subject ambient light etc Functions LA EA1 LA EA2 Autofocus Available with SAM SSM lens only Available AF system Contrast AF Phase detection AF AF MF Select Switchable on the lens SAM lens switchable on the lens SSM lens switchable on the lens ...

Страница 189: ...lecting MENU t Setup t Movie Audio Rec t Off It may take a long time or may be difficult for the camera to focus depending on the lens used or the subject The light of the flash may be blocked by the lens attached LA EA1 Multi The camera determines which of the 25 AF areas is used for focusing Center The camera uses the AF area located in the center area exclusively Flexible Spot Moves the focusin...

Страница 190: ...ition image quality can be played back only on AVCHD format compatible devices DVD based players or recorders cannot play back HD image quality discs as they are incompatible with the AVCHD format Also DVD based players or recorders may fail to eject HD image quality discs Recording and playback on your camera Based on the AVCHD format your camera records with the high definition image quality HD ...

Страница 191: ...into the cavity beyond the lens mount area in order to make sure that the tip of the blower does not touch the image sensor Hold the camera face downward to prevent dust from entering the camera Do not subject the camera to any shock during cleaning When cleaning the image sensor with a blower do not blow too hard Do not use a cleaning solution containing organic solvents such as thinner or benzin...

Страница 192: ...rature 88 Computer 160 Recommended environment 160 Connection Computer 165 Cont Shooting 44 Continuous AF 68 Contrast 96 Control wheel 19 Creative Style 96 Custom Key Settings 132 Custom white balance 89 D Date Format 137 Date Time Setup 137 Daylight Svg 137 Delete 31 97 Demo Mode 150 Digital Zoom 115 Direct Manual Focus 66 Disc creation 167 DISP 39 DISP Button Monitor 79 Display Card Space 158 Di...

Страница 193: ...ding 123 Live View Display 109 M Mac 162 Macro 55 Manual Exposure 59 Manual Focus 65 Memory card 183 Menu 22 Brightness Color 23 Camera 22 Image Size 23 Playback 24 Setup 24 Menu start 130 Metering Mode 90 MF Assist 117 MF Assist Time 118 Movie Audio Rec 127 MOVIE Button 131 MP4 85 Multi 67 90 N New Folder 156 Night Portrait 55 Night Scene 56 P Panorama 57 Panorama Direction 84 Peaking Color 113 P...

Страница 194: ...7 Shooting Tip List 78 Shutter Priority 61 Shutter speed 61 Single shot AF 68 Slide Show 99 Slow Sync 64 Smile Shutter 74 Soft keys 20 Soft Skin Effect 77 Software 162 Spd Priority Cont 45 Specify Printing 100 Sports Action 55 Spot 90 sRGB 119 SteadyShot 120 Still Movie Select 98 Sunset 55 Superior Auto 53 Sweep Panorama 57 T Tracking Focus 69 Troubleshooting 172 U USB Connection 147 USB LUN Setti...

Страница 195: ...D IN A PERSONAL ACTIVITY AND OR THAT WAS OBTAINED FROM A VIDEO PROVIDER LICENSED TO PROVIDE AVC VIDEO NO LICENSE IS GRANTED OR SHALL BE IMPLIED FOR ANY OTHER USE ADDITIONAL INFORMATION MAY BE OBTAINED FROM MPEG LA L L C SEE HTTP WWW MPEGLA COM On GNU GPL LGPL applied software The software that is eligible for the following GNU General Public License hereinafter referred to as GPL or GNU Lesser Gen...

Отзывы: