background image

6

Getting started

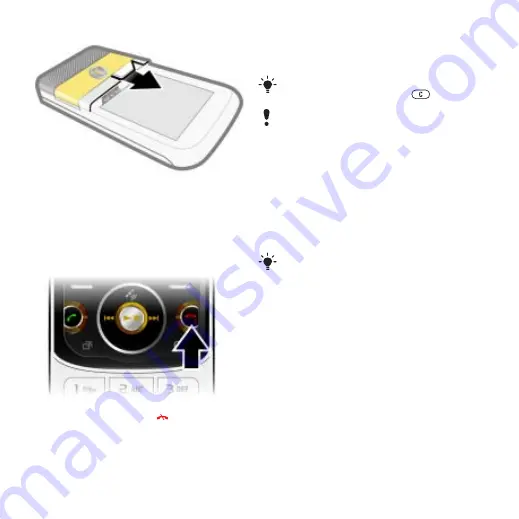
To remove the SIM card

1

Remove the battery cover.

2

Remove the SIM card from its holder.

Turning on the phone

To turn on the phone

1

Press and hold down 

.

2

Enter your SIM card PIN, if requested 
and select 

OK

.

3

Select a language.

4

Select 

Yes

 to use the setup wizard 

while settings are downloaded. 

SIM card

The SIM (Subscriber Identity Module) 
card, which you get from your network 
operator, contains information about 
your subscription. Always turn off your 
phone and detach the charger before 
you insert or remove the SIM card.

If you want to correct a mistake when 
you enter your PIN, press 

.

Before turning the phone off, you must 
return to standby.

You can save contacts on the SIM card 
before you remove it from your phone. 
See To copy names and numbers to the 
SIM card o
n page 23.

This is the Internet version of the User's guide. © Print only for private use.

Содержание Walkman W760i

Страница 1: ...herever you go For additional phone content go to www sonyericsson com fun Register now to get a suite of tools free online storage special offers news and competitions at www sonyericsson com myphone...

Страница 2: ...Share your music while protecting your phone Portable Bluetooth Speaker MBS 100 A wireless sphere of music These accessories can be purchased separately but may not be available in every market To vi...

Страница 3: ...king and receiving calls 21 Contacts 22 Call list 25 Speed dial 25 Voicemail 26 Voice control 26 More than one call 27 Restricted dialling 29 Call time and cost 29 Showing or hiding your phone number...

Страница 4: ...wireless technology 49 Using the USB cable 50 Synchronising 51 Update service 54 More features 55 Flight mode 55 File manager 55 Alarms 56 Calendar 57 Notes 58 Tasks 58 Profiles 58 Time and date 59 T...

Страница 5: ...ny other third party content Under no circumstances will Sony Ericsson be liable in any way for your improper use of additional content or other third party content Smart Fit Rendering is a trademark...

Страница 6: ...icences to export re export or import Software Software may not be downloaded or otherwise exported or re exported i into or to a national or resident of Cuba Iraq Iran North Korea Libya Sudan Syria a...

Страница 7: ...ontacts facing down To insert the battery 1 Insert the battery with the label side up and the connectors facing each other 2 Slide the battery cover into place To attach the battery cover 1 Align the...

Страница 8: ...criber Identity Module card which you get from your network operator contains information about your subscription Always turn off your phone and detach the charger before you insert or remove the SIM...

Страница 9: ...have turned your phone on and entered your PIN the name of the network operator appears This view is called standby Help In addition to this User guide Getting started guides and more information are...

Страница 10: ...ry The phone battery is partly charged when you buy it To charge the battery 1 Connect the charger to the phone It takes approximately 2 5 hours to fully charge the battery Press a key to view the scr...

Страница 11: ...ker 2 A B gaming keys 3 Screen 4 Selection keys 5 Call key 6 Activity menu key 7 Navigation key 8 Volume keys 9 Battery cover slot 10 End key on off key 11 C key Clear This is the Internet version of...

Страница 12: ...ed 12 Memory card slot 13 Charging indicator 14 Connector for charger handsfree and USB cable 15 GPS antenna 16 Walkman key 17 Strap holder This is the Internet version of the User s guide Print only...

Страница 13: ...Media Write new Inbox Email Drafts Outbox Sent messages Saved messages My friends Call voicemail Templates Manage messages Settings Photo Music Video TV Games Web feeds Settings Location services Con...

Страница 14: ...layout Theme Startup screen Screen saver Clock size Brightness Edit line names Calls Speed dial Smart search Divert calls Switch to line 2 Manage calls Time cost Show hide my no Handsfree Open to answ...

Страница 15: ...e your media 1 From standby select Menu Media 2 Scroll to a menu item and press the navigation key right 3 To go back press the navigation key left To delete items Press to delete items such as number...

Страница 16: ...n the background My shortcuts add your favourite functions to access them quickly Internet quick access to the Internet Memory card Your phone supports Memory Stick Micro M2 memory card adding more st...

Страница 17: ...xt Input to enter text The T9 Text Input method uses a built in dictionary To change text input method When you enter text press and hold down To shift between capitals and lower case letters When you...

Страница 18: ...d music You can listen to music audio books and podcasts Use Sony Ericsson Media Manager to transfer content to your phone For more information go to the Getting started section at www sonyericsson co...

Страница 19: ...Scroll to a title and select Play To stop playing music Press the centre navigation key To fast forward and rewind Press and hold down or To move between tracks Press or To change the volume Press the...

Страница 20: ...work the tracks need to be transferred using Media Manager Genre list music by genre Year list music by year Audio books list audio books you have transferred from your computer Podcasts list all podc...

Страница 21: ...croll to the track and press To view information about a track Scroll to a track and select Options Information Audio books You can listen to audio books that you have transferred to your phone from a...

Страница 22: ...ackID Start When the radio is playing select Options TrackID Online music and video clips You can view video clips and listen to music by streaming them to your phone from the Internet If settings are...

Страница 23: ...phone during a call 1 Press and hold down 2 Press and hold down again to resume To turn the loudspeaker on during a call Select SpkrOn To view previous calls from standby Press to open the call list N...

Страница 24: ...SIM card Default contacts You can choose which contact information is shown as default If Phone contacts is selected as default your contacts show all the information saved in Contacts If you select...

Страница 25: ...add information to a phone contact 1 From standby select Menu Contacts 2 Scroll to a contact and select Options Edit contact 3 Scroll between the tabs and select Add or Edit 4 Select an option and an...

Страница 26: ...ll a SIM contact 1 From standby select Menu Contacts 2 Scroll to a contact and press Deleting contacts To delete all contacts 1 From standby select Menu Contacts 2 Scroll to New contact and select Opt...

Страница 27: ...mark scroll to it and select Mark 7 Select Continue Done Call list You can view information about recent calls To call a number from the call list 1 From standby press and scroll to a tab 2 Scroll to...

Страница 28: ...contact has more than one number select the number to add the voice command to 3 Record a voice command such as John mobile 4 Follow the instructions that appear Wait for the tone and say the command...

Страница 29: ...select Menu Settings the Calls tab Divert calls 2 Select a call type and a divert option 3 Select Activate 4 Enter the number to divert calls to and select OK More than one call You can handle more t...

Страница 30: ...you can have a joint conversation with up to five people To add a new participant 1 During the call select Options Hold call This puts the joined calls on hold 2 Select Options Add call 3 Enter the n...

Страница 31: ...ict calls 2 Select an option 3 Select Activate 4 Enter your password and select OK Call time and cost During a call the duration of the call is shown You can check the duration of your last call outgo...

Страница 32: ...usually saved on the SIM card If the number to your service centre is not saved on your SIM card you must enter the number yourself To enter a service centre number 1 From standby select Menu Messagin...

Страница 33: ...n MMS profile 1 From standby select Menu Messaging Settings Picture message MMS profile 2 Select a profile To set the message server address 1 From standby select Menu Messaging Settings Picture messa...

Страница 34: ...s a voice message To record and send a voice message 1 From standby select Menu Messaging Write new Voice message 2 Record the message and select Stop Send Contacts look up 3 Select a recipient and se...

Страница 35: ...Menu Messaging Email Inbox 2 Scroll to the message and select View Options Save message To reply to an email message 1 From standby select Menu Messaging Email Inbox 2 Scroll to the message and selec...

Страница 36: ...o the My friends server From standby select Menu Messaging My friends Log in To log out of the My friends server Select Options Log out To add a chat contact 1 From standby select Menu Messaging My fr...

Страница 37: ...ing My friends the Chat groups tab Options Add chat group 2 Select an option To save a conversation 1 From standby select Menu Messaging My friends the Conversations tab 2 Enter a conversation 3 Selec...

Страница 38: ...The picture is automatically saved to the memory card To record a video clip 1 Activate the camera and press or to scroll to 2 Press the centre navigation key to start recording To stop recording 1 Pr...

Страница 39: ...ing pictures Transfer to and from your computer You can use Bluetooth wireless technology and the USB cable to transfer pictures and video clips between your computer and phone See Bluetooth wireless...

Страница 40: ...view and tag your pictures in Media To view pictures in a slide show 1 From standby select Menu Media and scroll to Photo Cam album 2 Scroll to a month and a picture Select View 3 Select Options Slide...

Страница 41: ...es and video clips To edit and save a picture 1 From standby select Menu Media and scroll to Photo Cam album 2 Scroll to a month and a picture Select View 3 Select Options Edit in PhotoDJ 4 Edit the p...

Страница 42: ...nternet Options Go to History To use pan and zoom on a Web page 1 When you browse the Internet press 2 Use the navigation key to move the frame 3 Press Zoom 4 To switch back to pan press Internet keyp...

Страница 43: ...e 1 When you browse a page on the Internet that has Web feeds indicated by the icon select Options Web feeds 2 For each feed you want to add scroll to the feed and select Mark 3 Select Options Continu...

Страница 44: ...subscribe to Photo feeds and download photos To start using Photo feeds see Web feeds on page 41 To access photo feeds From standby select Menu Media Photo Photo feeds GPS Your phone is equipped with...

Страница 45: ...favourites To save your current location 1 From standby select Menu Location services My favourites Add new place 2 Select Edit and enter the title Select OK 3 Scroll to Description and select Add Ent...

Страница 46: ...ing on how long time you want to train or on what distance you want to cover You can also base it on a previous training route which has GPS data To start a training session 1 From standby select Menu...

Страница 47: ...ation services Tracker Results 2 Scroll to a result and select Options Compare 3 Select a result to compare with Energy consumption To calculate and view the energy consumption for a session you must...

Страница 48: ...1 When you have found a radio channel select Options Save 2 Scroll to a position and select Insert To select saved channels 1 From standby select Menu Entertainment Radio Options Channels 2 Select a r...

Страница 49: ...ecord a voice memo or a sound Recorded sounds can also be set as ringtones To record a sound From standby select Menu Entertainment Record sound Record To listen to a recording 1 From standby select M...

Страница 50: ...e information Most Java applications use the same Internet settings as your Web browser Connectivity Settings Before you synchronise with an Internet service use the Internet PlayNow My friends Java p...

Страница 51: ...select Menu Settings the Connectivity tab Bluetooth Turn on 2 When you receive an item follow the instructions that appear To pair the phone with a device 1 From standby select Menu Settings the Conn...

Страница 52: ...th device at the same time To turn powersave on From standby select Menu Settings the Connectivity tab Bluetooth Powersave On Transferring sound to and from a Bluetooth handsfree You can transfer the...

Страница 53: ...click to open Phone memory and memory card appear as external drives Drag and drop selected files between the phone and the computer Synchronising You can synchronise in two different ways You can us...

Страница 54: ...crosoft Exchange Active Sync If Internet settings are not in your phone see Settings on page 48 SyncML You can synchronise remote data and personal information using SyncML Before you synchronise usin...

Страница 55: ...Before you synchronise using Microsoft Exchange ActiveSync You must enter settings for Microsoft Exchange ActiveSync to access a Microsoft Exchange Server Settings that are required are Server address...

Страница 56: ...ange Internet settings From standby select Menu Settings the General tab Update service Settings Internet settings To view the current software in the phone 1 From standby select Menu Settings the Gen...

Страница 57: ...between your phone a computer and a memory card See Transferring content to and from a computer on page 16 Files are saved on the memory card first and then in the phone memory Unrecognised files are...

Страница 58: ...Enter a time and select OK Save To set the recurrent alarm 1 From standby select Menu Organizer Alarms 2 Scroll to an alarm and select Edit 3 Scroll to Recurrent and select Edit 4 Scroll to a day and...

Страница 59: ...ate 3 Scroll to New appointment and select Add 4 Enter the information and confirm each entry 5 Select Save To view an appointment 1 From standby select Menu Organizer Calendar 2 Select a date 3 Scrol...

Страница 60: ...elect Add 3 Select an option 4 Enter details and confirm each entry To view a task 1 From standby select Menu Organizer Tasks 2 Scroll to a task and select View To set when reminders should sound 1 Fr...

Страница 61: ...tems such as colours and wallpaper You can also create new themes and download them For more information go to www sonyericsson com support To set a theme 1 From standby select Menu Settings the Displ...

Страница 62: ...PIN and select OK Phone lock You can stop unauthorised use of your phone Change the phone lock code 0000 to any four to eight digit personal code To use the phone lock 1 From standby select Menu Sett...

Страница 63: ...support go to www sonyericsson com support Common questions Master reset If you select Reset settings the changes that you have made to settings will be deleted If you select Reset all in addition to...

Страница 64: ...ons on the screen See Settings on page 48 I cannot use the Internet Your subscription does not include data capability Internet settings are missing or incorrect Please contact your network operator S...

Страница 65: ...e first time To reset code memo 1 From standby select Menu Organizer Code memo 2 Enter any passcode to access the code memo The checkword and codes that are then shown are incorrect 3 Select Options R...

Страница 66: ...eiving any network signal or the received signal is too weak Contact your network operator and make sure that the network has coverage where you are The SIM card is not working properly Insert your SI...

Страница 67: ...e correct at the time of going to print On www sonyericsson com you can always find the latest updates In the unlikely event that your product needs service please contact the dealer from whom it was...

Страница 68: ...tions PH support sonyericsson com Polska 0 prefiks 22 6916200 questions PL support sonyericsson com Portugal 808 204 466 questions PT support sonyericsson com Rom nia 4021 401 0401 questions RO suppor...

Страница 69: ...ould be harmful upon contact Do not use your Bluetooth Headset in positions where it is uncomfortable or will be subject to pressure CHILDREN Warning Keep out of the reach of children Do not allow chi...

Страница 70: ...ction from driving Emergency calls Calls cannot be guaranteed under all conditions Never rely solely upon phones for essential communications Calls may not be possible in all areas on all networks or...

Страница 71: ...e of necessary accessory For more information call the Sony Ericsson Special Needs Center on 877 878 1996 TTY or 877 207 2056 voice or go to www sonyericsson snc com Disposal of old electrical and ele...

Страница 72: ...ful to your hearing End User Licence Agreement This wireless device including without limitation any media delivered with the device Device contains software owned by Sony Ericsson Mobile Communicatio...

Страница 73: ...ricsson and its service partners reserve the right to charge a handling fee if a returned Product is found not to be under warranty according to the conditions below Please note that some of your pers...

Страница 74: ...riginal accessories intended for use with the Product Sony Ericsson disclaims any and all warranties whether express or implied for failures caused to the Product or peripheral devices as a result of...

Страница 75: ...countries regions additional information such as a valid warranty card may be requested FCC Statement This device complies with Part 15 of the FCC rules Operation is subject to the following two condi...

Страница 76: ...numbers in message 31 call time 29 caller specific ringtones 23 calls answering and rejecting 21 handling two calls 28 international 21 making and receiving 21 putting on hold 27 recording 47 camera...

Страница 77: ...pad lock 61 automatic 61 keys 9 L language 15 location services 42 lock keypad 61 phone 60 M master reset 61 Media Manager 16 media transfer 17 51 memory card 14 memory status 24 menu overview 11 menu...

Страница 78: ...IN code changing 60 unblocking 7 playlists 18 PlayNow 20 podcasts 42 profiles 58 PUK 7 59 60 push email 34 R restricted dialling 29 ringtones 46 RSS feeds See Web feeds 41 S safety guidelines 67 searc...

Страница 79: ...49 keypad lock 61 phone lock 60 SIM lock protection 60 U Update service 54 V video blog 38 editing 39 video player 46 video recorder 36 VideoDJ 39 voice answering 26 voice commands 26 voice control 26...

Отзывы: