Making a call
Saving battery power
Quick settings widget
■
Use Quick setting widget to set Wi-Fi
®
, Bluetooth
®
, backlight, data
transmission. Switching the settings reduces the battery power
consumption.
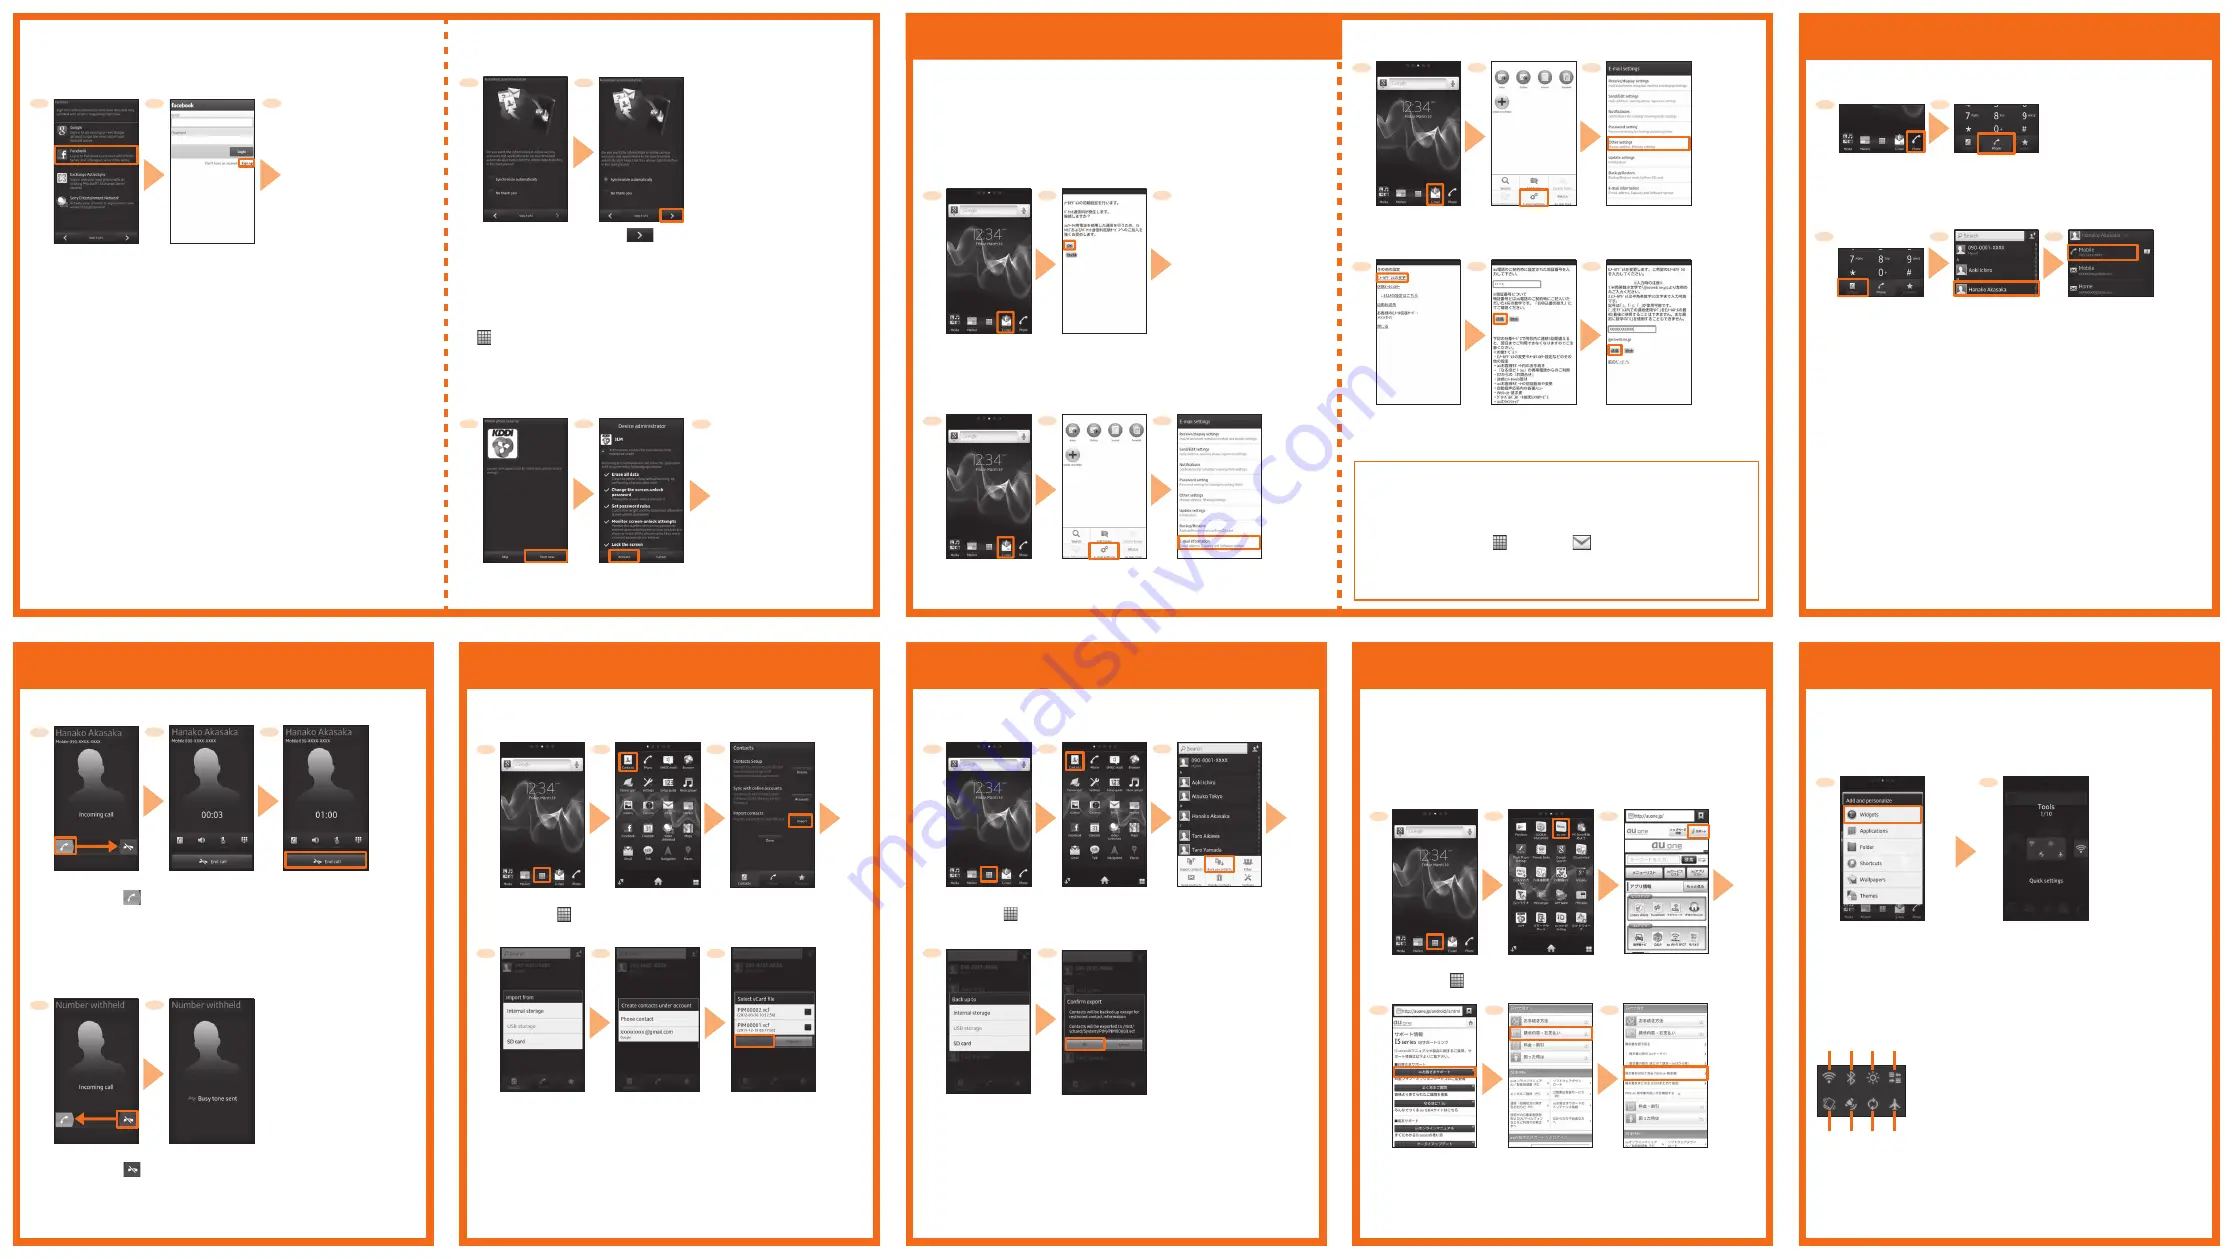
STEP 4: Online service <Facebook>
Register and log in to Facebook account to synchronize profile information
or images etc. opened by "Friends" of Social Network Service (SNS).
■
1
STEP 4: Online service <Exchange ActiveSync>
[Exchange ActiveSync]
→
Input mail address and password
→
[Next] and
then set account and server.
■
Receiving a call
Answering
■
1
Using WEB de
請求書
(WEB de Seikyu-sho)
Online billing statements, "WEB de
請求書
" allows you to check your
monthly charge using internet.
For the IS12S, billing statement can be checked on the PC web page.
Support ID is required for checking your charge on "WEB de
請求書
".
If you do not have Support ID yet, make a registration*.
* For registration, "au phone number", "security code", "customer number (on the
copy of new/change service agreement) are required.
●
●
Rejecting a call
When you reject call, the caller hears a guidance of no response, etc.
■
1
The call is rejected
* The caller hears the
guidance.
Exporting contacts
Importing contacts
Transfer contacts data from your previous au phone to the IS12S using
microSD memory card, storage, synchronized account.
1
Export contacts etc. regularly to microSD memory card etc. to secure
your data.
1
[au one]
1
[
サポート
(Support)]
4
1
* Operate on the home screen
you want to add.
From the Home screen,
t
→
[Add]
→
[Widgets]
2
[Tools]
→
[Quick settings]
2
3
From the Home
screen, [
]
[Contacts]
2
3
From the Home
screen, [
]
[Phone contact]/
Synchronized
account
5
2
3
On the receiving
screen, drag "
"
right
Start calling
To end the call,
[End call]
2
3
On the receiving
screen, drag "
"
left
2
[Facebook]
→
[Accept]
2
3
Register/Log into
account following
the instructions
→
[Done]
Direct input calling
■
From the Home
screen, [Phone]
1
2
Input phone number
→
[Call]
Calling from contacts
■
1
2
Tap a party
to call
3
Tap a phone
number
Dial screen
→
[Contacts]
Adding Quick settings widget
■
5
[au
お客さまサポ
ート
(au Customer
support)]
[
請求内容・お
支払い
(Billing
& payment)]
Make synchronizing settings after registration/login.
●
4
Select a location to
export
t
→
[Back up contacts]
6
Select vCard files
→
[OK]
* Contacts are
imported.
[Contacts]
[Import]
*
t
→
[Import contacts]
except first activation
From the Home
screen, [
]
①
Wi-Fi: Wi-Fi
®
On/Off
②
Bluetooth: Bluetooth
®
On/Off
③
Backlight: On/Off
④
Data: Data communication On/Off
⑤
Sound: Speaker On/Vibrate
⑥
GPS: GPS On/Off
⑦
Auto-sync: Auto-sync On/Off
⑧
Airplane mode: Airplane mode On/Off
[Sign up]
* If you already have your
account, input mail
address and password
→
[Login].
1
1
[Synchronize
automatically]/
[No thank you]
[
]
2
[Start now]
2
STEP 6: Completion of setup
When the setup completion screen appears, tap "Finish".
■
STEP 5: Setting auto-synchronization
Set auto-synchronization for online service account.
■
Alternatively, After setup completion, operate from the Home screen,
[
]
→
[Setup guide].
●
6
* For details about operations,
see the PC site (Japanese).
[
請求書を
WEB
で見る
(
WEB de
請求書)
(View bill on WEB (WEB
de Seikyu-sho)]
Calling overseas from au phones
(au International Call Service)
You can make international calls without any special procedure from
the IS12S. Dialpad screen
→
Input international access code, country
code, area code, phone number of the party
→
[Call].
■
Select a data
location
4
5
Confirm the
message
→
[OK]
* Contacts are
exported.
⑤ ⑥ ⑦ ⑧
① ② ③ ④
E-mail setting
E-mail (
〜
@ezweb.ne.jp) is an au service which allows you to exchange
mail with computers and mobile phones that support E-mail.
Your E-mail address is determined automatically after initial setting. You
can change the E-mail address later.
* For model change from au phone, E-mail address used on the previous model
can be used continuously after initial settings.
1
From the Home
screen, [E-mail]
Check the
contents
→
[OK]
2
3
After E-mail initial settings,
your E-mail address
appears.
Initial settings
■
1
From the Home
screen, [E-mail]
t
→
[E-mail settings]
2
3
Checking E-mail address
■
[E-mail information]
→
Check your E-mail
address
1
From the Home
screen, [E-mail]
t
→
[E-mail settings]
2
3
Changing E-mail address
■
[Other settings]
→
[OK]
4
[E
メールアドレスの
変更
(Change E-mail
address)]
Input security code
→
[
送信
(Send)]
→
[
承諾する
(Agree)]
5
6
Input E-mail address
→
[
送信
(Send)]
→
[OK]
PC-mail
You can use mail addresses except for E-mail (
〜
@ezweb.ne.jp). You
need to set up a PC-mail account to use PC-mail. When you use for the
first time, make settings as follows.
From the Home screen, [
]
→
[Email (
)]
→
Input mail address and
password
→
Input account name and display name
→
[Done]
* For details, see "Manual IS12S" application in the IS12S or "
取扱説明書
詳細版
(Full Instruction Manual)" (Japanese) available au homepage.
Calling from call history
Tap a phone number of the party from call history displayed on the
dialpad screen.
■
STEP 4: Online service
<Sony Entertainment Network>
[Sony Entertainment Network]
→
Input Sign-In ID (email address) and
password
→
[Sign in] to set account.
■
* If you do not set any
accounts, contacts
will be saved to
"Phone contact".
* For some data
locations, select
application.
Phone secutiry
Activate 3LM application to set security.
■
For enabling the settings, subscribe to Anshin Security Pack (charged).
●
3
[I Accept]
→
[Activate]
Phone information
screen appears.
t
→
[Finish] to
complete setup.
* If you tap [Skip] in Step 1,
setup is finished without
security setting and the Home
screen appears.


