background image

SONOSAX  SX-ST RECORDER

 Quick Start Guide   

Page 7 of 26 

3.


OPERATING INSTRUCTIONS 

3.1


RECORDER CONTROLS AND STATUS 

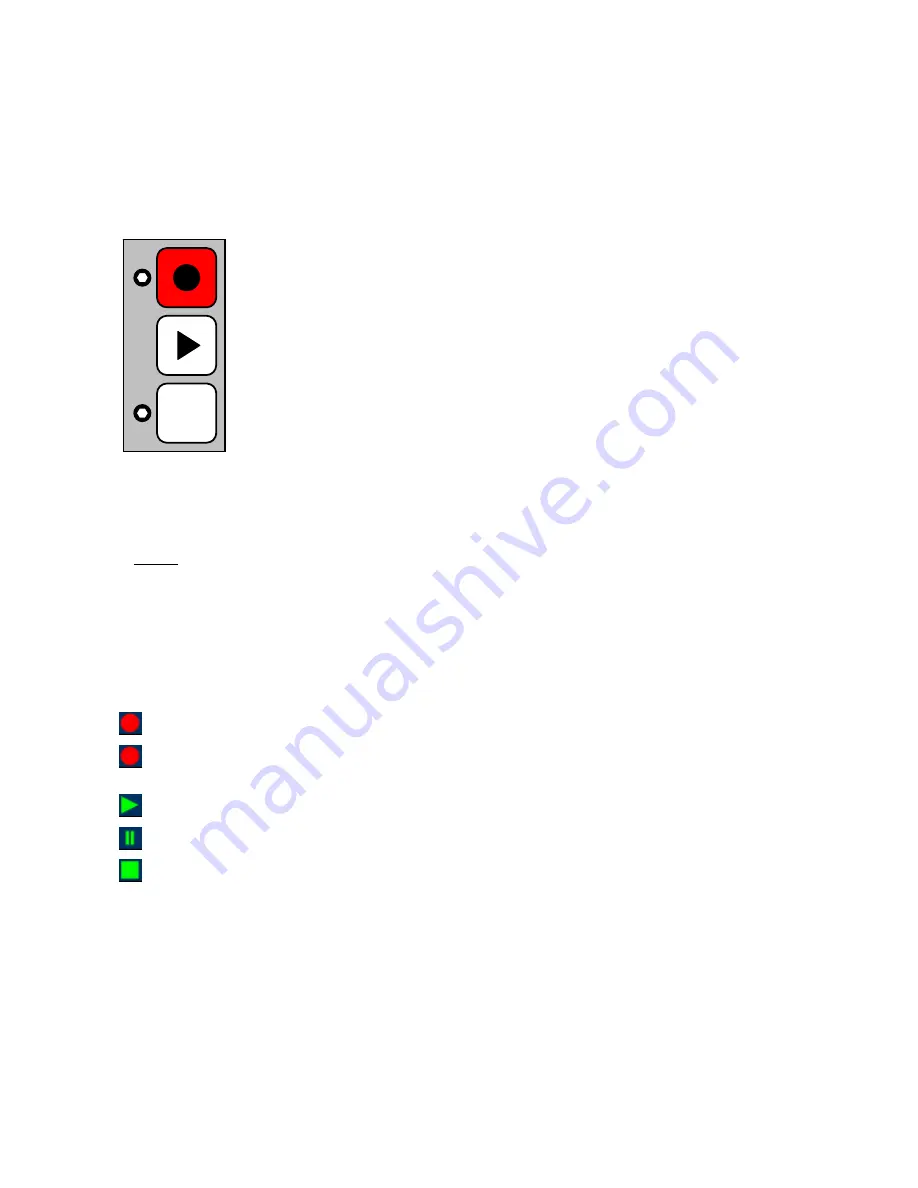
The recorder is controlled mainly by the 3 function keys on the recorder module; the touch screen of the 
remote control is used for configuration and settings purposes as well as metadata editing. 

3.1.1


Recorder's function keys  


- Record Ready mode, the key is flashing; pressing briefly starts recording 

RECORD KEY


- While recording, the key lights steady; pressing briefly adds an Index** 


- While recording, a long pressure stops recording 


- In record ready mode, pressing the PLAY key open the LAST TAKE  

PLAY KEY


menu on the remote, select a Take and press PLAY again to start playing 


- While Playing, press briefly to PAUSE at current location, the key flashes; 
a long pressure while playing or in pause will STOP, the key is darkened. 


MONITOR KEY

  - Act as any other P/A key on the mixing console, pressing the P/A key 


toggles between the monitoring of the console and the monitoring of the 
recorder's tracks, as selected in the HEADPHONES menu 


** INDEX

 =  New TAKE: pressing the REC key briefly while recording will automatically create a new TAKE 

the Take number is automatically incremented by 1. 


NOTE:


the RECORD key can be pressed in any situation to immediately start recording (Scratch 
Record), even while playing a Take; obviously there is no pre-record in this case. 


3.1.2


Recorder's status 

The status of the recorder is always posted on the upper left corner of the screen on the remote control, 
regardless of the displayed menu: 


  Red dot Flashing: 

Record Ready 


  Red dot Steady:  

Recording in progress, the lower region of the screen toggles from blue to red 
and a second red dot is posted on the upper area of the screen 


  Green triangle Steady:  Playing a take 


  Green double bars:  

Player in Pause 


  Green square flashing:  Player in Stop 


P/A 

Содержание SX-ST

Страница 1: ...ST Recorder Quick Start Guide Firmware revision 4 2 audio equipment manufacturer SONOSAX SAS S A Ch de la Naz 38 1052 Le Mont s Lausanne SUISSE Tel 41 21 651 0101 Fax 41 21 651 0109 Web www sonosax ch...

Страница 2: ...S AND STATUS 7 3 1 1 Recorder s function keys 7 3 1 2 Recorder s status 7 3 2 MAIN DISPLAYS 9 3 3 INPUT CHANNELS VS RECORDER TRACKS 9 3 4 INPUTS MODULOMETERS 9 3 5 TRACKS MODULOMETERS 10 3 6 MAIN MENU...

Страница 3: ...SONOSAX SX ST RECORDER Quick Start Guide Page 3 of 26 1 DIGITAL MODULE A D CONVERTER INTERNAL 8 TRACKS RECORDER...

Страница 4: ...f the A D Converter Centre Position The A D Converter is powered off thus reducing the overall power consumption of the console The A D Converters are always powered per pair therefore both switches o...

Страница 5: ...an external clock such as a video burst or a wordclock is only possible when the Internal Recorder is installed If the Digital module holds the A D converter only without Recorder the A D Converter w...

Страница 6: ...standard It allows connection to any computer having a USB 2 0 port PC or MAC Once it is connected to a computer the hard drive and or card the ComapctFash appear on the desktop as an external media...

Страница 7: ...P the key is darkened MONITOR KEY Act as any other P A key on the mixing console pressing the P A key toggles between the monitoring of the console and the monitoring of the recorder s tracks as selec...

Страница 8: ...ed while powering up the unit the system asks to confirm the date of the new working day This allows keeping the date of the current working days if the on going production works is passing across mid...

Страница 9: ...he INPUTS modulometers numbers 1 to 8 represent the digital audio applied at the input of the recorder this means the audio channels fed from the output of the A D Converter Obviously the audio depend...

Страница 10: ...igned inputs on that particular track in other words it shows what is effectively recorded on the tracks If the Inputs are not assigned on a 1 1 routing toggling the metering allows a rapid comparison...

Страница 11: ...pairs or individually as a mono track Tracks 1 to 8 are the tracks on the Hard disk A B are the two tracks of the CF Card A primary switch toggles the different monitoring modes for pairs 1 2 3 4 or 5...

Страница 12: ...s or any combination Enable disable the pair It s monitoring mode is as configured in the HEADPHONES page Non exclusive selection Second row Enable disable the pair and toggles its listening mode Odd...

Страница 13: ...re not related or not In Sync to a specific video take usually used for ambiances or atmo s The audio file is notified with the suffix W in the BROWSE FILE menu NO GOOD Tag the metadata of the last re...

Страница 14: ...Menu Call the next page for more metadatas Move the cursor to the Left Move the cursor to the Right The fields displayed in the second page depend on the operating mode the selected field is high lig...

Страница 15: ...adata but does not create a new directory SCENE editing the Scene name of an existing audio file only modify the metadata of that particular field but does not reset or modify the Take number TAPE thi...

Страница 16: ...oll Down 1 lines at a time Trash bin Scroll Down 10 lines at a time Return to Main Menu Back to an upper level Move the selected Folder to Trash bin Scroll Up or Down then touch on the name to select...

Страница 17: ...rom the BROWSE FILE menu the recorder will switch to PLAYER mode and will automatically reconfigure the system with the same parameters as set during the recording of that particular Take Routing Moni...

Страница 18: ...nd REVERSED modulometers are displayed over a white background with a higher contrast to improve reading on direct sun light 4 1 CONFIGURING THE RECORDER 4 1 1 Configuring the Tracks REC TRACKS Assign...

Страница 19: ...n the track Toggle the input channel number assign un assign the channel Multiple input channels can be assigned to the same track mixing Select Previous track Select Next track The ROUTING menu perfo...

Страница 20: ...4 1 4 Example of a complete configuration Tracks 5 6 are routed but not armed Input channels 1 2 3 assigned and mixed to track A on CF Card 1 x 1 assignment on the HD Tracks Input channels 4 assigned...

Страница 21: ...r 0 1 is posted beside the sampling frequency in the main screen POLYPHONIC all active tracks are recorded in a single file This mode requires to enable the MIRRORING regardless of whether the Compact...

Страница 22: ...TC is jammed on an external source then runs on its own clock External No Jam the TC reads the external source continuously Internal the TC is internally generated but its output on the Lemo 5 pin is...

Страница 23: ...a user settings name max 8 characters confirm with the green check key to save the setting RECALL Load the file and reconfigure the recorder with all parameters stored in that user setting file OVERWR...

Страница 24: ...ENCE LEVEL Set a vertical line for reference on the INPUTS modulometers screen Reference levels 9dB 12dB 18dB 20dB below 0dBFS MODUL HOLD TIME The Hold Time function detects the absolute peak level of...

Страница 25: ...format DD MM YYYY TIME Set the Time of the internal real time clock of the recorder format HH MM SS DISPLAY REVERSED reverse the orientation of the display thus users can choose the orientation of the...

Страница 26: ...ed in this manual apply to standard models only SONOSAX SAS SA reserves the right to modify these characteristics at any time without prior notice No part of this manual may be reproduced or transmitt...

Отзывы: