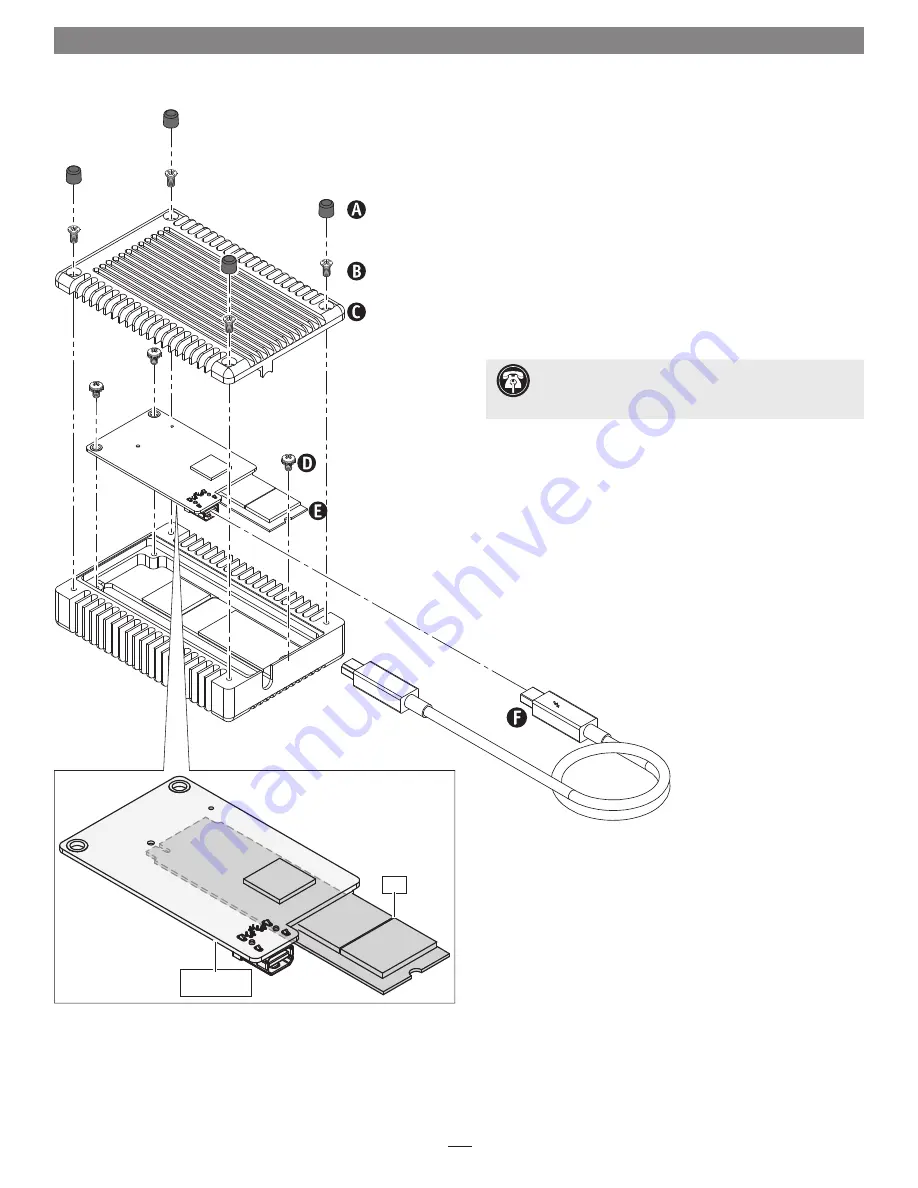
Thunderbolt Cable Replacement Instructions
3
Should the need arise, you may replace the Fusion PCIe Flash
Drive’s Thunderbolt nterface cable. Use Sonnet’s cable (part
number TCB-TB2-05M); other cables are not supported.
1.
Remove and set aside the four feet
(A)
from the bottom of the
Fusion PCIe Flash Drive, referred to as “the drive” from this
point onward.
2.
Using a Phillips screwdriver, remove and set aside the four
screws
(B)
securing the bottom cover to the drive enclosure.
3.
Remove and set aside the bottom cover
(C)
.
4.
Remove and set aside the three screws
(D)
securing the
Thunderbolt interface board/SSD assembly
(E)
to the drive
enclosure.
5.
Lift up the Thunderbolt cable
(F)
part way out of the drive
enclosure, grasp the circuit board it is plugged into by its
edges, and then disconnect the cable. Note that the SSD is
plugged into a spring-loaded slot and will separate from the
interface board as you lift it out of the enclosure.
6.
Plug in the replacement Thunderbolt cable
(F)
.
Support Note:
To avoid damaging components due to
static electricity discharge, wear an antistatic wrist strap while
working inside the Fusion PCIe Flash Drive.
7.
Pushing its short edge,
carefully seat the SSD in its slot
on the interface board, and
then set the interface board/
SSD assembly back in the
drive enclosure
(E)
.
8.
Using the three screws
(D)
you removed previously, secure
the interface board/SSD assembly
(E)
to the drive enclosure;
do not overtighten the screws
.
9.
Using the four screws
(B)
you removed previously, secure the
bottom cover
(C)
to the drive enclosure;
do not overtighten
the screws
.
10.
Replace the four feet
(A)
on the bottom of the drive. Note
that you may find it necessary to apply hot glue to the
bottom of the feet for them to adhere securely to the screws.
SSD
Thunderbolt
interface board


