background image

5

Quick Start Guide for Tempo-X eSATA 8

Drive Formatting—Individual Drives (continued)


7.

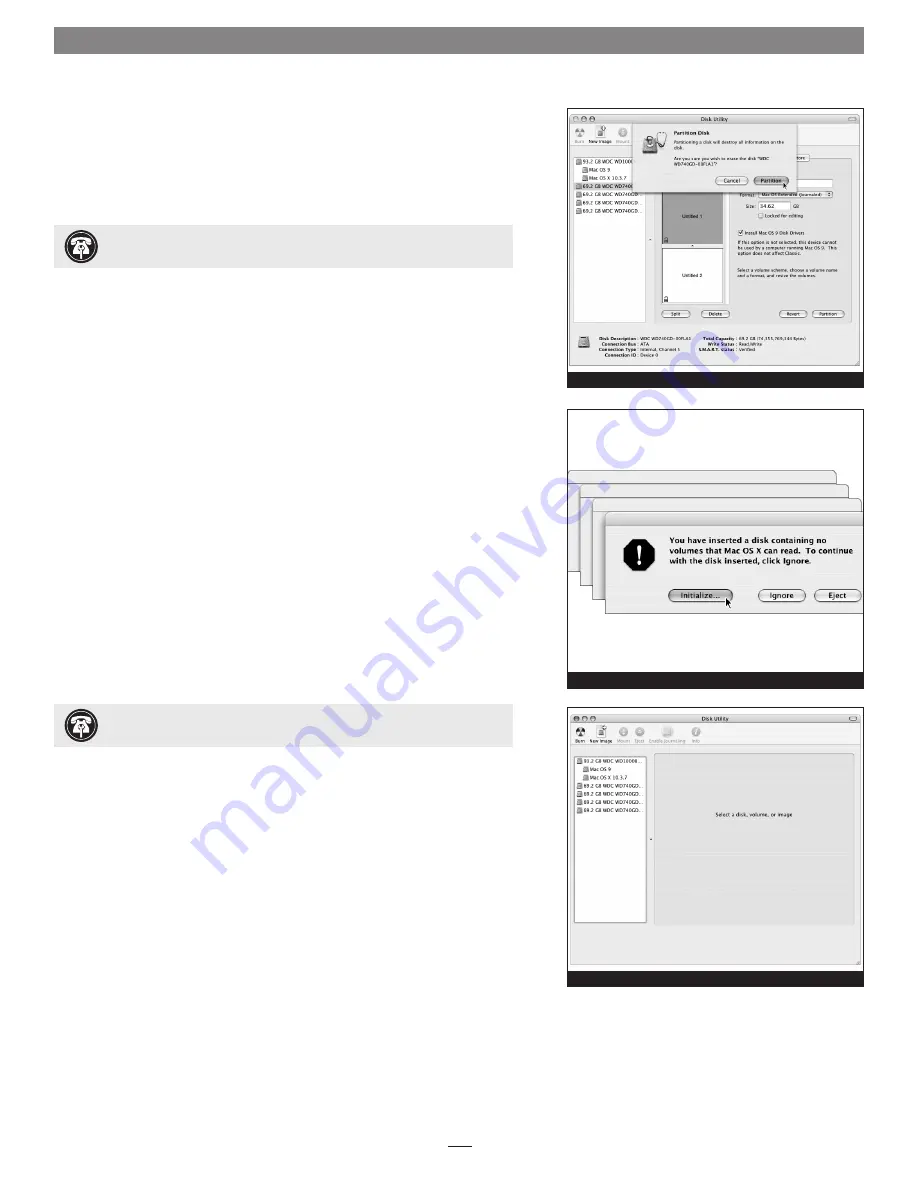
 When the 

Partition Disk 

window appears, click the Partition button 

(Figure 6)

. If necessary, repeat steps 3–6 to partition any other drives con-

nected to the Tempo-X card. When partitioning and formatting are com-
plete, close the Disk Utility application; you can now use your drive(s).


Drive Formatting—RAID Arrays

This section describes the process of formatting (initializing) individual hard 
drives connected to the Tempo-X eSATA 8 using Disk Utility under Mac OS X 
Version 10.3; the process under Versions 10.4 and 10.2 are similar. If you 
choose to do so, you may format your drives using SoftRAID 3.1 or later; refer 
to that product’s documentation for instructions.


1.

 Turn on your computer. During startup, your computer may display a 

message(s) referring to unreadable volumes; click Initialize… to launch 
Disk Utility 

(Figure 7)

.


2.

 If it is not already open, launch Disk Utility 

(Figure 8)

. Note that all 

attached drives appear in the information window, regardless of being for-
matted or not.

Figure 6

Figure 7

Figure 8


 Support Note:

 All hard drives connected to the Tempo-X card will be 

described by Disk Utility as having an internal connection 

(Figure 8)

.


 Support Note:

 See page 7 for port identification and information on 

Tempo-X eSATA 8’s status LEDs.

Содержание TEMPO-X eSATA 8

Страница 1: ...ype Simply Fast the Simply Fast logotype and Tempo are trademarks of Sonnet Technologies Inc Macintosh and Mac are trademarks of Apple Computer Inc registered in the United States and other countries Other product names are trademarks of their respective owners Product specifications subject to change without notice Printed in the USA QS TSATAII X8 E A 080805 Support Notes We recommend that you ma...

Страница 2: ...ted 6 Secure the Tempo X card firmly in place with the previously removed mounting screw if necessary and then close the computer be very careful not to pinch the cables 7 Connect the external Serial ATA data cable s between the Tempo X card and the drives or drive enclosures make sure all cables are connected securely to the Tempo X card and the drives or enclosures 8 If you are a Mac user skip t...

Страница 3: ... Wizard window appears select No not this time and then click Next 8 When the next window appears select Install from a list or specific location Advanced and then click Next 9 When the next window appears select Don t search I will choose the driver to install and then click Next 10 When the next window appears requesting you to select the device driver select Standard Dual Channel PCI IDE Control...

Страница 4: ...ppear in the information window regardless of being for matted or not 3 Select the drive you want to format by single clicking the drive symbol or the name of the drive Figure 5 At the bottom of the window drive capacity and connection type are listed 4 Click on the Partition button Figure 5 Click on the drop down menu beneath Volume Scheme and select a number of partitions for the vol ume you may...

Страница 5: ...the process under Versions 10 4 and 10 2 are similar If you choose to do so you may format your drives using SoftRAID 3 1 or later refer to that product s documentation for instructions 1 Turn on your computer During startup your computer may display a message s referring to unreadable volumes click Initialize to launch Disk Utility Figure 7 2 If it is not already open launch Disk Utility Figure 8...

Страница 6: ...rom the drop down menus select the RAID scheme stripe and the vol ume format and then type in the name for your RAID volume Figure 9 6 When the Creating RAID window appears click the Create button all of the selected drives will be formatted and the RAID volume created Figure 10 Close Disk Utility your drives are now ready to use and your installation is complete Figure 9 Figure 10 Support Note Th...

Страница 7: ... diagnose any issues Figure 11 2 When drives connected to the Tempo X card are powered and active the status LEDs on the card will light Figure 12 Green LED ON Drive is present and ready Amber LED ON Flashing Drive is reading writing data Figure 11 Figure 12 Channel 8 Channel 7 Channel 6 Channel 5 Channel 1 Channel 2 Channel 3 Channel 4 green LEDs green LEDs amber LEDs amber LEDs ...

Отзывы: