background image

5

Quick Start Guide for Tempo SATA E4P

Mac OS X Drive Formatting—RAID Sets

This section describes the process of formatting (initializing) multiple 
hard drives connected to the Tempo SATA E4P using Disk Utility under 
Mac OS X Version 10.5; the process is nearly identical under Mac OS X 
Versions 10.6 and 10.4. If you choose to do so, you may format your drives 
using SoftRAID 3.1 or later; refer to that product’s documentation for 
instructions.


1.

 Turn on your storage system, and then turn on your computer. 

During startup, one or more messages referring to unreadable 
volumes will be displayed; click Initialize… to launch Disk Utility. 
After Disk Utility launches, click the Initialize button in each 
remaining message window.


2.

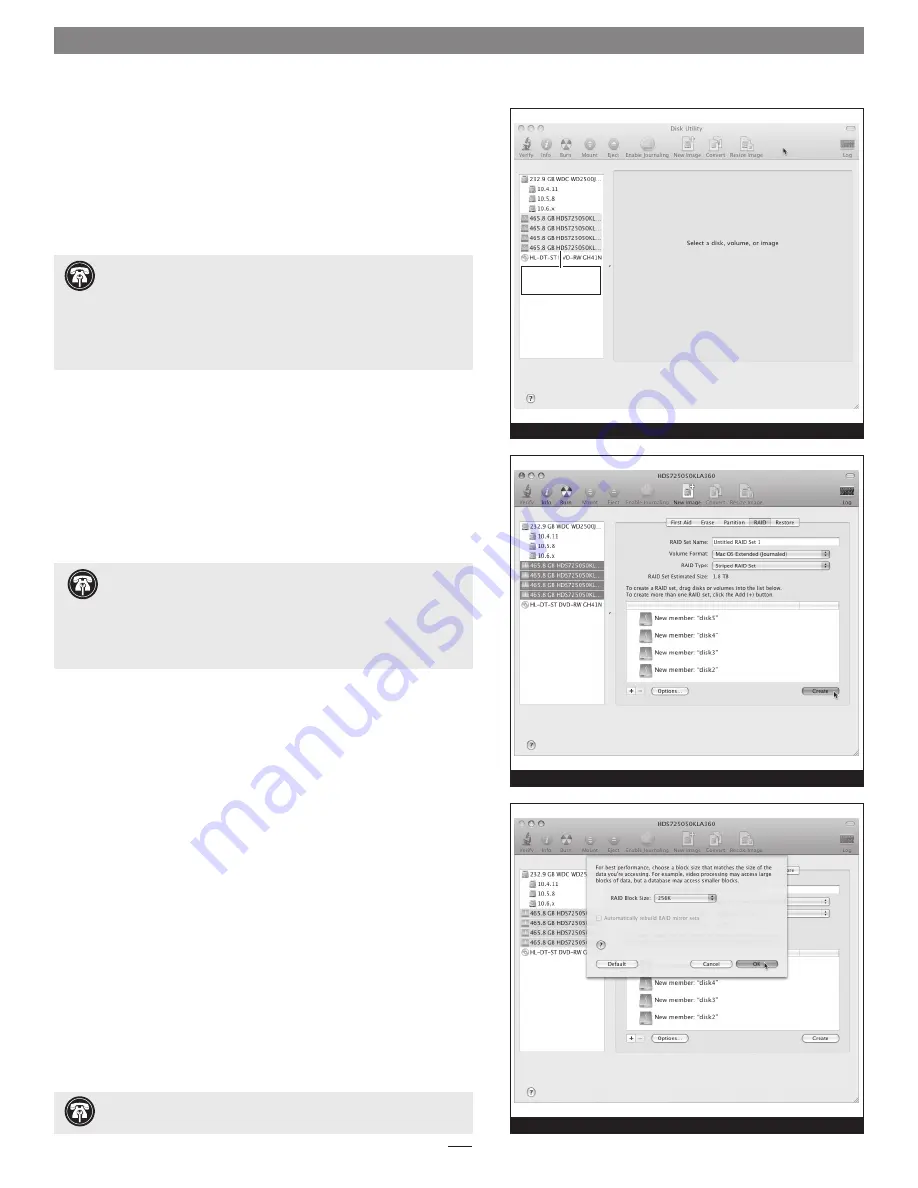
 If it is not already open, launch Disk Utility 

(Figure 3)

. Note that 

all drives attached to the Tempo card may be identified in the 
information window by their custom icon with the Sonnet S logo.

  3.

 Select one of the drives you want to format in a RAID set by 

clicking the drive symbol or the “name” of the drive; a set of tabs 
will appear in the right pane. Click the RAID tab, select all the 
drives you will use to create your striped RAID set, and then drag 
them into the disk field 

(Figure 4)

Be careful NOT to accidentally 

drag in a drive you don’t want included in the RAID

.


4.

 From the drop-down menus, select the volume format and the 

RAID scheme (Striped RAID Set), and then type in the name for 
your RAID volume 

(Figure 4)


5.

 Click the Options button. From the drop down menu, select a 

RAID block size 

(Figure 5)

. If you are working with video, selecting 

the largest block size will help improve performance. If you are 
working with many smaller files (databases, etc.) a smaller block size 
will work well. Click OK.


6.

 Click Create. When the 

Creating RAID 

window appears, click the 

Create button; all of the selected drives will be formatted and the 
RAID volume created. Close Disk Utility; your drives are now ready 
for use and your installation is complete.

Figure 3

Figure 4

Figure 5

drives connected 

to Tempo card


 Support Notes:

 The remaining steps in this section describe the 

creation of a RAID 0 (striped) set. If you intend to create a RAID 1 

(mirrored) or RAID 10 (striped/mirrored) set, the procedure is similar to the 
remaining steps. Please refer to Disk Utility help for further information.

 
All hard drives connected to the Tempo card will be described by Disk 
Utility as having an internal connection.


 Support Note:

 Depending on how you set it up, a drive 

enclosure with a built-in hardware RAID controller, like Sonnet’s 

Fusion D400QR5, may not present its drives separately to the operating 
system. For instance, if you choose a RAID 0 or RAID 5 configuration, 
only one “drive” will appear in Disk Utility. If this is the case, skip to 
“Mac OS X Drive Formatting—Individual Drives” on the next page for 
drive formatting instructions. 


 Support Note:

 See page 8 for port and channel identification, 

and information on Tempo SATA E4P’s status LEDs.

Содержание TEMPO SATA E4P

Страница 1: ...ation sonnettech com to be informed of future upgrades and product releases Software updates and links are available from the Sonnet web site at www sonnettech com Online support form available at http supportform sonnettech com Sonnet Technologies Customer Service hours are Mon Fri 7 a m 4 p m Pacific Time Customer Service Phone 1 949 472 2772 E mail support sonnettech com Sonnet Technologies Inc...

Страница 2: ......

Страница 3: ...s refer to your computer s user manual for specific information 2 Locate an available x4 4 lane or x8 8 lane PCI Express slot inside your computer and remove its access cover 3 Remove the Sonnet card from its packaging and then install it into the PCI Express slot make sure the card is firmly seated and secured 4 Close your computer 5 Connect the eSATA data cable s between the Tempo card and the d...

Страница 4: ...information Windows 7 Driver Installation This section describes the download and installation of drivers to support the Tempo SATA E4P in systems running Windows 7 1 Turn on your computer and log in during startup an Installing Device Driver Software pop up will appear followed by a message that the device driver software was not successfully installed Close the message 2 Log onto the Internet Go...

Страница 5: ...ge Windows Vista Driver Installation This section describes the download and installation of drivers to support the Tempo SATA E4P in systems running Windows Vista 1 Turn on your computer and log in during startup an Installing Device Driver Software pop up will appear followed by a message that the device driver software was not successfully installed Close the message 2 Log onto the Internet Go ...

Страница 6: ...e 13 Back in the Install from Disk window click OK 14 Back in the Hardware Update Wizard window click Next the software will be installed If a window appears stating that the Tempo software has not passed Windows Logo testing click Continue Anyway 15 When the next window appears click Finish you may now format drives attached to the Tempo card Skip to page 7 for drive formatting information Suppor...

Страница 7: ...riped RAID Set and then type in the name for your RAID volume Figure 4 5 Click the Options button From the drop down menu select a RAID block size Figure 5 If you are working with video selecting the largest block size will help improve performance If you are working with many smaller files databases etc a smaller block size will work well Click OK 6 Click Create When the Creating RAID window appe...

Страница 8: ...hat all drives attached to the Tempo card may be identified in the information window by their custom icon with the Sonnet S logo 3 Select one of the drives you want to format by clicking the drive symbol or the name of the drive a set of tabs will appear in the right pane Click the Partition tab and then click on the drop down menu beneath Volume Scheme to select a number of partitions for the vo...

Страница 9: ...ear click Continue 3 In the Administrative Tools window double click Computer Management 4 In the Computer Management window click Disk Management under Storage to launch the Disk Management application 5 If an Initialize Disk window appears or if disks are described as not initialized select a partition style for the attached drive s and then click OK the drive will be initialized Figure 9 Repeat...

Страница 10: ... Mac Users When drive enclosures with port multipliers are connected to Tempo SATA E4P you can identify individual drives within those enclosures in Disk Utility Figure 13 top In the Connection ID field Channel indicates the channel as well as the connector on the Tempo card while Port identifies the drive in the enclosure When drive enclosures without port multipliers are connected a simple drive...

Отзывы: