background image

Quick Start Guide – XP5s 


7/18/2018 


Page 

11

 of 

17


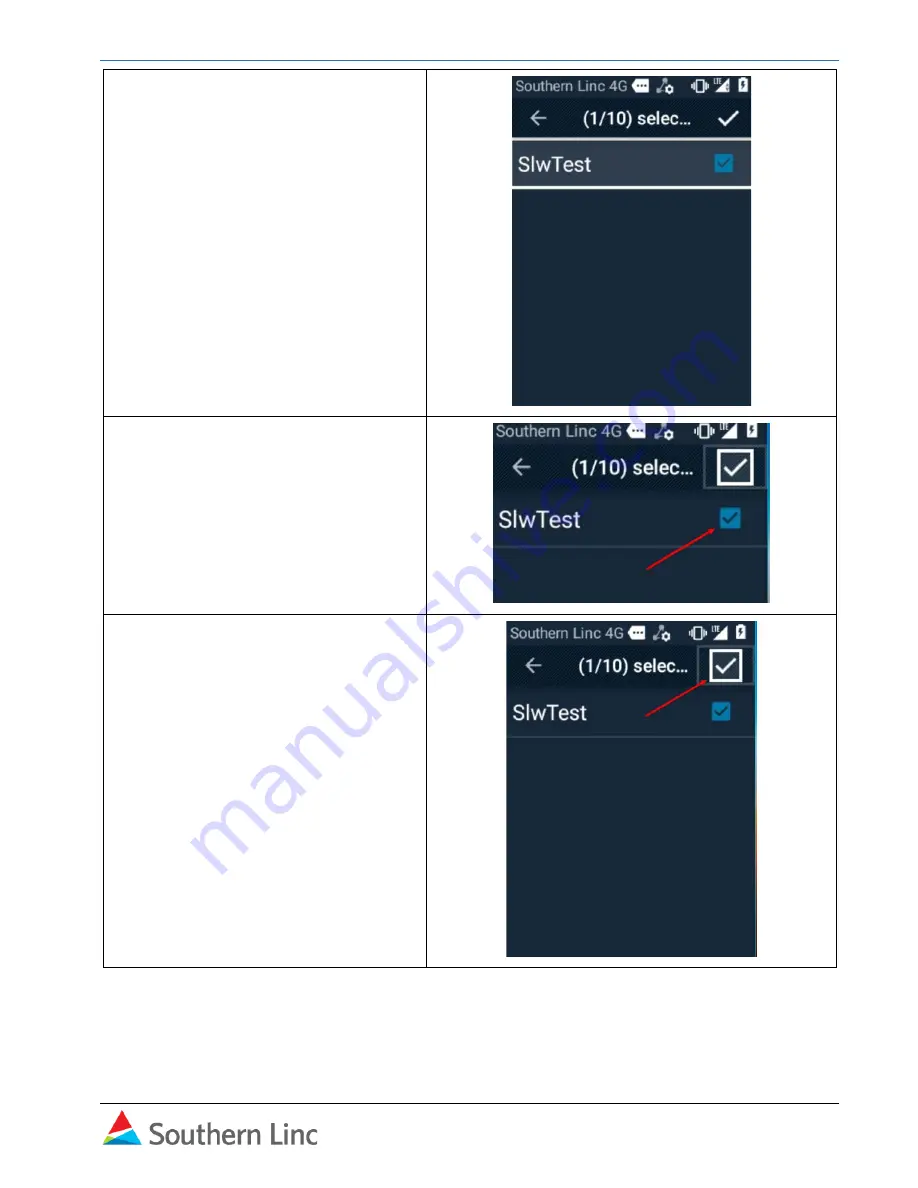
13. All groups pushed to you are listed. 

You can select up to 10 groups for a 
list. 


14. Select groups for the list using the 

checkbox. Use the arrow to go to 
the row and the home key to select. 


15. When you complete the group 

selection, go to the large check 
mark in the top right. Click the check 
mark to save. 


Содержание XP5s

Страница 1: ...Quick Start Guide XP5s ...

Страница 2: ...screen turns off press the PTT button grey left side of handset to turn back on INSTALL AND CHARGE THE BATTERY Unscrew the back panel to access the battery bay Follow placement instructions on the battery then reconnect the back panel Be sure to secure the panel tightly XP5s Fully charge the device using the provided USB charging cord or another device as appropriate ...

Страница 3: ... of 17 HANDSET INSTRUCTIONS The XP5s uses buttons to enter data and move through commands Use the Home OK button and arrow keys to navigate highlight and select Toggle the text mode with the key See XP5s User guide for detailed instructions ...

Страница 4: ...Quick Start Guide XP5s 7 18 2018 Page 4 of 17 SONIM SETUP 1 Select Start Provisioning 2 If you have been provided a QR code you can scan it and follow instructions for provisioning Otherwise select Skip ...

Страница 5: ...he contact list 4 In the My Information screen enter your personal information The XP5s uses the keypad to enter text and numbers Use the key to toggle between text number and predictive text modes Press the appropriate button to select letters Use the 0 zero button for a space Use C button to backspace and delete 5 In the Emergency contacts screen either select an existing contact or add a contac...

Страница 6: ...t Setup and follow on screen instructions To set up Wi Fi calling later go to Settings Wi Fi Calling and follow instructions 7 Sonim Setup is complete Instructions will be displayed for PTT Setup Scroll to the bottom and select Done See next section for PTT setup instructions ...

Страница 7: ...ite on You will need it later in the process 1 Go to the messaging inbox This can be accessed by selecting the down arrow on the home screen or by using the right arrow to access Missed Events 2 Select and open the PTT onboarding message 3 Arrow up to select the message Click the OK button to open the message ...

Страница 8: ...r arrow down and select Call number 5 In the next screen press the Call button on the keypad or select the call and press the OK button 6 You will hear a recorded message with the passcode Listen for the number and write it down The call will end automatically after the message is complete ...

Страница 9: ... 2018 Page 9 of 17 7 Navigate back to Messaging and select the onboarding message again Arrow down to the hyperlink and select Open Link 8 The Cockpit opens Select Allow access to location photos phone and files 9 Select sign in ...

Страница 10: ... toggle to number mode Arrow down to sign in and select 11 The Cockpit opens in Group List Selection If synchronization is in progress wait until it is complete and the box disappears 12 Arrow down select Create new list of groups Note A group must be in a list before it will appear in your Linc PTT contacts ...

Страница 11: ...u are listed You can select up to 10 groups for a list 14 Select groups for the list using the checkbox Use the arrow to go to the row and the home key to select 15 When you complete the group selection go to the large check mark in the top right Click the check mark to save ...

Страница 12: ...o toggle between text modes as needed Select Save 17 Confirm the list by selecting the checkmark on the Group List Selection screen You should return to the Cockpit automatically If not select the back arrow in the top left corner 18 Registration and initial setup is complete ...

Страница 13: ...TUP 1 Select the Linc PTT application from the home screen 2 In the next screen select and use OK button to Allow Linc PTT access to location audio files and phone 3 The next screen is the End User License Agreement EULA Scroll to the bottom and select Accept ...

Страница 14: ...SWORD You should change your PTT password to a personal selection as soon as possible This can be done on the Cockpit sign in page If internet access is available you may use the PTT Passcode website Before you start sign out of Cockpit Go to Cockpit Press the Options button on the handset then scroll down select sign out and confirm Using the passcode website ...

Страница 15: ...device or another one Enter your 10 digit phone number without dashes and select Continue 2 You will receive a text message with a one time password change code Write down the code 3 Return to the website Enter the code then enter and confirm the new password Select Change Password to confirm ...

Страница 16: ... Open Cockpit and sign in with the new password Change password in Cockpit 1 Open Cockpit Select Sign in and then Change Password 2 On the next screen sign in with your 10 digit phone number and current password Use key to toggle text mode to number ...

Страница 17: ...select Click to change password Note The name and phone number are not required 4 In Change Password screen enter current password then create and confirm a new password Select Change Password 5 A notification verifies the password was changed Return to Cockpit and sign in with the new password ...

Отзывы: