background image


|    

S O N I C - E Q U I P M E N T. C O M

Before use

Inspection

•  Inspect the jack carefully before each use. 

Ensure the jack is not damaged, excessively 
worn, or missing parts.  

•  Do not use the jack unless it is properly lubri-

cated.  

•  Using a jack that is not in good clean working 

condition or properly lubricated may cause 
serious injury.  

•  Inspect the work area before each use. Make 

sure it is free and clear of any potential 
hazards.

Operation

Prior to first use

•  After assembly, leave the jack to stand for one 

hour to allow the oil to settle before purging 
the system.

•  Note: Failure to allow sufficient time for the oil 

to settle could result in air remaining in the oil. 
In this event, the jack will not purge complete-
ly the first time and a second purge will be 
required.

•  Purge the hydraulic circuit to eliminate any air 

in the system by turning the air vent coun-
ter clockwise by one turn, turn and hold the 
release valve handle to the right and then 
pumping the foot pedal 15 to 20 times.

•  Retighten the air vent screw and release the 

handle.

•  Test the jack, with no load, by raising it to full 

height and then lowering it (see below).

Raising the jack

Warning:


Never load a weight greater than that 

which the transmission jack was designed for (0.5 
Ton), overloading can lead to personal injury or 
damage to the jack.

Before using the transmission jack, have a visual 
inspection to make sure there are no oil leaks or 
damage etc.

•  Roll the transmission jack into position. 
•  Pump the foot pedal until saddle reaches 

desired height. 

•  Carefully centre the load on the saddle; ensure 

the centre of gravity of the load is centred on 
the saddle and the setup is stable and secure.

•  Slowly and carefully turn the release handle 

to the right to lower the load to its lowest 
possible position.

Note:

 Carefully center load on the saddle. Ensure 

the load’s center of gravity is centered on the 
saddle and the setup is stable and secure.

Note:

 Before lowering load check to ensure all 

tools and personnel are clear and it is safe to 
lower the load.

Note:

 The speed of lowering is controlled by the 

release handle. The more the valve is opened the 
more rapidly the jack descends. Ensure the decent 
is slow and controlled.

Warning:

 Dangerous dynamic shock loads are 

created by quick opening and closing the release 
handle when the load is being lowered. The result-
ing overload may cause hydraulic system failure 
which could cause property damage and/or severe 
personal injury.

Lowering the jack

•  If necessary, carefully and slowly move the 

jack.

•  Transfer load immediately to appropriate 

support device for service or repair.

•  Note:

 The oil filler screw must be closed at all 

times whilst operating the transmission jack.

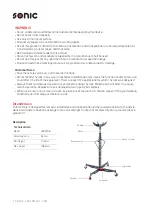
Содержание 4800708

Страница 1: ...S O N I C EQ U I P M E N T C O M ART NO 4800708 Instructions 0 5T Transmission jack ...

Страница 2: ...not modify the jack in any way Unauthorized modification may impair the function and or safety and could affect the life of the equipment There are specific applications for which the jack was designed Always check for damaged or worn out parts before using the jack Broken parts will affect the equip ment s operation Replace or repair damaged or worn parts immediately When jack is not in use store...

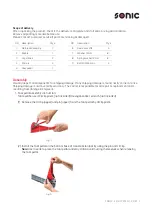
Страница 3: ... Visually inspect all components for shipping damage If any shipping damage is found notify carrier at once Shipping damage is not covered by warranty The carrier is responsible for all repair or replacement costs resulting from damage in shipment 1 Foot pedal assembly instruction Tools will be used Circlip pliers not included Hexagon socket wrench not included 1 Remove the circlip upper and pin u...

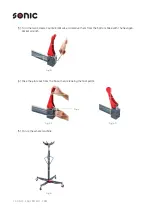
Страница 4: ... M 3 Turn the two screws counterclockwise to remove them from the bottom base with the hexagon socket wrench 4 Take the plate out from the base then releasing the foot pedal 5 Put up the whole machine Fig 5 Fig 4 1 Fig 4 2 Plate Fig 3 ...

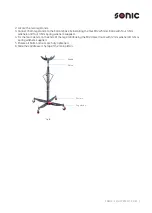
Страница 5: ...25mmL bolts with four 12mm washers and four 12mm spring washers supplied 4 Fix the four casters to the ends of the leg stands using the M12 domed nuts with 12mm washers 12mm spring washers supplied 5 Ensure all bolts and nuts are fully tightened 6 Slide the saddle over the top of the main piston Fig 6 Casters Leg stands Saddle Piston ...

Страница 6: ...on overloading can lead to personal injury or damage to the jack Before using the transmission jack have a visual inspection to make sure there are no oil leaks or damage etc Roll the transmission jack into position Pump the foot pedal until saddle reaches desired height Carefully centre the load on the saddle ensure the centre of gravity of the load is centred on the saddle and the setup is stabl...

Страница 7: ...n remove the air vent screw lay the jack on its side and drain the oil into a suitable container Note Ensure that no dirt gets into the system Set the jack in its level upright position fill with approved hydraulic jack oil Then replace the air vent screw and purge away air from hydraulic system Note Dispose of hydraulic oil in accordance with local regulations When equipment efficiency drops purg...

Страница 8: ...omponents Do not use it for any other purpose it is not designed to perform f Do not use this transmission jack as a vehicle lifting device or as a vehicle support g Vehicle must be properly and adequately supported before starting repairs h Do not use this jack to lift or support assem blies such as a differential with axle or a transmission with bell housing which will be bulky and difficult to ...

Отзывы: