

11
EN -Functions / H - Funkciók / SK - Funkcie / RO - Funcții / SRB-MNE - Funkcije / CZ - Funkce /
HR-BIH - Funkcije
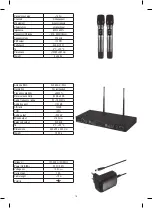
FEATURES
• Professional microphone set • Robust, metal handheld microphone • In-
novative, latest technology • Multifunctional digital display • Frequency/
channel/battery status • RF radio signal strength meter • AF audiolevel
meter • Digital noise filter circuit • 2x100 selectable channels • Scanning for
best available channel • Automatic or manual setting • Fast infrared pair
-
ing • Noise-free ON/OFF switching • 2x symmetrical XLR audio outputs •
∅
6.3 mm mixed audio output • High-gain BNC antennas • Operating range in
open field: ~140 m • Operating frequency band: UHF • Can be fitted into rack
cabinet • Accessories: power adapter, 6.3 mm/6.3 mm audio connection cable,
fixtures, colour coding rings
COMMISSIONING
Handheld microphone
The portion located under the display consists of an interwoven metal cylinder and
a plastic cap. Do not remove the plastic cap separately. Remove the metal cylinder
together with the cap. After the careful removal of the microphone handle from below
the display, place two size
AA
(1.5V) alkaline batteries into the battery compartment
observing the marked polarity (the positive end pointing downwards). Replace the
battery compartment cover. The device is turned ON by a single pressing of the button
under the display and turned OFF by a longer (~2 seconds long) pressing and holding
down of the button. On the digital display a battery symbol shows the battery status.
• Replace the batteries when indicated by the battery symbol on the display, or if
operating range is reduced, or transmission becomes noisy. • Batteries can only be
replaced by adults. • Do not use batteries of various brands and/or status together. •
Remove the batteries right away when depleted, or if the device will not be used for a
longer period. • If any fluids have leaked from the batteries, clean the battery compart
-
ment with a dry cloth wearing protective gloves. • Never open, place into fire or short
circuit the batteries. • Never charge non-rechargeable batteries. Explosion hazard! •
Do not use rechargeable battery cells instead of batteries, as the voltage output and
efficiency of these is significantly lower. • The efficiency of batteries is reduced in cold
ambient temperatures, thus more frequent replacement may be required.
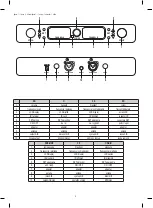
Receiver
Fit the two antennas into place (
ANT A, ANT B
) on the rear side using the BNC con
-
nectors. Connect the included power adapter to the rear socket, then to the mains
socket. Connect to an audio amplifier, or mixer, or active soundbox using the mixed
MIXOUT
(LINE IN for line level input) or
BALANCED A + BALANCED B
(for XLR
symmetrical microphone input) outputs. Use only one type of connection at a time.
The device is turned ON by a single pressing of the
POWER
button under the display
and turned OFF by a longer (~2 seconds long) pressing and holding down of the
button.
• In certain cases, a unique connection cable or adapter may be necessary, depending
on the external device. • Before switching ON the receiver unit and the amplifier, set
their volume controls, as well as volume controls
VOL A, VOL B
to minimum level.
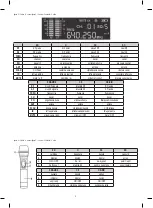
SETTING, PAIRING, FUNCTIONS
When the receiver and handheld microphones are turned ON, after a successful
automatic pairing, the RF graphic display will indicate both the achievement of a con
-
nection and the field strength. Carefully set VOL A and VOL B controls to the medium
position and the volume control of the amplifier to a lower position. If connection was
not achieved, or it is not clear, change to another frequency. Microphones and the
receiver unit can be paired, and the appropriate channel (frequency) can be selected
in two ways.
1. AUTOMATIC SETTING: Remove the metal cap of the handheld microphone. Press
and hold down the
˅
button for 2 seconds. The display shows
SCAN
and the scanning
process of all channels from 00-99 can be followed on the display. When the device
has selected the ideal, noise-free channel for connection, along with the
IR
message it
transmits the respective code of the channel to the handheld microphone and pairing
is realized. This is successful when the
UHF
(IR) sign on the handheld microphone
points towards the infra LED to the left of the
POWER
button. Position the handheld
microphone close to the front panel of the receiver unit. Pairing is complete, when
the microphone and the receiver unit displays show the same frequency. Repeat the
above steps for the second microphone as well.
2. MANUAL SETTING: Press and hold down the
˄
button for 2 seconds. The
CH
signal starts flashing on the display. Within 5 seconds, press repeatedly, or press and
hold down either of the
˅˄
buttons in order to select the desired channel (frequency).
The setting is stored after 5 seconds. This channel needs to be then transmitted to the
handheld microphone via the wireless infra connection. In order to do so, remove the
metal cap of the microphone, and point the
UHF
(IR) sign towards the infra LED to
the left of the
POWER
button, while holding it close to the receiver unit. Synchronize
the two devices using the
SET
button. This is successful when the microphone and
the receiver unit displays show the same frequency. Repeat the above steps for the
second microphone as well.
If the microphone is turned OFF, the battery status indication disappears and the
MUTE
message shows on the receiver unit’s display. Apply this method to mute either
one of the microphones.
•
It is recommended
to use
automatic
(
SCAN
) channel selection. Otherwise, the op-
erating range may be significantly reduced. When the operating range is exceeded,
the device automatically mutes the resulting noise (Squelch function).
• The two devices to be paired should be close to one another. In case of connection
problems, select another frequency, or turn the microphone and the receiver unit off
and back on again, or reposition the devices.
• The RF display of the receiver unit provides information on the existence of a stable
radio connection and the signal strength of the connection.
• The AF instrument indicates the level of the audio signal.
• 2x100 channels can be selected (0-99).
• The battery status of the handheld microphone can also be observed on the display
of the receiver unit.
• Walls, nearby electric appliances and moving bodies can disturb reception, or reduce
the operating range. In particular mobile phones, Wi-Fi routers, computers or larger
metal objects.
• Several microphone sets can be used in the same area, as long as various channels
are selected for each.
• A volume set too low results in higher noise, while a volume set too high will result
in distorted sound. The volume setting of the amplifier and the microphone receiver
should correspond. Ideal setting also depends on the position of the microphones.
PROTECTION AGAINST UNWANTED RESETTING
Upon the simultaneous pressing and holding down of the
˅˄
buttons for 2 seconds,
the lock symbol appears on the display. This prevents any unwanted pressing of the
setting buttons, thus the resetting of the device. This function is particularly useful
when unauthorized persons can also have access to the devices during use. Use the
same method to deactivate the lock function.
TIPS
• The antenna of the handheld microphones is located on the bottom. Therefore, avoid
holding the plastic cap of the microphones as this can suppress transmission.
• Do not move the microphone in the hands as it modifies the conditions of reception.
• Using colour coding labels, the sound engineer can identify and manage each micro
-
phone even from a distance.
• Frequencies around 800MHz may be noisier if, in the given geographical region, it is
also used by mobile phone stations.
• Avoid the presence of powered mobile phones, Bluetooth devices, television sets,
computers, Wi-Fi routers or other radio frequency equipment in the surroundings, as
these can disturb reception.
• The receiver unit should be at least 1 m above ground level. Do not mount the re
-
ceiver on walls, wall-mounted shelves, as this significantly deteriorates the conditions
of reception.
• If the microphone is positioned in front of or nearby the loudspeaker, pop noise may
be generated, which can damage the loudspeakers. It is best to place the micro
-
phone behind the soundbox. Increase the volume carefully during commissioning.
TROUBLESHOOTING
If there is no sound reception, or sound reception is noisy, check whether
- connection is according to instructions
- supply voltage is present and batteries are good
- the cables are undamaged
- amplifier settings are correct
- recommended distance was exceeded
- any nearby electric appliances are causing interference
- antennas are set vertically
- the plastic cap is covered
CLEANING
Before cleaning disconnect power supply by switching the device OFF and removing
the plug from the charger. Use a soft, dry cleaning cloth. Avoid the use of any aggres
-
sive detergents and liquids.
WIRELESS MICROPHONE SET


