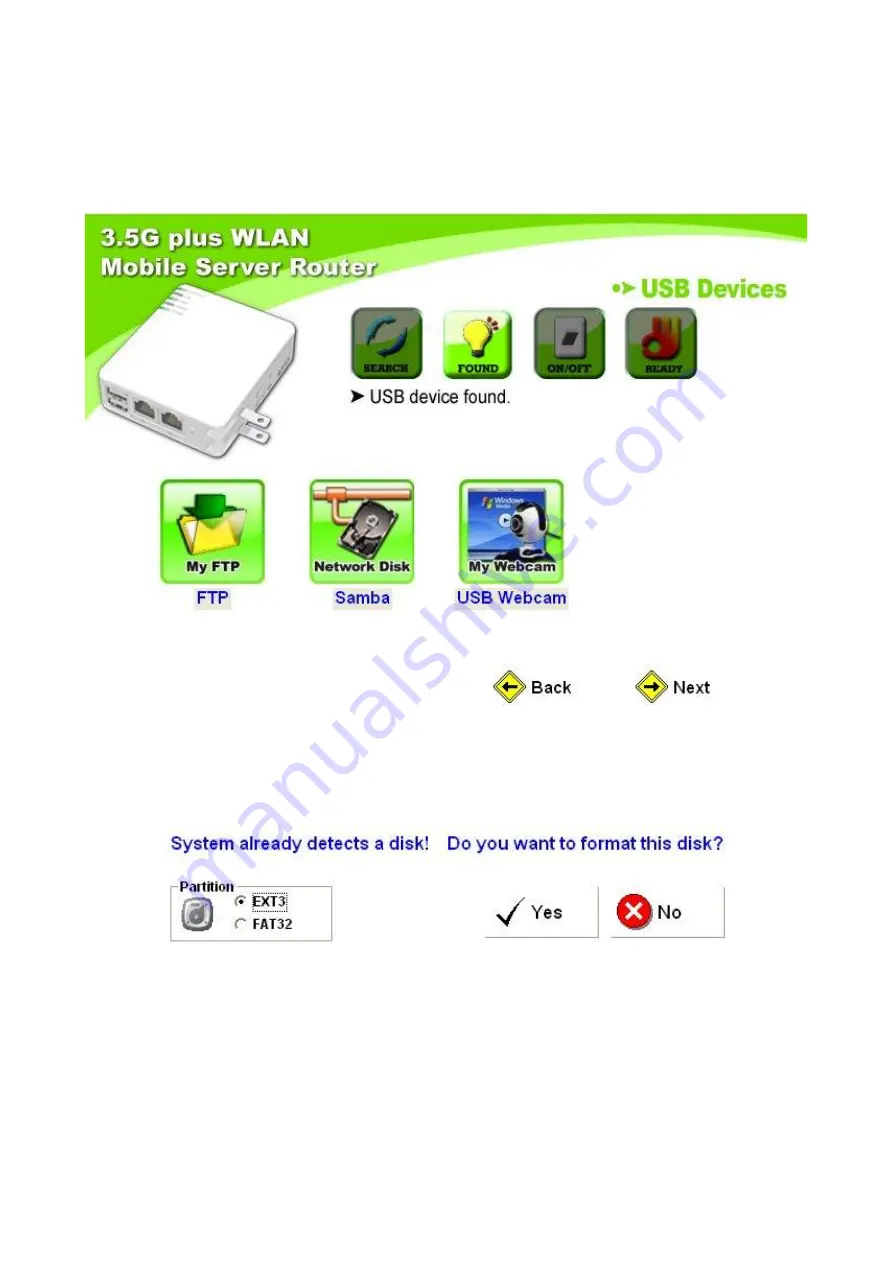
Solwise 3GWIFIMRW Скачать руководство пользователя страница 31

31

Version 1.0

Step 9.

The system can only detect at most 2 devices at a time and shows the relative

server icons as the example below. Please refer to

Chapter 5 Administrator

Optional Setup

 for further step.    Just click

Next

 to continue.

Step 10.

If a USB flash/drive is connected, the window pops up to enquire as follows. Click

Yes

or

No

 by demand.

<!> Disk format will erase all data within.

Step 11.

Please select to enable the server you need, and click on

Next

 to continue.

Содержание 3GWIFIMRW

Страница 1: ...1 Version 1 0 3GWIFIMRW 3 5G plus WLAN Wall Server Router Quick Setup Guide...

Страница 2: ...iguration utility provided with this product to check the current channel of operation and confirm that the devices operating in conformance with the spectrum usage rules for the European Community co...

Страница 3: ...eless Access Point Mode Setup 3 3 Wireless Client Mode Setup Chapter 4 Server Login 4 1 Server Login Setup 4 2 Administrator Login 4 3 User Login Chapter 5 Administrator Optional Setup 5 1 Quick Setup...

Страница 4: ...settings are back to default Ethernet Port 2 RJ 45 Ethernet 10 100 Ports USB2 0 Ports 2 USB Ports Power on the unit When Power Status Wireless indicator lights become solid the server router is ready...

Страница 5: ...et connection and USB devices 2 2 Install Easy Setup Step 1 After inserting the Install CD please click Install Utility on the auto run menu to start the installation Step 2 While the illustration bel...

Страница 6: ...rsion 1 0 Chapter 3 Administrator Complete Setup 3 1 Wireless Router Mode Setup Build up WAN and wireless LAN with 3 5G plus WLAN Mobile Server Router Step 1 Please switch to Router mode and plug in p...

Страница 7: ...p please select your Ethernet adapter for the internet connection If the operation mode is not switched properly the warning message will pop up Please power off the unit and check the switch Step 3 P...

Страница 8: ...P Setup Click DHCP as your Internet connection type If you re not sure please contact your Internet Service Provider ISP Here provides Backup of Connection function to indicate that when DHCP is disco...

Страница 9: ...hat when Static IP is disconnected and detected the system automatically provides HSDPA UMTS connection as backup The default interval between the two connection detection is 3 minutes and the range i...

Страница 10: ...ected and detected the system automatically provides HSDPA UMTS connection as backup The default interval between the two connection detection is 3 minutes and the range is from 1 to 3 minutes If 3 5G...

Страница 11: ...and detected the system automatically provides HSDPA UMTS connection as backup The default interval between the two connection detection is 3 minutes and the range is from 1 to 3 minutes If 3 5G signa...

Страница 12: ...ot sure please contact your Internet Service Provider ISP At this moment Backup of Connection is not available When 3 5G signal cannot be reached the system starts to search downward for 3 2 75 2 5G s...

Страница 13: ...eless network please follow the instruction and click on Next to continue The default Wireless_Mobile_Router is recommended Step 7 Please select to encrypt your wireless network or not If you wish not...

Страница 14: ...elow for each option Option 1 WEP As the illustration shown below select your encryption and key type from the drop down list Then enter the key and click Next when finished Or you can click Help for...

Страница 15: ...ext to continue Please read User Manual if you need more details Step 8 The system automatically detects the connected USB devices and lists them as the diagram shown below including document server w...

Страница 16: ...istrator Optional Setup for further step Just click Next to continue Step 10 If a USB flash drive is connected the window pops up to enquire as follows Click Yes or No by demand Disk format will erase...

Страница 17: ...elect to enable or disable your webcam server Step 13 Create user names passwords and authorize their access rights for each server at the same time then click Add Please click Next to finish when all...

Страница 18: ...18 Version 1 0 Step 14 When the following screenshot appears click Finish to end the quick setup...

Страница 19: ...reless Access Point Mode Setup While WAN is connected expand the network coverage with the unit 3 5G plus WLAN Mobile Server Router in AP mode doesn t support WAN and DDNS Step 1 Please switch to AP m...

Страница 20: ...p please select your Ethernet adapter for the internet connection If the operation mode is not switched properly the warning message will pop up Please power off the unit and check the switch Step 3 P...

Страница 21: ...word please enter your new password and click Next Or just click on Next to continue Step 5 Enter both AP and Gateway IP addresses as shown below or modify if necessary For more details please refer t...

Страница 22: ...lick Next to continue For more details please refer to User Manual Use the default of Wireless_Mobile_Router as recommended Step 7 Please select to encrypt your wireless network or not If you wish not...

Страница 23: ...e key and click Next when finished Or you can click Help for given examples For details please refer to the User Manual Option 2 WPA Please refer to the following graphic in explain Or you can click H...

Страница 24: ...rinter server etc The table indicates their operation status and other information Please click on Next to continue or Rescan to find any new devices Step 9 The system can only detect at most 2 device...

Страница 25: ...nected the window pops up to enquire as follows Click Yes or No by demand Disk format will erase all data within Step 11 Please select to enable the server you need and click on Next to continue Step...

Страница 26: ...mes passwords and authorize their access rights for each server at the same time then click Add Please click Next to finish when all accounts are completed Step 14 When the following screenshot appear...

Страница 27: ...function 3 5G plus WLAN Mobile Server Router in Client mode doesn t support WAN Step 1 Please switch to Client mode and plug in power Step 2 Please click on Easy Setup icon on your desktop to start th...

Страница 28: ...p up Please power off the unit and check the switch Step 3 Please select Administrator Complete Setup to start the configuration Please enter the default password admin and click Yes Step 4 To change...

Страница 29: ...29 Version 1 0 Step 5 Site Survey window will show all available APs please select one to connect then click Next If no AP is found please click Rescan...

Страница 30: ...Click Next to continue Step 7 In few seconds a connect status window will pop up Please click OK Step 8 Afterwards the system automatically detects the connected USB devices and lists them as the diag...

Страница 31: ...w Please refer to Chapter 5 Administrator Optional Setup for further step Just click Next to continue Step 10 If a USB flash drive is connected the window pops up to enquire as follows Click Yes or No...

Страница 32: ...elect to enable or disable your webcam server Step 13 Create user names passwords and authorize their access rights for each server at the same time then click Add Please click Next to finish when all...

Страница 33: ...33 Version 1 0 Step 14 Please click Finish to complete the client mode quick setup...

Страница 34: ...r this function users can manage their folders on different servers and create their own files Step 1 Please click on Easy Setup icon on your desktop to start the utility When the following window pop...

Страница 35: ...password admin and click Login to next step Step 2 The server list window shows the icons of previously enabled USB devices Please click each to find out more 4 2 1 My FTP Click My FTP to enter the FT...

Страница 36: ...to view recorded images in Webcam Record Files folder 4 2 3 Exit Close the server function utility window if you wish to go back to the main window And click Exit to log out the utility 4 3 User Login...

Страница 37: ...reviously enabled USB devices Please click each to find out more 4 3 1 My FTP Click My FTP to enter user s personal folder on FTP server Every authorized user can manage and store their files undernea...

Страница 38: ...folders on Samba Server and click on the folder needed for editing and management Note Only 2 icons show up at most 1 If a USB flash drive hard disk is connected and enabled the samba folder shows up...

Страница 39: ...r administrator to upload data and share with other users Click Anonymous to access those files and download them freely 4 3 4 Exit Close the server function utility window if you wish to go back to t...

Страница 40: ...respectively e g Document Server Webcam Server and Printer Server etc Step 1 Please click Easy Setup icon on your desktop to start the utility When the following window pops up please select your Eth...

Страница 41: ...window shows the connected devices if there s any Click on the icons to select the server you need Look for the illustrations below for each Step 3 1 Click My FTP to enable or disable FTP Server and...

Страница 42: ...42 Version 1 0 Step 3 2 Click My Webcam to enable or disable Webcam Server and then click Finish to exit...

Страница 43: ...rsion 1 0 Step 3 3 Click Account Create to add users and then click Finish to exit Step 3 4 Click DDNS to fill in the required information and enable this function Then click Finish to exit after comp...

Страница 44: ...5 2 Advanced Setup This optional setup allows administrator to manage via Web Please also refer to User Manual for thorough details Step 1 Please click on Easy Setup icon on your desktop to start the...

Страница 45: ...45 Version 1 0 Step 2 Please click on Administrator Optional Setup to enter Then enter the default password admin and click Yes Step 3 Please click on Advanced Setup to start the process...

Страница 46: ...46 Version 1 0 Step 4 A new web browser window pops up for the detailed setup please click on Administrator for further settings Also read User Manual for your reference...

Страница 47: ...d allows monitoring from WAN at any time Please see illustrations below and read User Manual for more details 5 2 1 1 Webcam Remote Supervision Administrator needs to activate the function from Webcam...

Страница 48: ...d e g http 210 68 117 196 webcam html Meanwhile put the user name and password in the login screen to enter and view the real time image 5 2 2 Sharing Printer and Remote Printing Printing is still ava...

Страница 49: ...refer to User Manual for more details 5 2 3 1 IP Address Filter MAC Address Filter URL Filter and filter schedule management It allows administrator to manage the Internet usage e g Restriction on In...

Страница 50: ...It is not recommended unless the significant fault is found The manufacturer will not be responsible for any operational misuses Please download the upgraded firmware to your hard drive first then upd...

Отзывы: