Solt SR5-BPR Скачать руководство пользователя страница 5

8

9

·

[E3 dUPT]


is displayed on the screen.

⑷ Press SET button,and then set value is saved.

⑸ Press MENU button, then it turns to standby for reception status.

MENU

ESC

◀              ▶

SET

PWR

MENU

ESC

◀              ▶

SET

PWR

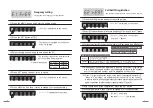
Setting of the time for prevention 

of duplicate reception

·The function to restrict reception of the same call bell
   during set time.

·

[E1 FrEq]


is displayed on the screen.

·

[E3 dUPT]

 is displayed on the screen.

·Set number is displayed on the screen.

⑴ Press the MENU button and enter the setting mode.

⑵ Browse [E3] mode with UP (▲) button and press SET button.

⑶ Set the desired set value with up/down button (▲▼).

MENU

ESC

◀              ▶

SET

PWR

MENU

ESC

◀              ▶

SET

PWR

MENU

ESC

◀              ▶

SET

PWR

·

[-------]

 is displayed on the screen.

Default setting is 5 seconds 

and [005] is 

displayed on the screen.

·

[E4 TXdT]

 is displayed on the screen.

·

[-------]

 is displayed on the screen.

Transmission delay time setting

·The function to set delay time for transmitting 
   after receiving call bell.

·

[E1 FrEq]


is displayed on the screen.

·

[E4 TXdT]

 is displayed on the screen.

·Set number is displayed on the screen.

⑴ Press the MENU button and enter the setting mode.

⑵ Browse [E4] mode with UP (▲) buttons, and then press SET button.

⑶ Set desired set value with up/down button (▲▼). 

MENU

ESC

◀              ▶

SET

PWR

MENU

ESC

◀              ▶

SET

PWR

MENU

ESC

◀              ▶

SET

PWR

⑷ Press SET button, and then set value is saved.

⑸ Press MENU button, then it turns to standby for reception status.

MENU

ESC

◀              ▶

SET

PWR

MENU

ESC

◀              ▶

SET

PWR

Default set value is 2 seconds


and [020] is 

displayed on the screen.

Содержание SR5-BPR

Страница 1: ...nk you for purchasing Solt wireless calling system products Please read this user s quide carefully before using and follow the instructions Specification and instructions are subject to change withou...

Страница 2: ...is needed contact service cen ter It may cause fire or electric shock not press or scrape the screen surface strongly with hand or sharp object nail pencil pen etc The screen surface can be damaged or...

Страница 3: ...F button DC12V 1A Picture of bracket mounting Back side cover Type of set mode User can set following modes with user set button E1 FrEq Frequency setting The function to set the frequency of the repe...

Страница 4: ...to be relayed E1 FrEq is displayed on the screen E2 rEgT is displayed on the screen and then 1 flashes Press the MENU button and enter the setting mode Select E2 mode with Upward button and press SET...

Страница 5: ...PWR MENU ESC SET PWR is displayed on the screen Default setting is 5 seconds and 005 is displayed on the screen E4 TXdT is displayed on the screen is displayed on the screen Transmission delay time s...

Страница 6: ...ption status MENU ESC SET PWR E5 dELE is displayed and then is displayed The call bell ID selected is displayed on the screen E6 NOrX is displayed and then is displayed No Receive bell ID setting The...

Страница 7: ...s shown in the picture it is most reliable to install the product on the location A and in case of location B even though it is located within the range of reception rate it is unstable location becau...

Отзывы: