Solt SOLTPEPEATER Скачать руководство пользователя страница 2

4

5

Rep

eater

Rep

eater

/P3FDFJWF

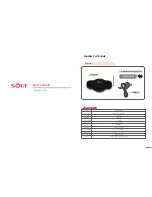
① Folding antenna : 180 degrees pivot 

④ Setting buttons

③ Wall mount holes :
    Refer to item 4 of Installation Guide in page 53.

⑤ Display

⑥ Adapter input: DC12V 1A (Use the supplied adapter)

② Bell number indicator : activated led number varies by different models.

Limited accessary warranty: malfunctioning of
supplied adapter during its use is not covered by
manufactures' warranty.

Purchasing an adapter with AC110~22OV input, 
DC12V 1A output is recommended.

PWR 

Red led indicates power is on

RX

Blinking Red led indicates bell model

TX

Blinking Green led indicates pager model

MENU / ESC

·Menu button in setting mode
· alphabetic and numeric changing button

▲  ▼

·up /down

◀   ▶

·left / right buttons

SET / PWR

·Storing button for set value
·Dower button

[Wall mount bracket installation]

Missed call icon

.&/6

&4$

4&5

183

/P3FDFJWF

① Retractable antenna

⑤ Call number Display

② Status indicator

[Back cover]

④ Setting buttons

⑥ Adapter input 

    (DC 12V 1A)

Name of each section

③ Holes for wall mount

Front

Back

Input : AC110~220V

Output : DC12V 1A

Содержание SOLTPEPEATER

Страница 1: ...cy MHz 433 0500 434 7900 Freq Stability 5 ppm Data Rate 1800 bps Channel space 12 5 KHz Modulation FSK 3KHz Output Power 10mW Max Sensitivity 118dBm at 12dB Power Supply DC 12V 1A Adapter Dimension mm...

Страница 2: ...an adapter with AC110 22OV input DC12V 1A output is recommended PWR Red led indicates power is on RX Blinking Red led indicates bell model TX Blinking Green led indicates pager model MENU ESC Menu bu...

Страница 3: ...install fix the mount Installation guide Location Transmitter must be installed with in 100 reception area This product is needed to avoid moisture and water It can be cause of breakdown Recommend to...

Страница 4: ...main transceiver CPr Extends pager receiving range by relaying main transceiver data to pager Cbr or CPr is displayed Repeater setting modes Listed items below can be set by using user setting buttons...

Страница 5: ...To set another receiving mode repeat steps 4 to 5 Press MENU button MENU ESC SET PWR ST r5 is displayed and ready for reception P 3FDFJWF e g Call number 200 is set to not receive when No Receive icon...

Страница 6: ...Registered call number is displayed Selected call number is displayed ST r5 is displayed and ready for reception Press SET button Press MENU button MENU ESC SET PWR MENU ESC SET PWR Repetition call se...

Страница 7: ...the screen and the number stop blinking ST r5 is displayed and ready for reception Call number registering mode Registers new call numbers E6 Breg is displayed Press button 5 times Press SET button Pr...

Страница 8: ...n 6 times Press SET button Press buttons Sets the desired number MENU ESC SET PWR MENU ESC SET PWR MENU ESC SET PWR MENU ESC SET PWR 0 is default value transmits as soon as receiving a call ST r5 is d...

Отзывы: