


12
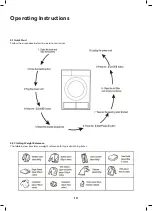
7. Options
7.1 Delay Function
Use this delay function to delay the drying program from
0 to 24 hours. The delay time means the program will
start after X hours. When the delay program starts, the
time starts to decrease on the display and the “clock” icon
blinks on your appliance display.
To activate the delay function:
— Load your clothing articles into your appliance and close
the door.
— Press the On/Off button and use the program selector
dial to select your desired drying program.
— You can select the “Anti-Crease” or “Signal” functions by
pressing the corresponding buttons, according to your
needs.
— Now press the “Delay” button.
— Continue to press the “Delay” button to set your desired
delay time.
— Once your desired delay time is displayed, simply
press the “Start/Pause” button and the dryer will
automatically begin your selected drying program at
the completion of your set delay period.
— If you press the “Start/Pause” button once again, the
delay function will be paused. To cancel the delay
function, press the “On/Off” button.
7.2 Time Function
When the Warm, Cool or Refresh drying programs are
selected, the Time button can be used to adjust the drying
time. Each press of the “Time” button will adjust the drying
time in 10 minute increments.
7.3 Intensity Function
Your appliance features a drying intensity control,
allowing you to adjust the dryness level of your laundry.
The Intensity function has four levels, indicated by the
icons below.
— The drying time increase by 3 minutes with each level.
— The Intensity function can only be activated before the
drying program is started.
— Press the Intensity button repeatedly to select the
desired intensity (and drying time).
— The Intensity function can be used for all programs
except Cotton Iron, Quick, Synthetic Iron, Baby Care,
Warm, Cool and Refresh.
7.4 Your Cycle Function
The Your Cycle function can be used to define and save
your favourite drying program for easier selection in the
future (i.e. Use this function to save your most frequently
used drying settings).
To set your Your Cycle function:
— Use the program selector dial to select your required
program and select any other drying functions.
— Press and hold the “Intensity” button for 3 seconds until
the display flashes, indicating that your desired
program has been saved.
— To use your preset Your Cycle, simply turn the program
selector dial to the Your Cycle position and press the
“Start/Pause” button to begin.
— If you wish to change your Your Cycle settings, simply
repeat the steps above at any time.
7.5 Light Function
Your Heat Pump Dryer has an integrated light inside the
drum to assist with viewing your clothing.
Press the “Light” button to activate the internal light
for 3 minutes when the door is closed or the dryer is in
operation, or 1 minute when the door is open.
7.6 Signal Function
This function allows you to turn the audible tone on or
off, to indicate that your drying program is complete. By
default the audible signal is set to On.
When the Signal function is on, your appliance will make
an audible tone when:
— The extra function buttons are pressed
(i.e. Speed Dry, Anti-Crease, etc).
— If the dryer is operating and the program selector knob
is turned, the appliance will make an audible tone to
alert the user that an invalid choice has been made.
— At the completion of a drying program, an audible tone
will sound.
7.7 Anti-Crease Function
At the end of a drying program, the anti-crease operation
time is 30 minutes (by default) or 120 minutes (if selected).
The “Anti-Crease” light shall illuminate when the function
is selected. This function helps to prevent the laundry from
creases. The laundry can be removed during the anti-
crease phase. All programs have the ability to use this
function, except for Cool, Refresh and Wool.
7.8 Child Lock
Your appliance features a child lock, preventing children
from pressing keys or changing the dryers operation.
To activate the child lock:
— When the appliance is in operation, press and hold the
“Anti-Crease” and “Signal” buttons simultaneously for 3
seconds. Once activated, the display will show the Child
Lock icon.
— Whilst the Child Lock is activated, pressing of buttons
won’t effect the dryer.
— To deactivate the Child Lock, simply press and hold the
“Anti-Crease” and “Signal” buttons simultaneously for
3 seconds. The Child Lock indicator icon will switch off
the display.
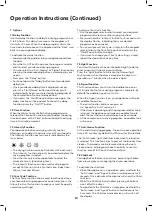
Operation Instructions (Continued)