background image

SoloChina Co.,Ltd                                                                                                                   

www.solochina.com.cn 


12 

ignition, connect the yellow wire to the “+” pole of the batery. Please note: The fuse is 
used for protecting the battery from shortcut so you need to connect the fuse near to the 
battery.  


NOTE 

1


The DVR uses DC power input, please be very careful when connecting to the “+” and 
“-” of the power supply. 

2


Wide voltage range of 8V-32V for the DVR. The DVR may be damaged if the voltage 
comes too high. And the DVR may not work if the voltage comes too low. 

3


Power of the DVR should be supplied by the car battery. 

4


Power consumption of the DVR can be 60W when the engine starts. All the cables for 
connecting from power to the DVR should be thick enough for current over 5 Amperes.   

5


To protect the battery from being damaged of short circuit on the cable, the fuse 
should be placed very closed to the car battery. 

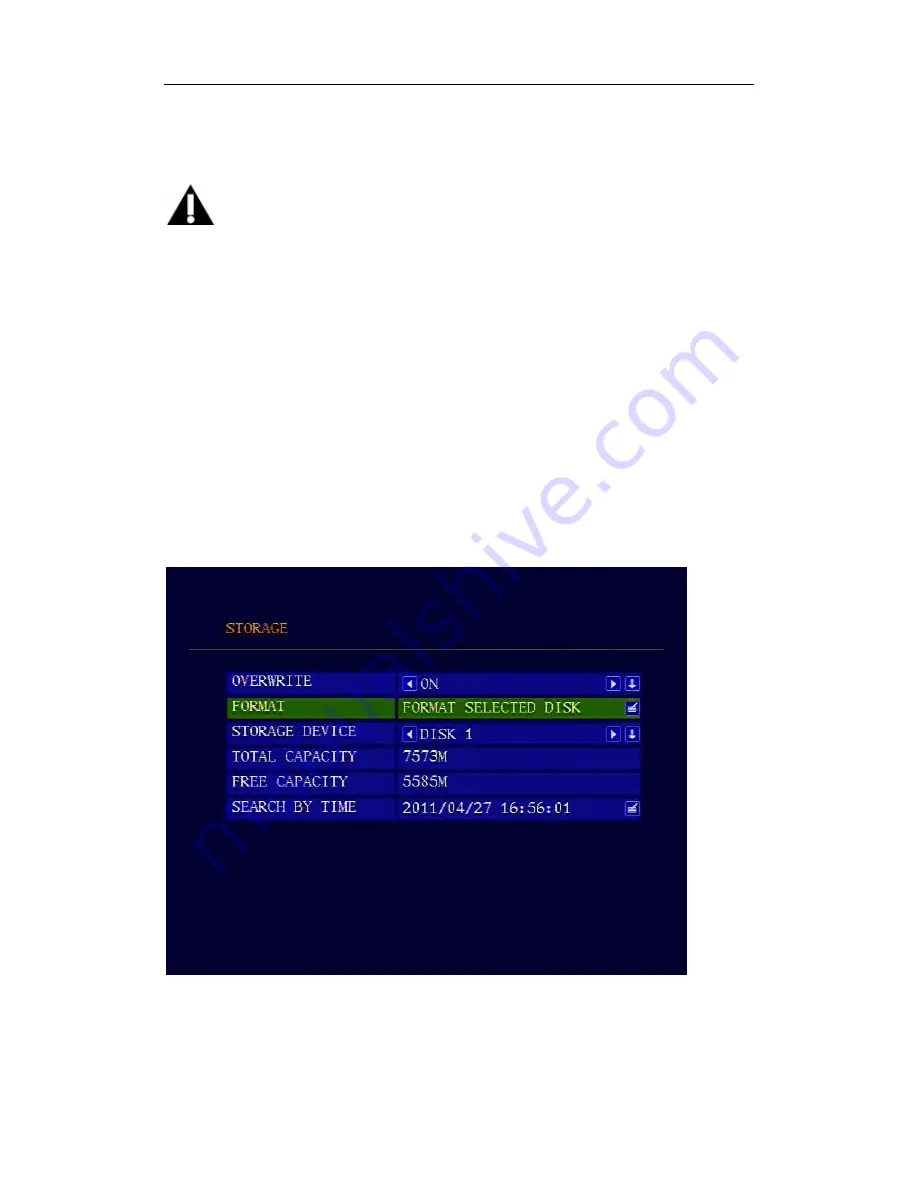
Step 4, format the Hard Disk 

You need to format the Hard Disk before using it. Press    <MENU> to enter the main menu 

and select “FORMAT” in “STORAGE” sub menu. 


Choose “YES” to format the Hard Disk. The format process will take some time and you will 
see the capacity of the Hard Disk after formatting. 

Содержание H850

Страница 1: ...al The Main Purpose Help the investigation of the scene for traffic accident Gather evidence for violent crimes blackmail and robbery Facilitate the management of company vehicles GPS positioning Full view backing car function Speed alarm Home security CCTV ...

Страница 2: ...ed maintenance man to repair when needed 12 The device can only be installed horizontally Installed vertically or out of the horizontal could hurt person or damage the device or and its parts Warning This DVR is NOT of waterproof to prevent it from any accident of fire or electric shock please do NOT put any container with water on the device or nearby Do not expose the device to moisture or extre...

Страница 3: ...camera 11 Step 3 Connect to power supply 11 Step 4 format the SD card 12 Step 5 Choose recording quality 13 Step 6 start recording 13 4 Operations 14 4 1 Play back the files on SD card 14 4 2 Manage the power 16 4 3 Alarm recording 18 4 4 Get speed from GPS 18 4 5 Get speed from speedometer 18 5 Appendix cables 20 5 1 Power supply 20 5 2 AV cables 20 5 3 Signal cables 21 6 Specification 21 7 List ...

Страница 4: ...n recording Support alarm recording recording can be set to star open the door Support timer switch temer recording Speed and Vehicle status recording Support 1 channel speed 3 way universal sensor inputs can be simultaneously displayed and recorded license plate vehicle speed braking steering Ming sirens and other traffic state Support over speed alarm Achieve reversing video automatically switch...

Страница 5: ...camera with stable 12VDC power DVR can detect the short cut on power circuit Can use ignition to control the power Configurable power timer after ignition is off Automatic event trigger schedule or motion recording options Can record speed with audio and video Support overspeed alarm Support 3 sensors can record brake return right turn left turn light status into the record file GPS allows for veh...

Страница 6: ...DVR is running The DVR will be turned off when it reached the Ignition Power Off Delay time Blinking Off The DVR is turned off It will restart if POWER button is pressed on the remote Alarm light yellow Description On Alarm indication such as overspeed Off No alarm System light yellow Description On In recording Don t remove the SD card in this status Please press stop on the remote to stop record...

Страница 7: ...V input 3 AV input 4 AV output including audio output video output and power 1 IR Cable 1 speed sensor 3 universal sensors 2 3 Remote 0 power 1 Numbers 2 Audio 3 Up 4 Left 5 Menu 6 Esc 7 Down 8 Pause 9 Previlus 10 Fast Backward 11 Alarm 12 REC 13 Video 14 Stop 15 Right 16 Play 17 Ok 18 OSD 19 Next 20 Fast Forward 21 ...

Страница 8: ...n the different menu item 3 Press OK to save and exit the current menu Press ESC to cancel and exit the current menu If you modify something in the menu recorder will prompt a window to ask you to save or cancel your modification 4 Press VIDEO to toggle among different video channel 5 Press AUDIO to toggle among different audio channel 6 To delete character in the edit control you can press Left 7...

Страница 9: ...h SATA interface please do as following steps 1 Remove screws on the back side of the hard drive case 2 Take the SATA connector out of the hard drive case 3 Connect the connector with the hard drive 4 Put the hard drive back to the hard drive case Please note the hard drive should be put to the mounting bracket inside of the hard drive case ...

Страница 10: ...ure to fix the hard drive Please note that under pressure after the test block shake the hook if the hard disk is not fixed firmly because the vibrations may cause damage to the hard disk hard drive data will loss 6 Install the connector back to the back side of hard drive case Then the SATA hard drive is installed into the hard drive case ...

Страница 11: ...ion Figure A small camera is connected The cable use for DC 3 3V camera Figure B is connected ordinary camera The cable use for DC 12V camera Step 3 Connect to power supply Connect the red wire to the pole of the battery and black wire to the pole of the battery The yellow wire is for connecting the ignition signal If you don t need to use ...

Страница 12: ...tage comes too low 3 Power of the DVR should be supplied by the car battery 4 Power consumption of the DVR can be 60W when the engine starts All the cables for connecting from power to the DVR should be thick enough for current over 5 Amperes 5 To protect the battery from being damaged of short circuit on the cable the fuse should be placed very closed to the car battery Step 4 format the Hard Dis...

Страница 13: ...Step 6 start recording Press REC on the remote to start recording There will be one red dot on each channel indicating the recording The recorder will record all of the channel by default If you need to record only one channel use UP DOWN LEFT RIGHT or number key 1 2 3 4 to select one channel and press REC to recording Quality Resolution Maxiam bit rate Bit s Minumum bit rate Bit s Audio Bitrate B...

Страница 14: ...lay back the recent record file Press the PLAY button on the remote the recorder will play back the file for first channel You can also use UP DOWN LEFT RIGHT or number key 1 2 3 4 to select the channel and press PLAY to play the channel you want to play You can also press VIDEO to toggle the full screen of one channel Press Next Previous to select the next or previous file The play status is indi...

Страница 15: ...k the file at a specific time Press MENU to enter the main menu and select SEARCH BY TIME in the STORAGE sub menu Select the Vedio dir you want to seek and choose OK The recorder will list the record file around the time you set Then press PLAY to play the file ...

Страница 16: ... maximum duration for the power off delay is 86400 seconds 24 hours If the power off delay is set to 0 the recorder will turn off immediately if the ignition is off If the vehicle is using low level as ignition you need to set the ignition signal to low level 2 Turn on off the recorder automatically 1 Connect the DVR to the battery Please note that you need to connect the yellow wire ignition wire...

Страница 17: ...ER ON and POWER OFF in the Power sub menu and set the time you want to turn on off the recorder If you don t need to turn on off the recorder automatically set the POWER ON and POWER OFF time to 00 00 Fuse Recorder Red wire Yellow wire Black wire Battery ...

Страница 18: ...r Alarm 1 SENSOR2 Gray Sensor Alarm 2 SENSOR3 Gray Sensor Alarm 3 SPEED Purple Speed sensor pulse signal input 4 4 Get speed from GPS 1 DVR Build in GPS model Please send a better signal reception on the GPS antenna position 2 Choose menu item Vehicle Setup then choose the Speed to be From GPS 3 The speed will be displayed on the right bottom of the screen If you need the speed to be MPH other tha...

Страница 19: ...SoloChina Co Ltd www solochina com cn 19 Speed sensor input wire on DVR Label Color Description SENSOR Purple Speed sensor input 2 Connect 1 3 Connect2 Speed sensor input Speed sensor input ...

Страница 20: ... Color Description 2 RED of power supply 4 YELLOW Ignition signal Connect this wire to of power supply if you don t use ignition to control the power 6 BLACK of power supply 5 2 AV cables Audio and video connection interface in the DVR back panel 1 AV input cables Mark Description ...

Страница 21: ... 2 AV output cable Mark Description Yellow VO Video out White AO Audio out Black 12V Power output for camera 12 VDC Maximum current 0 5A 5 3 Signal cables Mark Description Color Description 1 IR Black IR control line 2 SNR2 Grey Sensor 2 3 SNR3 Grey Sensor 3 4 SPEED Purple Speed sensor 5 SNR1 Grey Sensor 1 6 Specification SPECIFICATION ITEM H850 ...

Страница 22: ...711 STORAGE 1 8 inch Hard drive Just for 5 mm thickness SD card external USB device memory stick or hard drive STORAGE FILE FORMAT AVI SENSORS 1 speed sensor 1 ir port 3 sensors INTERFACE GPS Built in GPS model can record GPS information along with video and audio GPS data format NEMA0183 Baudrate 4800bps PLAYER Specially designed player for the DVR SOFTWARE THIRD PARTY SOFTWARE Windows Media Play...

Страница 23: ...ard Accessories Item Description Quantity 1 Disk reader 1 pc 2 antivibration mounting shock mount 1 pc 3 AV Input Cable 2ps 3 AV Output Cable 1pc 4 Integration cable 1pc 5 Remote controller 1 pc 7 Fuse box 1pc 8 2 Amp fuse 2pcs 9 Screw for DVR installation 4 pcs 10 Hard Drive Case w o Hard Drive 1pc 11 Power cable 1 pc 12 gps antenna 1 pc ...

Отзывы: