background image


- 40 - 


ES 


GB 


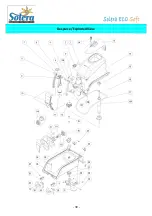
REFERENCIA 

CODES 

DESCRIPCIÓN 

DESCRIPTION 

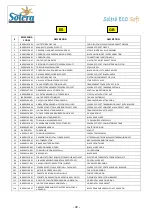
B0004107-002 

JUNTA TÓRICA OR2106 

FOOD SYLICON SLEEVE HOLDING GASKET OR2106 

B0004101-002 

MANGUITO SOLERA ECO SOFT 

SOLERA ECO SOFT SLEEVE 

B0000110-001 

PASADOR CILINDRICO 4X35MM INOX A2 

STEEL CYLINDRICAL PLUG 4X35MM 

B0003108-002 

CONEXIÓN LEVA DERECHA NYLON NEGRO 

BLACK NYLON RIGHT LEVER CONNECTION 

B0003106-001 

CONEXIÓN LEVA 

CONNECTIONS JUNCTION AXSIS 

B0003111-001 

JUNTA SILICONA  DE156 

SILICON TAP RELIEF GASKET DE156 

B0003109-003 

PISTON GRIFO COMPLETO SOLERA ECO SOFT 

SOLERA ECO SOFT COMPLETE DRAIN PISTON 

P0006105-001 

TORNILLO M4X10MM INOX 

STEEL SCREW 

B0003107-002 

CONEXIÓN LEVA IZQUIERDA NYLON NEGRO 

BLACK NYLON LEFT HANDLE BRIDGE 

10 

B0003120-001 

PALANCA NEGRO SOLERA ECO SOFT 

SOLERA ECO SOFT BLACK HANDLE 

11 

B0003112-002 

JUNTA TORICA OR3118 

PISTON SILICON GASKET OR 3118 

12 

B0003101-001 

VÁLVULA ESTRELLA SOLERA ECO SOFT 

STAR SUPPLY VALVE 

13 

B0006109-002 

TAPA DEPÓSITO SEF CON BLOQUEO 

TRANSPARENT COVER WITH KEY LOCK 

14 

B0000102-003 

DEPÓSITO TRANSPARENTE SOLERA ECO SOFT 

SOLERA ECO SOFT TRANSPARENT TANK 

15 

M0000107-001 

ABRAZADERA PALA HORIZONTAL 

VERTICAL BLADE FIXING RING 

16 

B0000106-001 

EJE DE TRANSMISIO CON TUERCA INOX 

STEEL SHAFT WITH STEEL NUT 

17 

L0000106-001 

JUNTA DE DEPÓSITO BB/SEF 

TANK GASKET BB/SEF 

19 

M0000104-001 

CASQUILLO ARBOL DE TRANSMISION 

TRANSMISSION SHAFT BUSHING 

20 

B0000103-004 

ARBOL DE TRANSMISION SEF CON CASQUILLO 

SOLERA ECO SOFT TRANSMISSION SHAFT WITH BUSHING 

21 

B0004102-003 

SOLERA ECO SOFT PALA HORIZONTAL 2017 VERS. 

SOLERA ECO SOFT HORIZONTAL AUGER 2017 VERS. 

22 

A0000114-001 

JUNTA ARBOL DE TRANSMISION  

TRANSMISSION SHAFT GASKET 

23 

M0000120-001 

TUERCA CUADRADA D5 HIERRO ZN UNI 5597 

D5 SQUARE NUT 

24 

M0006103-003 

BISAGRA POSTERIOR NEGRO 

BLACK REAR HINGE        

25 

M0001101-001 

TORNILLO GALVANIZADO 5X12  

TE GALVANIZED SCREW 5X12 

26 

B0002101-002 

EVAPORADOR SOLERA ECO SOFT NEGRO 

SOLERA ECO SOFT COMPLETE BLACK TANK 

27 

M0000105-001 

ABRAZADERA ARBOL 

SHAFT FIXING RING 

28 

DADOD.6ZFL 

TUERCA M6  

M6 NUT 

29 

A0000115-001 

TORNILLO M5X20MM 

SCREW TE  M5X20MM 

30 

B0000117-001 

PASADOR CON ROSCA + TUERCA M3 SEF 

KIT SCREW+NUT M3 BRUSHLESS/TRANSMISSION SEF 

31 

B0005102-001 

MOTORREDUCTOR 

BRUSHLESS GEARMOTOR 24VDC 

32 

M0006115-003 

BISAGRA ANTERIOR NEGRO 

BLACK FRONT HINGE       

33 

M0006102-003 

GANCHO BISAGRA NEGRO 

BLACK HINGE HOOK    

34 

M0006119-001 

TORNILLO FIJACIÓN M5X25mm 

SPLINED KNOB 

39 

M0006116-003 

BASE NEGRO 

BLACK BASE       

55 

B0005101-001 

TERMOSTATO ELECTRONICO PT1000 SOLERA ECO SOFT 

ELECTRONIC THERMOSTAT PROBE COMPLETE 

94 

B0006113-001 

CLAVE PARA DESBLOQUEAR TAPA DEPÓSITO SEF 

COVER UNLOCK KEY 

98 

A0000117-001 

CASQUILLO MOTORREDUCTOR / ALBERO 

GEAR MOTOR BUSHING 

104 

B0004113-001 

SOLERA ECO SOFT PALA VE CASQUILLO 

SOLERA ECO SOFT VERTICAL AUGER + BUSHING 

107 

B0003118-001 

MUELLE DE CIERRE DEL GRIFO 

TAP CLOSING SPRING 

108 

B0003115-001 

CHAVETA DE BLOQUEO DEL MUELLE  

SPRING LOCKING PIN  

109 

B0003119-001 

SOPORTE DE REDUCCIÓN DE APERTURA DEL GRIFO  

OPENING TAP REDUCTION BRACKET  

111 

B0004115-001 

ANILLO DE FIJACIÓN DE ENGRANAJE HORIZONTAL 

HORIZONTAL GEAR FIXING RING 

112 

B0004116-001 

JUNTA DE ENGRANAJE HORIZONTAL 

HORIZONTAL GEAR GASKET 

114 

B0004114-007 

PARES DE ENGRANAJES CÓNICOS PA6FV+POM-C 
HEXAGON 

BEVEL GEAR PAIRS PA6FV+POM-C HEXAGON 


Содержание ECO Soft

Страница 1: ... ENGLISH ESPAÑOL MANUAL DE USO Y MANTENIMIENTO USE AND MAINTENANCE MANUAL ...

Страница 2: ...ctrico 34 Sistema Frigorífico 36 Esquema de Despieze 38 Códigos de Descripción 39 Certificado de Garantía 43 Declaración de conformidad 45 E Index A quality choice 19 Instructions and general warnings 20 Installation of the machine 21 Cleaning 22 Condenser cleaning procedure 24 Pressure switch refit procedure 24 Controls and signals 24 How to produce Soft Ice Cream 25 Keypad lock 26 Product dispen...

Страница 3: ...ación día a día Gracias a nuestra estrategia de innovación nuestra empresa es hoy en día considerada como una de las empresas líderes en el campo de la tecnología avanzada Por eso trabajamos para intentar ser cada vez más y más eficientes en administración y dirección de nuestra empresa cumpliendo con los estándares de la normativa ISO 9001 2000 Los clientes y sus necesidades son nuestro objetivo ...

Страница 4: ...r 3 4 liters 1gallon 712x276x471 28X10 86X18 54 420W 220 230Volts 50Hz 530W 115Volts 60Hz 420W 220Volts 60Hz Blanco Negro Siga cuidadosamente las instrucciones de montaje consérvelas para un futuro montaje El fabricante declina cualquier responsabilidad del daño derivado del incumplimiento de las siguientes instrucciones Instale la máquina siguiendo las instrucciones de montaje La potencia usada d...

Страница 5: ... 4 ESPAÑOL A Grifo B Módulo electrónico C Bandeja de goteo D Tapa E Depósito transparente F Interruptor principal ...

Страница 6: ...o Lea cuidadosamente las siguientes instrucciones antes de la instalación de la máquina Advertencia Esta máquina debe ser solo usada para el uso indicado por el fabricante el uso de la misma para cualquier otro propósito puede resultar altamente peligroso Instalación Se recomienda que la instalación sea efectuada por personal cualificado El fabricante no se hace responsable de cualquier circunstan...

Страница 7: ...co lejía con las siguientes proporciones 10grs 1 2 cucharadita de lejía por cada litro de agua Aclare con agua templada Una proporción mayor de lejía podría ser dañar las palas Si las piezas plásticas son lavables asegurese de que la temperatura no es mayor a 60 C o 140 F ya que podrían dañarse No utilice productos abrasivos en polvo Para conseguir que su máquina dure el mayor tiempo posible es mu...

Страница 8: ...ndicados en la imagen 14 mecanismos de engranajes y zona frontal de la pala horizontal para evitar cualquier posible ruido pitido proveniente de la fricción entre dos elementos plásticos Humedezca el depósito antes de colocarlo en su posición original Tenga mucho cuidado e inserte el depósito en cada una de las juntas de las esquinas posteriores Vuelva a montar la máquina Desmontaje de la junta de...

Страница 9: ...bicada cerca de un foco de calor y su temperatura interna se incrementa 3 La circulación de aire está obstruida Resuelva el problema y resetee el interruptor de presión localizado en la parte derecha posterior de la máquina cerca del interruptor general como se muestra en la imagen 17 Si la luz roja se apaga significa que la operación se ha efectuado con éxito Controles y Señalizaciones dentro del...

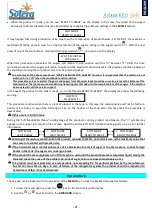
Страница 10: ... la unidad de control Use las teclas o para encontrar en la pantalla TEMP LIM MIN TLI Pulse la tecla para confirmar y ver la temperatura que ha sido programada en el panel de control electrónico Si el proveedor de su producto no le ha aportado instrucciones claras usando la tecla podrá bajar los valores TLI a 8 5 C 16 7 F Pulse la tecla para confirmar Para salir del menú pulse la tecla En este cas...

Страница 11: ...ito esté listo por ejemplo Modo Soft LISTO PARA SERVIR puede que aparezca la siguiente advertencia en la pantalla Este procedimiento se activa cuando hay poca cantidad de producto en el depósito En este caso la electroválvula estará deshabilitada durante 5 minutos para evitar la formación de una capa de hielo en la parte inferior del depósito después de este tiempo el procedimiento quedará desacti...

Страница 12: ... que una vez abierta deja el que el producto pase a un habitáculo Una vez lleno éste se podrá servir el producto en el recipiente que vaya a servir el helado soft Cuando se esté sirviendo el producto las palas elevaran su velocidad de rotación a 70rpm volverán a su velocidad habitual transcurridos 20 segundos de haber cerrado el grifo llave de paso La capacidad del habitáculo es de aproximadamente...

Страница 13: ...do la fecha y hora de su restaurante o bar siguiendo los siguientes pasos 1 Pulsa la tecla del panel de control electrónico para ver las opciones de menú 2 Pulse o hasta que vea FECHA en su pantalla 3 Manteniendo pulsada la tecla verá la fecha en la pantalla del panel electrónico 4 Ajuste la fecha correcta si fuera necesario pulsando las teclas o para aumentar o disminuir los valores y pulse la te...

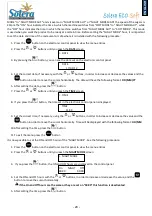
Страница 14: ...a ver las opciones del menú 2 Pulse las teclas o hasta que vea en al pantalla TEMP DEPOSITO 3 Si pulsa la tecla en la última línea aparecerá la temperatura del producto A continuación se muestra un ejemplo donde la temperatura es 6 4 C 20 5 F 4 Anote la temperatura 5 Pulse la tecla para volver a la pantalla anterior 6 Pulse las teclas o hasta que vea en la pantalla TLI 7 Pulse la tecla para ver la...

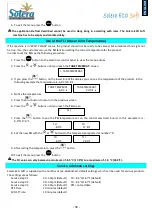
Страница 15: ...gundos o si la tecla vuelve a ser pulsada saldrá automáticamente del menú Cuando esto ocurra la unidad de control electrónico volverá a la pantalla anterior 2 Use las teclas o hasta ver en la pantalla SERVICE 3 Mantenga apretada la tecla por al menos 6 segundos o hasta que aparezca en la pantalla la opción del primer submenú El texto de la pantalla parpadeará y aparecerá velocidad V1 que es la vel...

Страница 16: ...PERE POR FAVOR a LISTO PARA SERVIR Aunque el modo LISTO PARA SERVIR aparezca en la pantalla la electroválvula estará activada ya que está controlada por TIEMPO EV OFF la quinta opción del submenú En el modo TIEMPO EV OFF TIEMPO RST la máquina pasa de ESPERE POR FAVOR a LISTO PARA SERVIR que coincide con la desactivación de la electroválvula El valor programado por defecto es TIEMPO RTS 10 min a Pu...

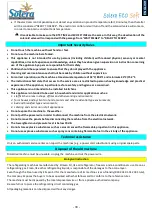
Страница 17: ...E POR FAVOR a LISTO PARA SERVIR IMPORTANTE Reglas de Seguridad No toque la máquina con las manos o pies mojados No utilice la máquina cuando esté descalzo El uso de esta máquina no está previsto para personas con discapacidades o niños problemas de capacidad sensorial o mental o sin experiencia y conocimiento a no ser estén supervisados o instruidos por una persona responsable de su seguridad Los ...

Страница 18: ...reón como otros refrigerantes líquidos es uno de los principales responsables de deterioro de la capa de ozono Aunque el tipo de freón utilizado para la fabricación de éstas máquinas es ecológico normativa R404 CE 01 01 2001 nuestra empresa pone en conocimiento de los clientes que desde el momento de la compra de esta máquina en adelante deben de actuar de acuerdo a la normativa cumpliendo con sus...

Страница 19: ... vibración No hay suficiente producto en el depósito esto hace que el evaporador quede descubierto lo que provoca formación de hielo en la parte inferior del depósito Cuando giran las palas provoca un roce en el depósito causando ruido y vibración Si esto ocurriera rellene el depósito con más producto Las palas chirrían cuando giran El ruido proviene de las palas horizontal y vertical Esto puede s...

Страница 20: ... first slush machine we aimed to renovate our idea of innovation every day Thanks to this approach today we are considered as leaders in the advanced technology field We therefore work and try to be more and more efficient in the organization and management sectors of our company pursuant the ISO 9001 2000 standards Customer and his needs are our focus By choosing this manufacturer you showed that...

Страница 21: ...cy Color 3 4 liters 1gallon 712x276x471 28X10 86X18 54 420W 220 230Volts 50Hz 530W 115Volts 60Hz 420W 220Volts 60Hz White Black Carefully keep the use and mounting instructions for future purchasers too The manufacturer declines all responsibility for damages deriving from failure to comply with the following instructions Install the machine according to the mounting instructions The power supply ...

Страница 22: ... 21 ENGLISH G Tap H Control electronic board I Drip tray J Cover K Transparent tank L Main switch ...

Страница 23: ...ersonnel Carefully read the following instructions before installing the machine Warnings This machine must be used only for the purposes it was manufactured for Any other use is to be considered as dangerous Installation It is recommended that the installation is carried out by a skilled technician The manufacturer will not be held responsible under any circumstances for a wrong installation that...

Страница 24: ...lorite bleach with the following proportion 10 grams 1 2 tea spoon for each liter of water Rinse with warm water A greater quantity of bleach could damage the augers If the plastic parts are dishwashed ensure the temperature is not higher than 60 C or 140 F because they could be damaged Do not use abrasive powder Cleaning is very important if you want the machine to last longer it is therefore use...

Страница 25: ... auger mechanism and front side of the horizontal auger with food grade Vaseline to avoid any eventual noise whistle due to friction between the two plastic elements Wet the gasket before inserting it in its place Please be careful and insert the gasket with its junction in one of the rear corner Reassemble the machine Disassembling the piston seal for cleaning On removing the piston from the cont...

Страница 26: ...d close to an heating source and its internal temperature increases 6 The air circulation is obstructed Resolve the problem and reset the pressure switch placed on the right rear side of the machine basis close to the general switch as illustrated in pic 17 If the red light switches off the reset operation was successful Controls and signals within the menu it means to go forward within the menu i...

Страница 27: ...s in the SERVICE section To view the menu options press the button on the electronic control unit Use the or keys to find the TLI screen Press the button to confirm and view the TLI temperature that has been set on the electronic control panel If the product supplier has not provided clear instructions using the key to decrease the TLI values to 8 5 C 16 7 F Press the button to confirm To exit the...

Страница 28: ...ck of product in the tank In this case the solenoid valve will not be fed for a period of 5 minutes to avoid the formation of ice on the bottom of the tank after this time limit the procedure is deactivated If this occurs re fill the tank During the Soft Mode Wait Please cooling stage of the product or during product maintenance the symbol may appear on the upper left corner of the screen Read the...

Страница 29: ...nd to count the portions served The portion counter will only appear on the display when the machine reads Soft Mode READY TO SERVE In order to count the portions served please see the following procedure 1 Press the button on the electronic control panel to view the menu entries 2 Press the or buttons until you reach the DOSE COUNTER screen 3 By pressing the button you can see the number of porti...

Страница 30: ...g format DD MM YY 5 After setting the date press the button 7 Press the or buttons until you reach the TIME screen 8 If you press the button the time set in the electronic control panel is displayed 9 Set the correct time if necessary using the or buttons in order to increase or decrease the value and the button in order to move the cursor horizontally Time will be displayed with the following for...

Страница 31: ...0 5 F 4 Notice the temperature 5 Press the button to return to the previous screen 6 Press the or buttons until you reach the TLI screen 7 Press the button to see the TLI temperature set on the control electronic board In this example it is 8 0 C 17 6 F 8 Set the new TLI with the or buttons to the temperature reported at number 4 9 After setting the temperature press the button 10 To exit the menu...

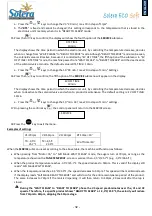
Страница 32: ...50rpm and T1 8 5 C 16 7 F c Press the or keys to change the V1 20 min max 70 in steps of 1rpm settings d Press the key to switch to the next T1 8 5 C 16 7 F min max 2 5 C 27 5 F in steps of 0 5 C 0 9 F setting 13 Press the key to confirm the display will show the second option of the SERVICE submenu The display will flash and show the V2 speed at which the augers must turn once the T1 temperature ...

Страница 33: ...e default setting is EV OFF TIME 10min a Press the or keys to change the 10 min 03 max 20 in steps of 1min settings 17 On pressing the confirm key the control panel will return to the SERVICE screen 18 Press the key to exit the menu Examples of settings V1 70rpm V2 50rpm V3 40rpm RTS time 10 T1 3 5 C 25 7 F T2 4 5 C 23 9 F EV off time 10 When the SERVICE submenu is set according to the above table...

Страница 34: ...cations such as 1 staff kitchen areas in shops offices and other working environments 2 farm houses and by clients in hotels motels and other residential type environments 3 bed and breakfast type environments 4 catering and similar non retail applications Do not expose the machine to the weather Do not pull the power wire in order to disconnect the machine from the electrical network Do not remov...

Страница 35: ...ecurely When turning the horizontal auger scrapes on the bottom of the tank causing noise and vibration There is not enough product in the inox tank this leaves the rear evaporator uncovered with the subsequent formation of ice on the bottom of the tank As the auger turns it scrapes on the tank causing noise and vibration If this occurs refill the tank with the relevant product The augers make a s...

Страница 36: ... 35 Sistema Eléctrico Electric System ...

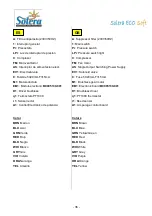
Страница 37: ...a Color BRN Marron BLU Azul GRN Verde RED Rojo BLK Negro WHI Blanco GRY Gris VIO Violeta ORA Naranga YEL Amarillo GB A Suppressor filter 230V 50HZ 1 Main switch Pr Pressure switch LPr Pressure switch light C Compressor FM Fan motor AS Single Output Switching Power Supply EV1 Solenoid valve 9 Fuse 5X20mm F315mA M1 Brushless gear motor EB1 Electronic board B0005130 001 D1 Brushless driver q1 PT1000 ...

Страница 38: ... 37 Sistema de Refrigeración Cooling System ...

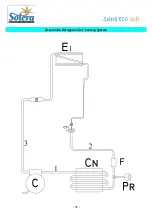
Страница 39: ...dor ev1 Electrovalvula E1 Evaporador 1 Linea de descarga 2 Linea liquido 3 Linea de aspiración Pr Presostato GB C Compressor Cn Condenser F Dryer filter B Accumulator ev1 Solenoid valve E1 Evaporator 1 Discharge line 2 Liquid line 3 Suction line Pr Pressure switch ...

Страница 40: ... 39 Despiece Exploded View ...

Страница 41: ...NTAL 2017 VERS SOLERA ECO SOFT HORIZONTAL AUGER 2017 VERS 22 A0000114 001 JUNTA ARBOL DE TRANSMISION TRANSMISSION SHAFT GASKET 23 M0000120 001 TUERCA CUADRADA D5 HIERRO ZN UNI 5597 D5 SQUARE NUT 24 M0006103 003 BISAGRA POSTERIOR NEGRO BLACK REAR HINGE 25 M0001101 001 TORNILLO GALVANIZADO 5X12 TE GALVANIZED SCREW 5X12 26 B0002101 002 EVAPORADOR SOLERA ECO SOFT NEGRO SOLERA ECO SOFT COMPLETE BLACK T...

Страница 42: ... 41 ...

Страница 43: ... 42 ...

Страница 44: ... 43 ...

Страница 45: ... incuria o bien haya sido utilizado incorrecta o impropiamente Quedan específicamente excluidas de la garantía posibles irregularidades de funcionamiento causadas por condiciones anómalas de conexión eléctrica Los daños directos o indirectos eventualmente sufridos durante el periodo de funcionamiento del equipo no implicarán en ningún caso derecho de indemnización por nuestra parte El único docume...

Страница 46: ...i Rapporto di collaudo Schede Tecniche standards or other normative documents Test report Technical file IEC 60335 1 2010 Fifth Edition IEC 60335 2 24 2010 Seventh Edition EN 60335 1 2002 A1 2004 A11 2004 A2 2006 A12 2006 A13 2008 corr Jul 2009 A14 2010 EN 60335 2 24 2010 EN 62233 08 EN 55014 1 2006 A1 2009 EN 55014 2 1997 A1 2001 A2 2008 EN 61000 3 2 2006 A1 2009 A2 2009 EN 61000 3 3 2008 EN 6223...

Страница 47: ......

Отзывы: