INSTALLATION MANUAL
4
ENG
FRA
ESP
ITA
INSTALLATION USING DOUBLE-SIDED ADHESIVE OR GLUE
Before commencing, the surface onto which the modules are to be installed must be perfectly clean and dry. The installation
of SolbianFlex modules using structural double-sided tape supplied by the manufacturer must be carried out carefully and with
precision, as this permanent method does not allow repositioning. The surface on which the modules are installed does not
necessarily need to be regular, but if it is not, the modules cannot be walked on. Similar results can be obtained with silicon
or polyurethane glue. In this case, Solbian is not responsible for the results, but may be consulted about the adhesive to use.
When using commercial glue, be careful not to create an irregular surface, if the modules are to be walked upon. The glue should
be applied uniformly with a thickness not exceeding 2mm.
Before proceeding with a permanent installation using glue or double-sided tape, we recommend that you check the performance
of the module by measuring Voc and Isc and comparing with the datasheet.
WARNING:
The double-sided adhesive backing tape makes a very strong bond with the support material and does not allow
repositioning. Trying to remove a module, even if it is only partially attached, can seriously damage the cells.
PROTECTIVE FILM ON FRONT OF MODULE
The modules are shipped with a protective film on the front surface. We recommend that you remove this after the installation has
been completed. In any case, the protective film
must be removed before using the module for the first time.
ELECTRICAL INSTALLATION: ALLinONE series
The PV modules of the ALLinONE series include an on-board high efficiency MPPT charge controller. Thanks to this electronic
feature they can directly charge lead batteries with 12 or 24 V nominal voltage.
ALLinONE modules are supplied with a flexible cable resistant
to weathering that can be directly connected to the positive and
negative poles of your battery. Alternatively, the cables may be
attached to the positive and negative bus bars or posts, to avoid
wiring clutter at the batteries. The electronics are configured at the
factory, the right model must be ordered for the chosen battery type.
The length and section of supplied cable are defined as to prevent
too large voltage drop between charge controller and battery. If
extension is needed it must be realized with 4 mm² copper section
cables. In any case a total cable length larger than 8 meters is not
advised.
Each ALLinONE, thanks to the integrated electronics, behaves like an independent charger, thus more ALLinONEs can be used to
charge the same battery simply by connecting them in parallel on the battery leads. The maximum charging current of the battery
must in any case be considered. As an example, with a 120 Ah lead battery the recommended charging current could be 12 A max
and thus already two SP72 ALLinONE (each one supplying a max current of 6 Amps) are close the recommended limit.
Remember that your batteries are a powerful energy source; be sure to install protective fuses on your wiring reasonably close to
where they are connected on the battery end (as per standard safe electrical procedures).
MAINTENANCE OF THE PHOTOVOLTAIC SYSTEM
Due to the absence of moving parts, the required maintenance is minimal. The following instructions are important:
P
Keep the modules clean. Wash with fresh water, especially in a marine environment, to avoid damage caused by saltwater.
P
The surface of the modules may be cleaned using neutral soap and water, wiping carefully and without using abrasive material.
Denatured alcohol (methylated spirit) can be used to remove grease etc.
P
Check the structural integrity of the installation and the electrical connections periodically.
P
Check the efficiency of the system using the monitoring functions in the charge regulators (LEDs or displays).
15 A fuse
Wattmeter (Optional)
18 W
0.85 A
13.8 V
Содержание ALLINONE
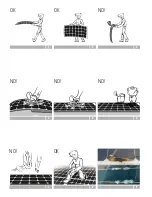
Страница 2: ...3 OK OK NO 1 2 3 NO NO NO 4 5 6 NO OK 8 9 7...
Страница 3: ...7 Installation manual Manuale di installazione...
Страница 15: ......


