SolarEdge Smart Energy Relay Скачать руководство пользователя страница 12

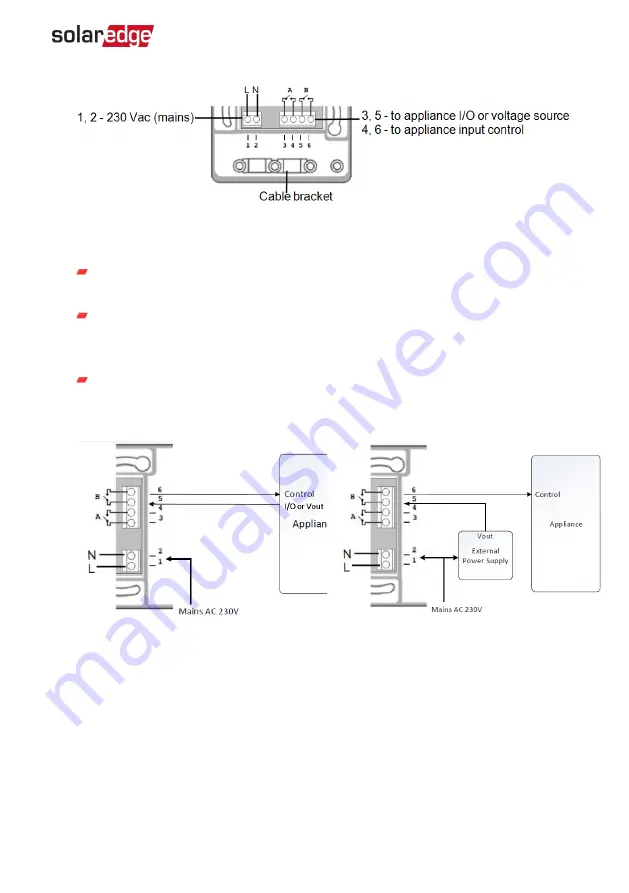
Figure 4: Smart Energy Relay connections

 5.  Connect the load wires  to the terminal blocks (see Figure 4, Figure 5 and Figure 6 ):

230 Vac (connections 1,2 ) - to Line and Neutral. The connections are 

interchangeable. 

Dry-contact 250V / 13A maximum (connections 3, 5) - to a dedicated voltage 

source from the appliance (see 

Figure 5), or an external power supply according 

to the input control specifications of the appliance (see 

Figure 6).

Managed load (connections 4,6) -to the appliance input control

The two switches have a single control. That is, either both are closed or both are 

opened.

Figure 5: Connecting to appliance with 

internal voltage source (Vout)

Figure 6: Connecting to appliance with 

external voltage source 

 6.  Place the cable bracket over the cables and fasten using the screws.

 7.  Attach the cover to the device and fasten the screws.

Overview     

11

Smart Energy Relay Installation Guide

Содержание Smart Energy Relay

Страница 1: ...Installation Guide Smart Energy Relay Version 1 3...

Страница 2: ...re necessary However discrepancies cannot be excluded No guarantee is made for the completeness of these documents The images contained in this document are for illustrative purposes only and may vary...

Страница 3: ...receiver is connected Consult the dealer or an experienced radio TV technician for help Changes or modifications not expressly approved by the party responsible for compliance may void the user s auth...

Страница 4: ...ory 5 Overview 6 Installation 10 Configuration 12 12 Configuration with Inverters with an LCD 12 Configuration with Inverters with SetApp 16 Modifying the Device Operation Mode and Schedules 17 Verify...

Страница 5: ...s of life Do not proceed beyond a warning note until the indicated conditions are fully understood and met CAUTION Denotes a hazard It calls attention to a procedure that if not correctly performed or...

Страница 6: ...rsion 1 3 December 2019 SetApp configuration updated Version 1 2 August 2019 SetApp configuration added Version 1 1 May 2018 Terminology and product name updated Revision History 5 Smart Energy Relay...

Страница 7: ...et the Duration to 2 hours and Ready by to 18 00 The boiler may work before 16 00 if there is available PV power but in any case you are guaranteed to have hot water by 18 00 Refer to Figure 2 for exa...

Страница 8: ...llowing figure illustrates a typical example of device operation with Smart Save and Schedule modes Note that in Smart Save mode the consumption is reduced by taking advantage of excess PV earlier in...

Страница 9: ...Figure 2 Examples of device operation To enable the Smart Energy Relay functionality the following supporting devices must be installed Smart Energy Relay Installation Guide 8 Overview...

Страница 10: ...Energy Meter with Cellular Connection Refer to https www solaredge com sites default files se_energy_ meter_cellular_na pdf ZigBee Plug in for Smart Energy Refer to https www solaredge com sites defa...

Страница 11: ...iron Do not let the product come into contact with water or other liquids The enclosed documentation is an integral part of this product Keep the documentation in a convenient place for future referen...

Страница 12: ...pply according to the input control specifications of the appliance see Figure 6 Managed load connections 4 6 to the appliance input control The two switches have a single control That is either both...

Страница 13: ...guration with Inverters with an LCD Required inverter Firmware CPU version v3 25xx and later To associate the device with the inverter using the inverter LCD user buttons 1 Enter the inverter Setup mo...

Страница 14: ...the device to ON or OFF as described below Auto allows setting two types of schedules for Home Energy Management as described in the next sections Smart Save set the device operation requirements Read...

Страница 15: ...lue Otherwise the device will turn off when there is insufficient power to divert to the appliance Min ON Time optional the minimum duration in minutes the appliance should remain ON once switched on...

Страница 16: ...0 W e e k D a y s 1 2 3 4 5 6 7 Start End Time the time of day by which the Smart Energy Relay must start complete its task of delivering energy to the load default 00 00 format hours minutes If thes...

Страница 17: ...the association button for 2 seconds SetApp indicates that the device has been associated 7 After all required devices have been associated tap Stop in the Smart Energy Manager to exit To configure th...

Страница 18: ...ble or delete a schedule only for inverters with an LCD Select Disable or Remove Schedule from the Schedule screen Verifying the Connection 1 Check the status screens HA devices status showing the dev...

Страница 19: ...the relay is open Button Functionality The following table describes the device button functions depending on the network association state Network state Pressing duration Result No ZigBee association...

Страница 20: ...set the device by pressing the button for more than 10 seconds and then repeat the association process Reconfiguration is not required From the Device Manager screen select Remove Device and repeat th...

Страница 21: ...ll the devices using the association button and begin the discovery process again for all devices From the Device Manager screen select Remove All and repeat the discovery process for all the devices...

Страница 22: ...OS Range 400 m Indoor Range 1 50 m STANDARD COMPLIANCE Radio ETSI EN 300 328 V 1 8 1 ETSI EN 301 489 1 ETSI EN 301 489 17 Safety EN 60335 1 EN 60335 2 30 EN 50371 Immunity EN 55014 2 Emissions EN 5501...

Страница 23: ......

Отзывы: