5
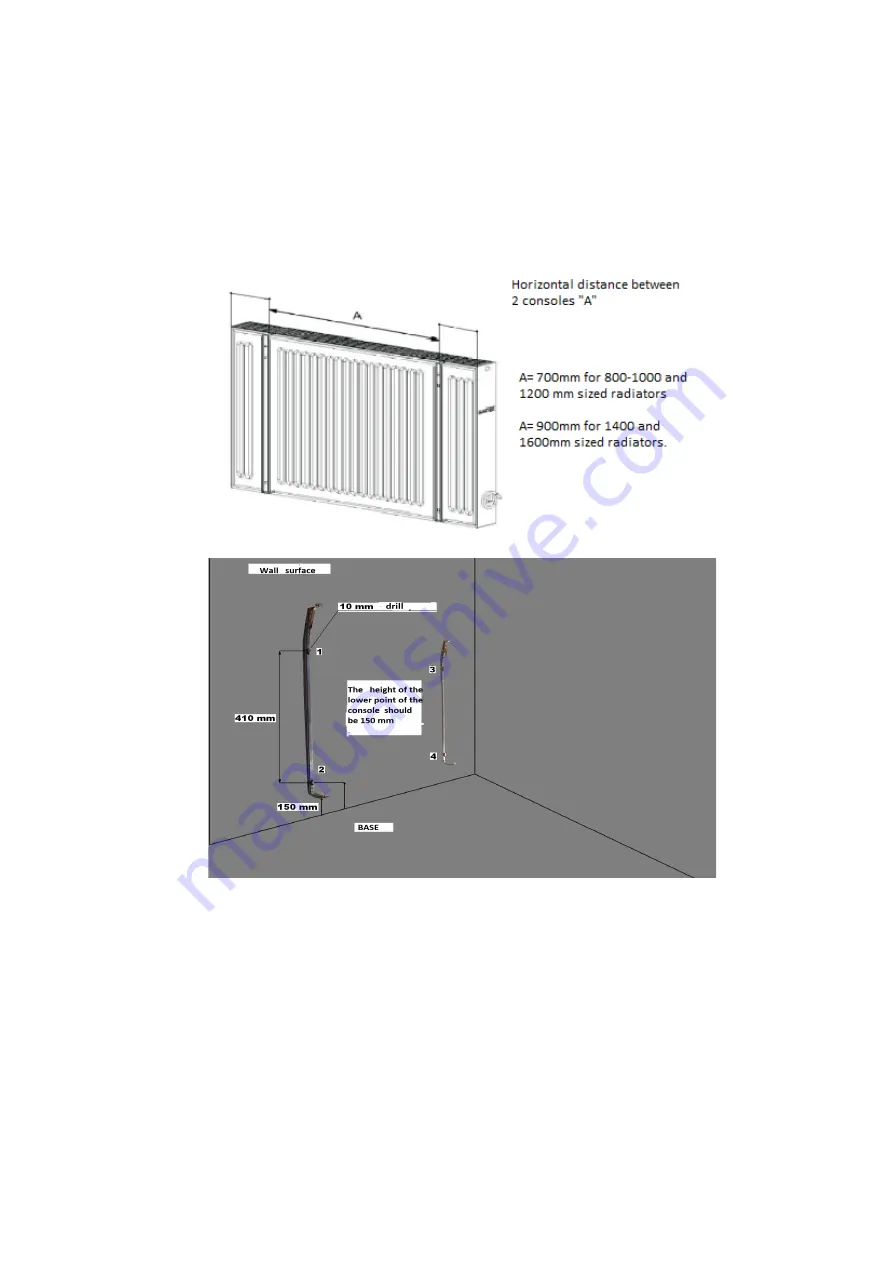
Wall Bracket Installation
SECURE THE WALL BRACKETS, TOP AND BOTTOM, WITH THE SCREWS AND PLUGS SUPPLIED.
ALTERNATIVELY USE SUITABLE WALL FIXINGS FOR HOLLOW OR LIGHTWEIGHT WALLS.
Страница 1: ...H BER Electric Radiator User Guide...
Страница 2: ...Page 3 Safety Page 3 Before you start Page 4 Wall Bracket Installation Page 5 6 First Start Page 7 Useful Information Page 8 Further Information Page 9 Wiring Diagram Page 10 Programming the Controlle...
Страница 3: ...carefully and keep it safe for future reference Never cover the radiator Do not use near to a source of water or spill any fluids inside the Radiator Ensure the Radiator has been installed in accordan...
Страница 4: ...Class 1 fully earthed product and must be connected to a suitably grounded supply Minimum Clearances 150mm from the floor to the bottom 50mm from each side Avoid placing furniture directly against th...
Страница 5: ...5 Wall Bracket Installation SECURE THE WALL BRACKETS TOP AND BOTTOM WITH THE SCREWS AND PLUGS SUPPLIED ALTERNATIVELY USE SUITABLE WALL FIXINGS FOR HOLLOW OR LIGHTWEIGHT WALLS...
Страница 6: ...tor Carefully lift the bottom of the radiator onto the bottom of the bracket Make sure the radiator sits in the space between the front and rear of the support Now offer the top of the radiator to the...
Страница 7: ...tronic thermostat control will cycle the radiator on off at the set temperature Lowering the oil temperature will reduced the radiator s surface temperature The PR 4 programmer will control the room s...
Страница 8: ...t illuminated If they are please contact your supplier SAFETY THERMOSTATS There are two over heat limiters inside the radiator To ensure the internal fluid does not exceed 1000 C If the over heat limi...
Страница 9: ...Scandinavia is to set 2 set temperatures a comfort and 210 C re duced 160 C mode This keeps a warmth in fabric of the building meaning less power is required to bring the room back to the comfort tem...
Страница 10: ...s the 240v supply Terminal 1 Live to heater 2 Link wire to 3 not supplied 3 Live supply and link wire from 2 4 Both neutral load and supply cables The PR 4 uses a common neutral and a switching live t...
Страница 11: ...11...
Страница 12: ...12...
Страница 13: ...through the radiator Is there power from the supply to the PR 4 Check supply at terminal 3 Is there power from the PR 4 to the Huber radiator Check supply at terminal 1 Are there any lights illuminat...