background image

1-

3

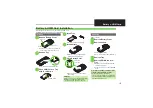
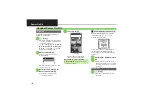
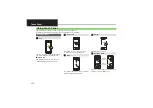
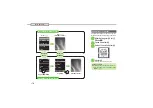
Battery & USIM Card

.

Do not apply excessive force to insert/remove USIM Card.

.

USIM Card must be inserted to use this handset.

1

Remove Battery Cover

.

Use Notch to open Cover. Push Cover 
up as shown, then lift to remove it.

2

Remove Tray

.

Use Tab to pull Tray straight out.

3

Place USIM Card on Tray 
with IC chip down

4

Insert Tray

.

Position and push in Tray fully.

5

Insert battery

.

With logo side up, align battery 
terminals with contact pins.

6

Close Battery Cover

.

Fit cover top into slot, then press 
down firmly.

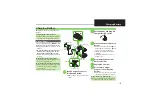
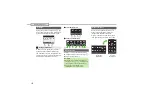
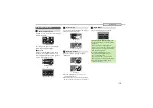
Power off first.

1

Remove Battery Cover

2

Remove battery

.

Lift battery as shown.

.

Do not short-circuit removed battery.

3

Remove Tray

4

Remove USIM Card from 
Tray

.

Replace Tray, reinstall battery and 
close Battery Cover.

.

Take care not to lose removed USIM 
Card.

Battery & USIM Card Installation

Inserting

N

otch

Battery Co

v

er

P

u

sh here

Tray

Ta

b

USIM Card

USIM Tray

.

Take care not to lose or damage removed Tray.

.

Always insert USIM Card with Tray to 
prevent card damage upon removal.

Press firmly
along edges

Removing

After Repairs, USIM Card Replacement 
or Handset Upgrade/Replacement

.

Some downloaded files may be 
inaccessible. In addition, S! Applications 
and BookSurfing

®

 may be disabled after 

USIM Card replacement.

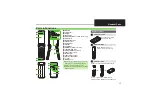
Содержание Aquos shot 002 SH

Страница 1: ...i Recorder Microphone j m Logo k Battery Cover Keep handset closed when not in use Open handset to place or answer calls enter text etc Handset is closed with Display outward Do not carry handset wit...

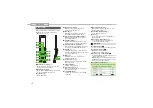
Страница 2: ...cancel Wi Fi b Dictionary Key Open Dictionary Long Press to activate cancel VeilView c Camera Key Activate mobile camera d Yahoo Keitai Key A Open Yahoo Keitai portal Long Press to open Bookmarks lis...

Страница 3: ...y Power off first 1 Remove Battery Cover 2 Remove battery Lift battery as shown Do not short circuit removed battery 3 Remove Tray 4 Remove USIM Card from Tray Replace Tray reinstall battery and close...

Страница 4: ...playing the symbol shown above To avoid fire or electric shock do not short circuit or disassemble battery About USIM Card Precautions Do not insert USIM Card into any other IC card device SoftBank Mo...

Страница 5: ...mination Light goes out when battery is full 4 Disconnect handset from Desktop Holder 5 Unplug AC Charger 6 Disconnect Charger Connector from Desktop Holder Squeeze Charger Connector release tabs and...

Страница 6: ...n appears 4 Yes or No S Standby Choose No to enter Standby immediately after powering on Handset initiates Network Information retrieval when a B or A is pressed for the first time Follow these steps...

Страница 7: ...tor to open menu window e g Battery Meter window from battery strength indicator May be unavailable for some indicators Information window opens at the bottom for Missed Calls new mail etc Information...

Страница 8: ...y goes dark after Display Saving time elapses Press any key except during a call to activate it Sensor detects handset movement In Viewer position Display orientation changes with handset orientation...

Страница 9: ...recording in progress handset TV recording in progress Memory Card 2 Memory Card inserted Accessing Memory Card Reading Memory Card Formatting Memory Card TV Timer TV Recording Timer set 3 Compass In...

Страница 10: ...n progress Infrared file transfer in progress Bluetooth transmission ready Bluetooth transmission in progress appears for multiple connections Bluetooth talk in progress IC Transmission in progress S...

Страница 11: ...issed Call Notification New Voicemail Unread mail Unread Delivery Report Contents Key received Unread S Information Channel info Weather Indicator update Weather Indicator Location Info request Pedome...

Страница 12: ...ions operations Double Tap Tap Display twice in rapid succession within approximately 0 6 seconds Touch item for 1 seconds to execute corresponding function operation Touch and drag to move item or sc...

Страница 13: ...etc Enlarged Double tapping images etc may also enlarge reduce them On Internet page or before saving captured image Long Touch area portion to enlarge it Long Touch Display to open menu Operational...

Страница 14: ...one Settings Open create messages etc Browse the Internet Use S Applications including games Receive news play download media files etc Capture images or record video Access various media services Man...

Страница 15: ...n screenshots are based on Viewer position Press in Standby Use g to select Tools Use f to select Clock Gauge tab Use e to select World Clock Tap MENU in Standby Tap Tools Tap Clock Gauge tab Tap Worl...

Страница 16: ...Correct Touch Panel S 4 Yes S Follow onscreen instructions Escape Return Handset Keys Press Press Standby returns Navigate Back Return to Standby Escape Return Touch Panel Tap END Tap CLEAR BACK Stan...

Страница 17: ...okSurfing e Book Viewer Camera Easy Auto Camera Pro Auto Camera Quick Camera Rapid Shooting Camera Best Select Photo Fish eye Camera Miniaturize Camera HD Video Camera Pro Auto Video Camera Golf Swing...

Страница 18: ...My Details Set Category Mail Groups Rakutomo Link Speed Dial Mail Touch Tone Signal List Settings Manage Settings Mode Settings Display Customized Screen Sounds Alerts Date Time Language Ringer Output...

Страница 19: ...ettings Reset All Direct Browser Lock Proxy Setting etc Center Access Code Network Password Four digit code selected at contract change service options access Optional Services via landlines or set ca...

Страница 20: ...nced security set Need UnNeed Setting to Need Handset Code is now required to delete all files entries etc 1 In Locks menu Handset Code Settings S 2 Need UnNeed Setting S 3 Need S S Enter Handset Code...

Страница 21: ...dset use aboard trains buses etc Refrain from use that interrupts the flow of pedestrian or vehicle traffic Mutes most handset function sounds 1 Long Manner mode is set Temporarily suspends all transm...

Страница 22: ...nu Date Time S 2 Set Date Time S 3 Enter the year S Enter the month S Enter the day S Enter the time S If a confirmation appears choose Yes and press 1 S Settings S S In Sound Display menu Language or...

Страница 23: ...k S 2 Set Time Zone Window 3 f Select area S 4 S Standby returns 1 S Settings S S In Sound Display menu Display S 2 Standby Display S 3 Clock Calendar S 4 World Clock L etc S 5 S Standby returns Openi...

Страница 24: ...ard into or out of handset Keep Memory Cards out of infant s reach may cause suffocation if swallowed Do not touch terminals or expose them to metal objects SoftBank Mobile is not liable for any damag...

Страница 25: ...l Memory Card files even those created on other devices 1 S Settings S S f Phone G S Memory Card S 2 Format Card S S Yes S Offline Mode is set Handset transmissions are suspended until format is compl...

Отзывы: