8
Unpacking
Carton Contents
• Electric cultivator housing
• Upper handle
• Middle handle
• Extension cord restraint holder
• Cable clip
• Handle knob, spacer and bolt (4)
• Manual with registration card
1. Carefully remove the electric cultivator and check to
see that all of the above items are supplied.
2. Inspect the product carefully to make sure no breakage or
damage occurred during shipping. If you find damaged or
missing parts, DO NOT return the unit to the store. Please
call the Snow Joe
®
+ Sun Joe
®
customer service center at
1-866-SNOWJOE (1-866-766-9563).
NOTE: Do not discard the shipping carton and packaging
material until you are ready to use the electric
cultivator. The packaging is made of recyclable materials.
Properly dispose of these materials in accordance with
local regulations or save the packaging for long-term
product storage.
IMPORTANT! The equipment and packaging material are not
toys. Do not let children play with plastic bags, foils, or small
parts. These items can be swallowed and pose a suffocation
risk!
Assembly
m
WARNING!
Do not connect to the power supply
until assembly is complete. Failure to comply could result in
accidental starting and serious personal injury.
m
WARNING!
To prevent serious personal injury, make
sure the unit is unplugged, and the blades have come to a
complete stop before inspecting, cleaning, or servicing the unit.
m
WARNING!
The product must be fully assembled before
operation. Do not use a product that is only partially assembled
or assembled with damaged parts.
Follow the assembly instructions step-by-step and use the
pictures provided as a visual guide to easily assemble the
product.
Connecting the Handles
NOTE: Small parts can easily get lost during asembly or when
making adjustments to the machine. To avoid this, secure all
small parts that are removed from the machine and keep them
accessible.
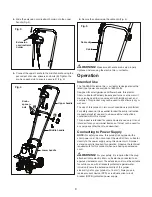
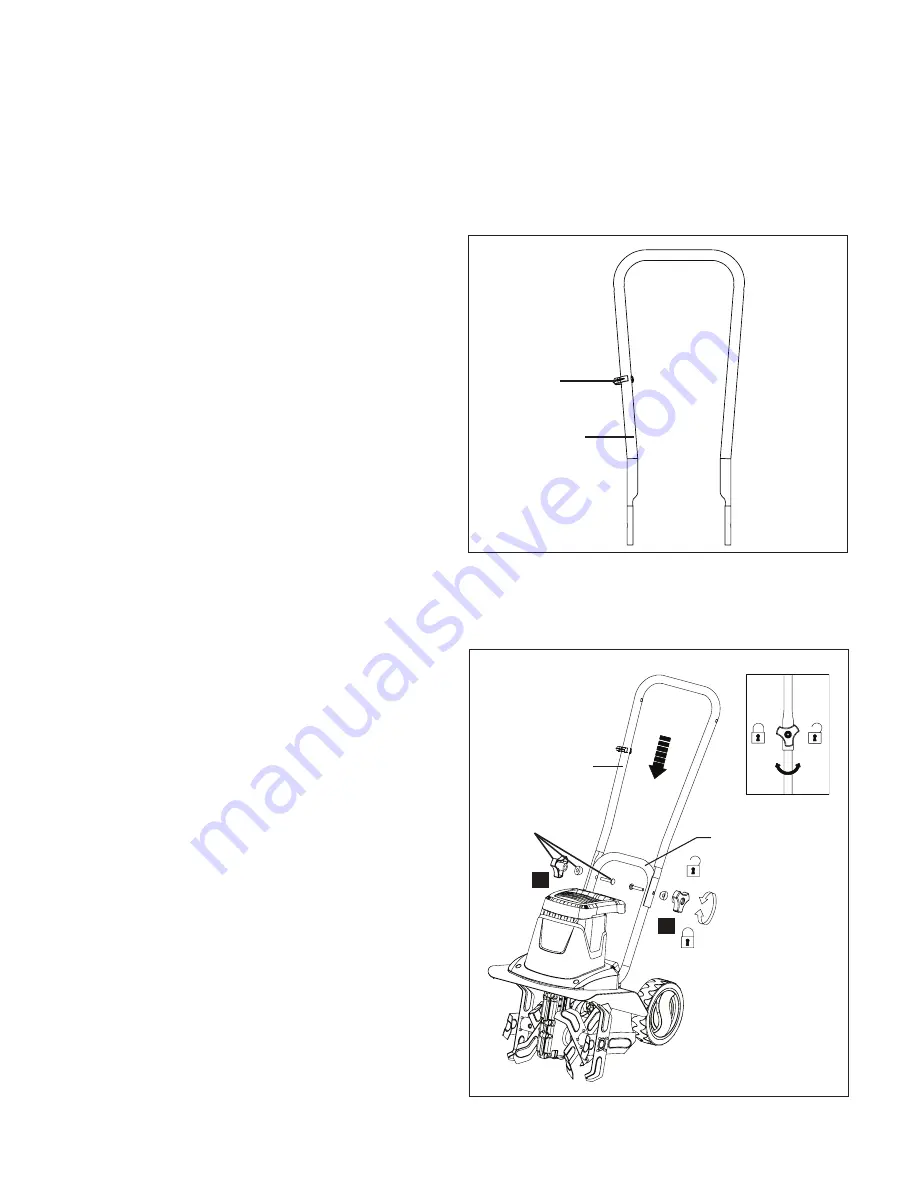
1. Attach the cable clip on the middle handle bar (Fig. 1).
2. Remove the bolts from the knobs and keep them handy.
3. Secure the middle handle to the lower handle using the
first set of knobs, spacers and bolts (A). Tighten the knobs
on each side to ensure a secure fit (Fig. 2).
Fig. 1
Cable clip
Middle handle
Fig. 2
Knob +
bolt
Middle handle
Lower handle
A
A
Содержание SUNJOE TJ602E-RM
Страница 14: ...14 NOTES...
Страница 16: ...snowjoe com...


