background image

4

Assembly

Your push lawn sweeper requires assembly. Account for all 

parts and hardware before beginning assemble. If any parts 

are missing or damaged, or if you have any questions or need 

additional instructions, please call the Snow Joe

®

 + Sun Joe

®


customer service center at 1-866-SNOWJOE  

(1-866-766-9563).
Tools needed: 

•  10 mm wrench

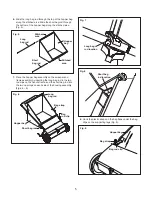
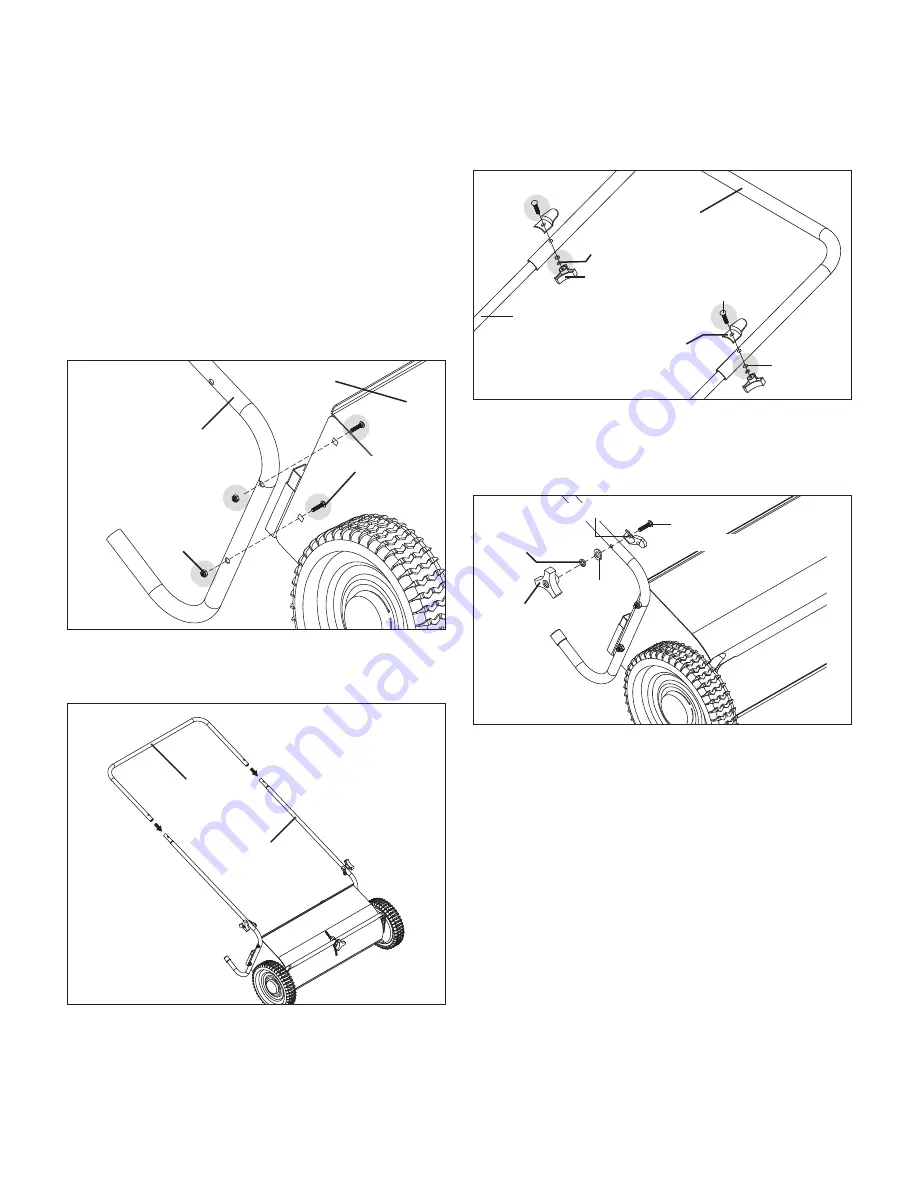
1.  Attach the supporting leg to the sweeper assembly and 

secure with M6 x 30 carriage bolt, and M6 nylon lock nut 

(Fig. 1). Do not tighten yet. Repeat for the other side.

2.  Assemble the handle frame over the supporting legs. 

Align the holes in the handle frame and supporting legs 

(Fig. 2).


3.  Secure the supporting legs and the handle frame with two 

M6 x 30 carriage bolts, bag rod clips, flat washers, lock 

washers, and handle knobs (Fig. 3).

4.  Fully tighten all hardware in step 1.  
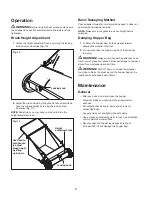
5.  Put two bag rod clips on the inside of each supporting 

leg, secure by a M6 x 30 carriage bolt, a flat washer, a 

lock washer, and a handle knob (Fig. 4).

Fig. 1

Sweeper  

assembly

Support leg

M6 x 30 

carriage bolt

M6 nylon 

lock nut

Fig. 2

Handle frame

Supporting 

leg

Flat  

washer

Fig. 3

Handle frame

Supporting 

leg

Handle 

knob

Lock washer

Bag rod 

clip

M6 x 30 

carriage bolt

Fig. 4

Handle knob

Lock washer

Flat  

washer

Bag rod clip

M6 x 30 

carriage bolt

Содержание SUNJOE SJSW26M-RM

Страница 1: ...e com To make sure you get the most out of your product be sure to register online at to enjoy full product support A Division of Snow Joe LLC Model SJSW26M RM Form No SJ SJSW26M RM 880E V1 R OPERATOR S MANUAL PUSH LAWN SWEEPER 26 INCH AFFIX SERIAL NUMBER LABEL ...

Страница 2: ...itting or standing on the sweeper 2 Do not permit children to operate sweeper 3 Do not push sweeper too close to a fire the hopper and the brushes will burn 4 Do not exceed the maximum capacity of the hopper bag at 52 3 gal 198 l 5 Use caution when operating the sweeper on rough terrain ditches and hillsides to prevent tipping 6 This sweeper is not meant for street or highway use Watch for traffic...

Страница 3: ...g rod clip 4 12 Lock washer 4 13 M6 nylon lock nut 4 14 Flat washer 4 15 Handle knob 4 16 Wrench Technical Data Material Steel rubber Drive Type Walk behind push Brush to Wheel Ratio 4 25 1 Height Adjustable Brush Diameter 10 in 25 4 cm Sweeping Width 26 in 66 cm Hopper Bag Capacity 52 3 gal 198 l Wheel Size 9 8 in 25 cm Weight 34 lbs 15 4 kg 1 2 3 4 6 7 8 9 5 10 11 12 13 14 15 16 Know Your Push S...

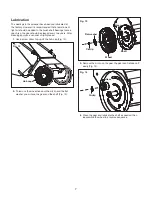
Страница 4: ...rame over the supporting legs Align the holes in the handle frame and supporting legs Fig 2 3 Secure the supporting legs and the handle frame with two M6 x 30 carriage bolts bag rod clips flat washers lock washers and handle knobs Fig 3 4 Fully tighten all hardware in step 1 5 Put two bag rod clips on the inside of each supporting leg secure by a M6 x 30 carriage bolt a flat washer a lock washer a...

Страница 5: ...bag rod in the two rod clips on the handle frame and the short bag rod into the two openings on each side of the housing assembly Figs 6 8 8 Hook the plastic straps on the bag flaps under the bag clips on the supporting legs Fig 9 Fig 5 Hopper bag Long bag rod Short bag rod Stitched area Stitched area Fig 6 Short bag rod Hopper bag Long bag rod Bag strap Bag rod clip Fig 7 Long bag rod location Fi...

Страница 6: ...ial to fall out 2 You can also take the hopper bag off of the sweeper to dump mWARNING Always dump hopper bag after each use Damp or wet grass and leaves will cause damage to hopper if stored for an extended period of time mWARNING DO NOT dump or unload the sweeper too close to fire as the brushes and the hopper bag can be destroyed by excessive heat of flame Maintenance General After each use dum...

Страница 7: ...leaning apply an even coat of light grease 1 Use a screw driver to pop off the hub cap Fig 12 2 To remove the wheel take out the circlip and the flat washer you will see the gear and the shaft Fig 13 3 Remove the circlip on the gear the gear can be taken off easily Fig 14 4 Clean the gear and lubricate the shaft as needed then reassemble the wheel in a reverse sequence Fig 12 Hub cap Fig 13 Circli...

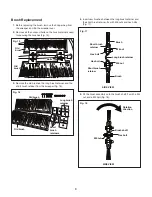
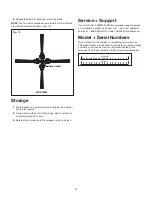
Страница 8: ...g 16 4 Insert new brushes between the long brush retainer and the short brush retainer fix with M6 nuts and hex bolts Fig 17 5 Fit the brush assembly onto the brush shaft fix with a M5 nut and a M5 bolt Fig 18 Fig 15 Old brush Bolts Bolts Old brush Fig 16 Old brush Old brush Short brush retainers Long brush retainer Fig 17 SIDE VIEW Brush Brush Long brush retainer Short brush retainer Short brush ...

Страница 9: ...ng make sure the sweeper is dry and clean Service Support If your Sun Joe SJSW26M RM lawn sweeper requires service or maintenance please call Snow Joe Sun Joe customer service at 1 866 SNOWJOE 1 866 766 9563 for assistance Model Serial Numbers When contacting the company or arranging service from an authorized dealer you will need to provide the model and serial numbers which can be found on the d...

Страница 10: ...10 NOTES ...

Страница 11: ...in this warranty shall be construed as obligating Snow Joe Sun Joe to incorporate such design changes into previously manufactured products nor shall such changes be construed as an admission that previous designs were defective This warranty is intended to cover product defects only Snow Joe LLC is not liable for indirect incidental or consequential damages in connection with the use or misuse of...

Страница 12: ...snowjoe com ...
Отзывы: