background image

© 2021 by Snow Joe

®

, LLC

All rights reserved. Original instructions.

SAVE THESE INSTRUCTIONS

1

A Division of Snow Joe

®

, LLC

Model SJPH1500E

Form No. SJ-SJ-SJPH1500E-880E-M

R

OPERATOR’S MANUAL

ELECTRIC INFRARED HEATER

1500-WATT | FREE ST WALL-MOUNTED

EN

IMPORTANT!

Safety Instructions
All Operators Must Read These 

Instructions Before Use

Read all the instructions contained in this manual. Keep this 

manual in a safe place, so that the information is available at 

all times. If you give this equipment to another person, make 

sure to provide these operating instructions. Basic safety 

precautions should always be followed to reduce the risk of 

explosion, which could cause property damage, personal 

injury, or death. 
Notice the safety alert symbol 

m

 used in this manual to draw 

your attention to a WARNING given along with the particular 

operating instruction. This means that the operation requires 

special ATTENTION, CAUTION, and AWARENESS.

m

WARNING!

 Surface temperatures become very 

hot when operating the heater.

m

WARNING!

1.  Read all instructions before using this heater.
2.  This heater is hot when in use. To avoid burns, do not let 

bare skin touch hot surfaces. If provided, use handles 

when moving this heater. Keep combustible materials, 

such as furniture, pillows, bedding, papers, clothes, and 

curtains at least 3 feet (0.9 m) from the front of the heater 

and keep them away from the sides and rear.

3.  Extreme caution is necessary when any heater is used by 

or near children and whenever the heater is left operating 

and unattended. 

4.  Always unplug heater when not in use. 
5.  Do not operate any heater with a damaged cord or plug 

or after the heater malfunctions, has been dropped or 

damaged in any manner. Discard heater, or return to 

authorized service facility for examination and/or repair.

6.  This heater is not intended for use in bathrooms, laundry 

areas and similar indoor locations. Never locate heater 

where it may fall into a bathtub or other water container.

7.  Do not run cord under carpeting. Do not cover cord with 

throw rugs, runners, or similar coverings. Do not route 

cord under furniture or appliances. Arrange cord away 

from traffic area and where it will not be tripped over.

8.  After shutting down the heater, remove plug from outlet.

9.  Connect to properly grounded outlets only.

10. Do not insert or allow foreign objects to enter any 

ventilation or exhaust opening as this may cause an 

electric shock or fire, or damage the heater.

11. 

To prevent a possible fire, do not block air intakes or 

exhaust in any manner. Do not use on soft surfaces, like a 

bed, where openings may become blocked.

12. A heater has hot and arcing or sparking parts inside. Do 

not use it in areas where gasoline, paint, or flammable 

liquids are used or stored. 

13. Use this heater only as described in this manual. Any 

other use not recommended by the manufacturer may 

cause fire, electric shock, or injury to persons.

14. Always plug heaters directly into a wall outlet/receptacle. 

Never use with an extension cord or relocatable power tap 

(outlet/power strip).

15. This heater is NOT to be operated by children.
16. 

The unit must be securely placed on a horizontal and flat 

surface, with the clearance of 3 ft to the wall and 1 ft to 

the ceiling.

17. DO NOT cover the unit with anything during operation or 

right after shutting down. Wait for 30 – 45 minutes for the 

unit to cool down before storage.

18. DO NOT wrap the power cord on the unit.
19. When damaged, the unit must be repaired by an 

authorized service center. If the power cord is damaged, it 

must be replaced by the manufacturer, its service agent or 

similarly qualified persons in order to avoid a hazard.

20. DO NOT use this heater with a programmer, timer or any 

other device that switches the heater on automatically, 

since a fire risk exists if the heater is covered or positioned 

incorrectly.

21. This appliance is NOT intended for use by persons 

(including children) with reduced physical, sensory or 

mental capabilities, or lack of experience and knowledge, 

unless they have been given supervision or instruction 

concerning use of the appliance by a person responsible 

for their safety.

22. The unit is for household use only. It's NOT allowed to use 

in building site, greenhouses, barn or stable where there's 

flammable dust.

23. DO NOT use this unit as a cloth drier or towel drier.
24. DO NOT use this unit as a sauna heater.
25. DO NOT immerse this unit into water for cleaning. 

Содержание Sunjoe SJPH1500E

Страница 1: ...pliances Arrange cord away from traffic area and where it will not be tripped over 8 After shutting down the heater remove plug from outlet 9 Connect to properly grounded outlets only 10 Do not insert or allow foreign objects to enter any ventilation or exhaust opening as this may cause an electric shock or fire or damage the heater 11 To prevent a possible fire do not block air intakes or exhaust...

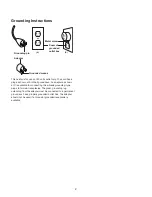
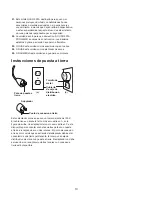
Страница 2: ... for connecting three blade grounding type plugs to two slot receptacles The green grounding lug extending from the adapter must be connected to a permanent ground such as a properly grounded outlet box The adapter should not be used if a three slot grounded receptacle is available A B C Grounding pin Metal screw Cover of grounded outlet box Adapter Grounded means ...

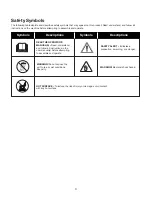
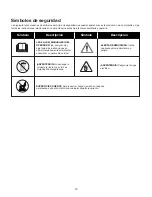
Страница 3: ...THE OPERATOR S MANUAL S Read understand and follow all instructions in the user manual s before attempting to assemble and operate SAFETY ALERT Indicates a precaution a warning or a danger WARNING Do not expose the unit to rain or wet conditions Keep dry WARNING Electrical shock hazard Symbols Symbols Descriptions Descriptions HOT SURFACE To reduce the risk of injury or damage avoid contact with a...

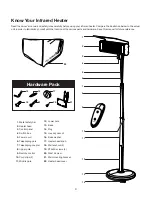
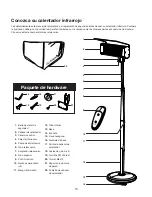
Страница 4: ...anual for future reference 1 Metal safety bar 2 Heater head 3 Control panel 4 Switch box 5 Power cord 6 Telescoping pole 7 Telescoping coupler 8 Upper pole 9 Remote control 10 Cord clips 2 11 Middle pole R R 22 Hardware Pack 15 16 17 18 19 20 21 12 Lower pole 13 Base 14 Plug 15 Hex key wrench 16 Base washer 17 Heater head knob 18 Wall anchors 4 19 ST4x30 screws 4 20 M6x12 screw 21 Wall mounting br...

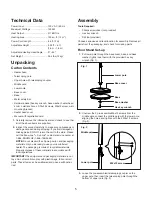
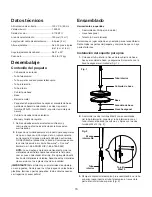
Страница 5: ... the shipping carton and packaging material until you are ready to use your new infrared heater The packaging is made of recyclable materials Properly dispose of these materials in accordance with local regulations IMPORTANT The equipment and packaging material are not toys Do not let children play with plastic bags foils or small parts These items can be swallowed and pose a suffocation risk Asse...

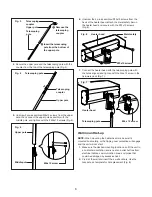
Страница 6: ...When mounting the heater head make sure it s mounted horizontally or the tipping over protection will engage and the unit will not start 1 Make sure the desired mounting location can fit the unit in a horizontal orientation and is near an outlet but free from electrical cables communication lines and pipes that could be damaged by excessive heat 2 Pre drill the wall and insert the 4 wall anchors U...

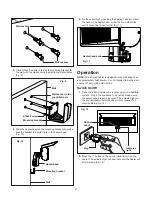
Страница 7: ...g or as a supplementary heat source It s not intended to be the main source of heat during cold months Switch On Off 1 Place the infrared heater on a level and non combustible surface Plug in the appliance to an outlet making sure the power supply is same as rated The indicator light on the control panel will start flashing which means it s in standby status Fig 12 2 Press the I button on the cont...

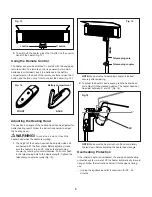
Страница 8: ...efore adjusting make sure the heater is turned off Loosen the telescoping coupler by twisting it counterclockwise Pull out or push in the telescoping pole to the desired length Tighten the telescoping coupler securely Fig 15 NOTE Make sure the telescoping coupler is locked securely after adjusting 2 To adjust the heater head s angle grab the heater head and adjust it to the desired position The he...

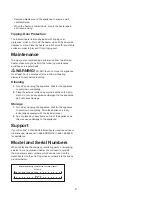
Страница 9: ...t for the appliance to cool down completely 2 Clean the external surface by wiping it with a soft damp cloth Do not use any abrasive detergent on the appliance as it will cause damage Storage 1 Turn off and unplug the appliance Wait for the appliance to cool down completely Store the appliance in a dry indoor space covered with the included cover 2 Do not place any heavy items on top of the applia...

Страница 10: ...a registration card available online from our website or calling our Customer Service Department at 1 866 SNOWJOE 1 866 766 9563 or by e mailing us at help snowjoe com Failure to register your Product will not diminish your warranty rights However registering your Product will allow Snow Joe to better serve you with any of your customer service needs WHO CAN SEEK LIMITED WARRANTY COVERAGE This War...

Страница 11: ...11 ...

Страница 12: ...do para ser usado en baños lavanderías e interiores similares Nunca coloque el calentador en un lugar desde donde pueda caer a una bañera u otro contenedor de agua 7 No coloque el cable debajo de una alfombra No cubra el cable con tapetes correderas o cubiertas similares No haga pasar el cable debajo de muebles o artefactos Haga que el cable pase lejos de áreas de tráfico por donde nadie se pueda ...

Страница 13: ...O SUMERJA esta unidad en agua para su limpieza Instrucciones de puesta a tierra Este calentador solo se usa con un tomacorriente de 120 V El cable tiene un enchufe tal como se muestra en A en la figura de arriba Un adaptador tal como se muestra en C está disponible para conectar enchufes de tres patas con puesta a tierra a receptáculos con dos ranuras El punto de conexión a tierra color verde que ...

Страница 14: ...RADOR lea comprenda y siga todas las instrucciones en el los manual es antes de intentar ensamblar y operar esta unidad ALERTA DE SEGURIDAD indica una precaución advertencia o peligro ADVERTENCIA No exponga la unidad a la lluvia ni a entornos mojados Manténgala seca ADVERTENCIA Peligro de choque eléctrico Símbolo Símbolo Descripción Descripción SUPERFICIE CALIENTE para reducir el riesgo de daños o...

Страница 15: ... de seguridad 2 Cabezal de calentador 3 Panel de control 4 Caja de interruptor 5 Cable de alimentación 6 Tubo telescópico 7 Acoplador telescópico 8 Tubo superior 9 Control remoto 10 Ganchos para cable 2 11 Mango intermedio R R 22 Paquete de hardware 15 16 17 18 19 20 21 12 Tubo inferior 13 Base 14 Enchufe 15 Llave hexagonal 16 Arandela de base 17 Perilla de cabezal de calentador 18 Anclas de pared...

Страница 16: ...ga de la caja de transporte ni de los materiales de embalaje hasta que usted esté listo para usar su nuevo calentador infrarrojo El empaquetado está hecho de materiales reciclables Deseche estos materiales de acuerdo con los reglamentos de su localidad IMPORTANTE Este artefacto y sus materiales de embalaje no son juguetes No deje que los niños jueguen con las bolsas plásticas láminas o partes pequ...

Страница 17: ...asegúrese de que sea horizontalmente Si no la protección contra volcaduras se activará y la unidad no se encenderá 1 Asegúrese de que la ubicación de montura deseada pueda darle espacio a la unidad en una orientación horizontal y que esté cerca de un tomacorriente pero libre de cables eléctricos líneas de comunicación y tuberías que puedan dañarse por el calor excesivo 2 Marque agujeros en la pare...

Страница 18: ...omo fuente de calor suplementaria No está destinado a ser la fuente principal de calor durante meses fríos Encendido apagado 1 Coloque el calentador infrarrojo en una superficie nivelada y no combustible Enchufe el artefacto a un tomacorriente asegurándose de que el voltaje de la fuente de alimentación sea el mismo que el especificado La luz indicadora en el panel de control empezará a parpadear i...

Страница 19: ...asegúrese de que el calentador esté apagado Afloje el acoplador telescópico girándolo en sentido antihorario Jale o empuje el tubo telescópico a la altura deseada Apriete de forma segura el acoplador telescópico Fig 15 NOTA asegúrese de que el acoplador telescópico esté trabado de forma segura luego del ajuste 2 Para ajustar el ángulo de cabezal del calentador sujete el cabezal del calentador y mu...

Страница 20: ...Apague y desenchufe el artefacto Espere a que el artefacto se enfríe por completo 2 Limpie la superficie con un paño suave y húmedo No use un detergente abrasivo ya que dañará el artefacto Almacenamiento 1 Apague y desenchufe el artefacto Espere a que el artefacto se enfríe por completo Guarde el artefacto cubierto con la funda incluida en un lugar seco y bajo techo 2 No coloque ningún objeto pesa...

Страница 21: ...istro disponible en línea en nuestro sitio Web llamando a nuestra central de servicio al cliente al 1 866 SNOWJOE 1 866 766 9563 o enviándonos un e mail a help snowjoe com Si usted no registra su Producto sus derechos de garantía no disminuirán sin embargo registrar su Producto permitirá que Snow Joe le pueda atender mejor si usted tiene alguna necesidad como cliente QUIÉN PUEDE SOLICITAR COBERTUR...

Страница 22: ...22 ...

Страница 23: ...23 ...

Страница 24: ...eur ou le retourner à un centre de réparation et d entretien agréé pour qu il soit examiné et ou réparé 6 Ce radiateur n est pas destiné à être utilisé dans les salles de bains les buanderies et à l intérieur dans des pièces ou des salles de même type Ne jamais placer le radiateur dans un endroit d où il pourrait tomber dans une baignoire ou des récipients contenant de l eau 7 Ne pas faire courir ...

Страница 25: ...ement Il N EST PAS conçu pour être utilisé dans un chantier de construction une serre une grange ou une écurie où il y a de la poussière inflammable 23 NE PAS utiliser cet appareil pour sécher des vêtements ou une serviette 24 NE PAS utiliser cet appareil comme chauffe sauna 25 NE PAS plonger cet appareil dans de l eau pour le nettoyer Instructions concernant la mise à la terre Ce radiateur doit ê...

Страница 26: ...Lire comprendre et suivre toutes les instructions du ou des manuels avant d essayer d assembler et d utiliser l appareil ALERTE DE SÉCURITÉ Indique une précaution un avertissement ou un danger AVERTISSEMENT Ne pas exposer l appareil à la pluie ou une forte humidité Le maintenir au sec AVERTISSEMENT Risque de secousse électrique Symboles Symboles Descriptions Descriptions SURFACE CHAUDE pour réduir...

Страница 27: ... dans le futur 1 Barre de sécurité en métal 2 Tête chauffante 3 Tableau de commande 4 Boîte d interrupteur 5 Cordon d alimentation 6 Manche télescopique 7 Coupleur télescopique 8 Manche supérieur 9 Télécommande 10 2 Serre câbles 11 Manche intermédiaire R R 22 Sachet de quincaillerie 15 16 17 18 19 20 21 12 Manche inférieur 13 Socle 14 Fiche 15 Clé hexagonale 16 Rondelle de socle 17 Bouton de tête ...

Страница 28: ...èle Snow Joe Sun Joe au 1 866 SNOWJOE 1 866 766 9563 REMARQUE ne jetez pas la caisse d expédition et l emballage tant que vous n êtes pas prêt à utiliser votre nouveau radiateur à infrarouge L emballage est fabriqué dans des matériaux recyclables Éliminez ces matériaux de façon appropriée et conformément aux réglementations locales IMPORTANT L appareil et son emballage ne sont pas des jouets Ne la...

Страница 29: ...ral REMARQUE lorsque vous assemblez la tête chauffante assurez vous de la monter à l horizontale Sinon l arrêt automatique en cas de basculement accidentel s activera et l appareil ne s allumera pas 1 Assurez vous que l endroit où vous souhaitez placer l appareil permet de le monter à l horizontale et à proximité d une prise mais à l écart de câbles électriques de fils de téléphone et de tuyaux qu...

Страница 30: ...Il n est pas destiné à être une source de chaleur principale pendant la saison froide Interrupteur marche arrêt 1 Placez le radiateur à infrarouge sur une surface de niveau et non combustible Branchez la fiche dans une prise en vous assurant que la tension de la source d alimentation électrique est celle spécifiée Le témoin sur le tableau de commande commencera à clignoter ce qui signifie qu il es...

Страница 31: ... le coupleur télescopique en le tournant dans le sens antihoraire Tirez ou poussez le manche télescopique à la longueur voulue Serrez bien le coupleur télescopique Fig 15 REMARQUE après le réglage assurez vous que le coupleur télescopique est bien verrouillé 2 Pour régler l angle de la tête chauffante saisissez la et inclinez la à la position voulue La tête chauffante peut se régler entre 0º et 25...

Страница 32: ... externe en l essuyant à l aide d un chiffon doux humide N utilisez pas de détergents abrasifs sur l appareil car ils pourraient l endommager Rangement 1 Éteignez et débranchez l appareil Patientez jusqu à ce que l appareil se soit complètement refroidi Rangez l appareil à l intérieur dans un endroit sec en le recouvrant de la housse incluse 2 Ne placez pas d objets lourds sur la partie supérieure...

Страница 33: ...hone en appelant notre Service à la clientèle au 1 866 SNOWJOE 1 866 766 9563 ou encore en nous envoyant un courriel à l adresse help snowjoe com Le fait de ne pas enregistrer l achat de votre Produit n a aucune conséquence sur vos droits concernant la garantie Toutefois l enregistrement de votre Produit permettra à Snow Joe de mieux répondre au moindre besoin que vous pourriez avoir en matière de...

Страница 34: ...34 ...

Страница 35: ...35 ...

Страница 36: ...sunjoe com ...

Отзывы: