background image

6

Unpacking

Carton Contents:

• 

Reel mower body

• 

Upper handle bar (2)

•  Lower handle bar (2)
•  Handle knob and bolt (3)
•  Paper test strips (20)
•  Hex wrench
•  Manual with registration card

1.  Carefully remove the manual reel mower and check to see 

that all of the above items are supplied.

2.  Inspect the product carefully to make sure no breakage or 

damage occurred during shipping. If you find damaged or 

missing parts, DO NOT return the unit to the store. Please 

call the Snow Joe

®

 + Sun Joe

®

 customer service center at 

1-866-SNOWJOE (1-866-766-9563).

  NOTE: Do not discard the shipping carton and packaging 

material until you are ready to use your new manual reel 

mower. The packaging is made of recyclable materials. 

Properly dispose of these materials in accordance with 

local regulations.

IMPORTANT! The equipment and packaging material are  

not toys. Do not let children play with plastic bags, foils, 

or small parts. These items can be swallowed and pose a 

suffocation risk!

Assembly

Fitting the Handle

NOTE: Do not tighten the knobs completely until assembly  

is complete.

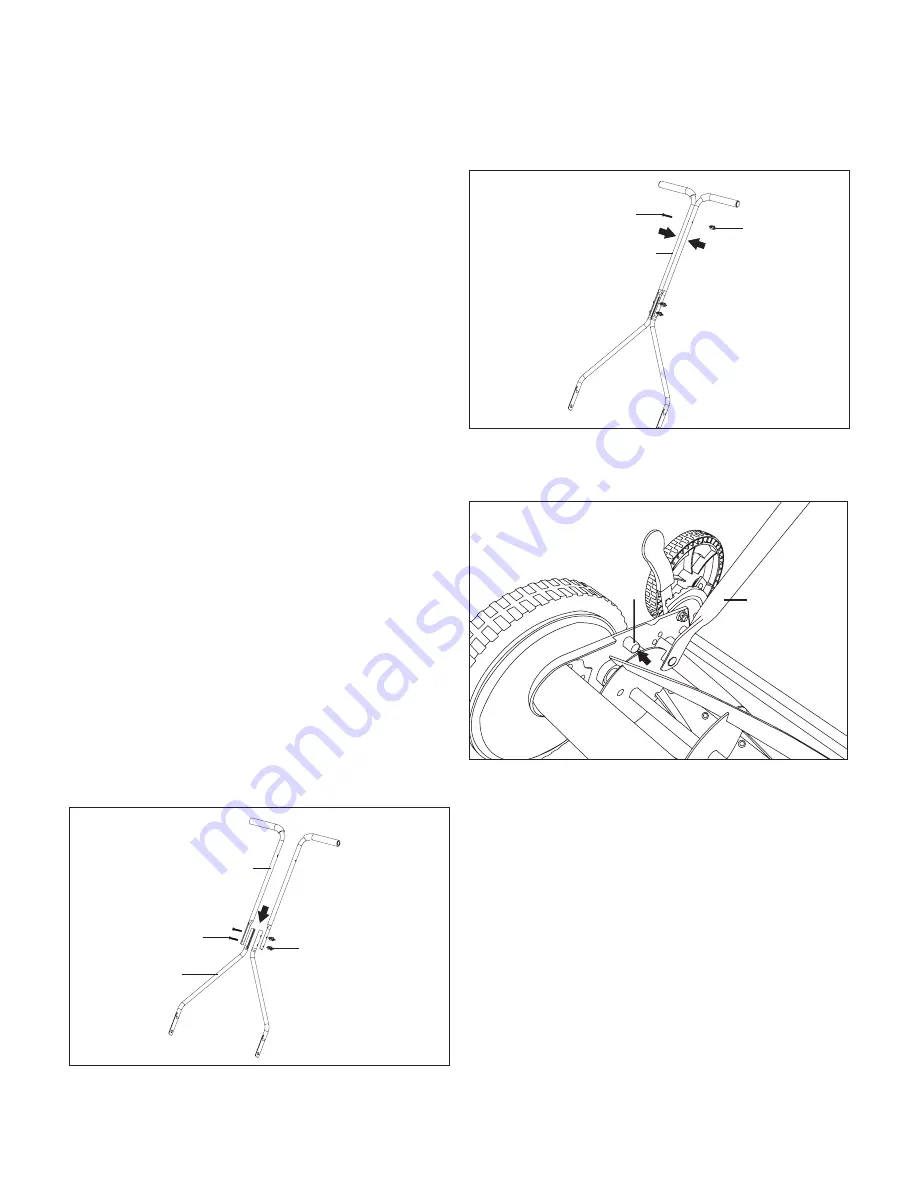
1.  Secure the two lower handle bars to the upper handle 

bars using the two knobs and bolts provided. Tighten the 

knobs on each side to ensure a secure fit (Fig. 1).

2.  Attach the two upper handle bars to each other using 

one bolt and knob provided. Tighten the knob to ensure a 

secure fit (Fig. 2).

3.  After assembling the handle, line up the holes at the lower 

end of each handle arm with the short posts that extend 

from the side plates of the mower base (Fig. 3).

4.  Pull both sides of the lower handle bars over the posts 

on the mower body. Press inward on the handle bars to 

ensure a secure fit over the posts.

Operation 

Cutting Height Adjustment

1.  The cutting height of the 14 in. (35.6 cm) reel mower can 

be adjusted from 1.1 in. to 2.9 in. (27 mm to 73 mm) by 

moving the 9-position height adjustment levers to the 

desired setting. The height adjustment levers are located 

next to the smaller wheels.

2.  In order to set the mower to its lowest cutting position, 

pull the adjustment levers on both sides, one at a time, 

and set them to position A (Fig. 4). 

3.  In order to set the mower to its highest cutting position, 

move the adjustment levers on both sides to position B 

(Fig. 4). 

  NOTE: The two adjustment levers MUST be set to the 

same position (height).

Upper handle bar

Lower 

handle 

bar

Knob

Bolt

Fig. 1

Upper handle bar

Knob

Bolt

Fig. 2

Fig. 3

Post

Lower  

handle  

bar

Содержание Sunjoe MJ503M-RM

Страница 1: ...ake sure you get the most out of your product be sure to register online at to enjoy full product support PASTE UPC LABEL HERE A Division of Snow Joe LLC OPERATOR S MANUAL Model MJ503M RM Form No SJ MJ503M RM 880E V1 R MANUAL REEL MOWER 14 INCH 9 CUTTING HEIGHTS RAZOREEL ...

Страница 2: ...el mower Always keep proper footing and balance when using this reel mower 5 Do not intentionally strike or hit trees fences or other objects Doing so can cause severe injuries or permanently damage the reel mower s mechanisms 6 Make sure that the reel mower is in proper working order prior to use Do not attempt to operate this reel mower if it is damaged Contact your authorized Snow Joe Sun Joe d...

Страница 3: ... presence of children Children are often attracted to the mower and the mowing activity Never assume that children will remain where you last saw them Keep children out of the mowing area and under the watchful care of a responsible adult other than the operator Stay alert and stop the reel mower if a child enters the area Never allow children access to the machine Use extra care when approaching ...

Страница 4: ...s and children a safe distance away DANGER Sharp blades can sever fingers and toes Keep away from the cutting area Slip on slope hazard Use extra caution when mowing on slopes to prevent slip and fall accidents CAUTION Beware of stones and other foreign objects that could be thrown from the appliance DANGER Cutting dismemberment hazard Keep hands away from the rotating blades Symbols Symbols Descr...

Страница 5: ...l for future reference 1 Foam grip 2 Upper handle bar 2 3 Upper handle knob and bolt 4 Lower handle knob and bolt 2 5 Lower handle bar 2 6 Height adjustment lever 7 Rear wheel 2 8 Front wheel 2 9 Steel blades 10 Reel mower body 5 6 8 7 10 9 3 1 2 4 Technical Data Rotor 5 steel blades Cutting Width 14 in 35 6 cm Cutting Heights 1 1 in 2 9 in 27 mm 73 mm Wheel Size Front 10 in 25 cm Rear 6 in 15 cm ...

Страница 6: ...r handle bars using the two knobs and bolts provided Tighten the knobs on each side to ensure a secure fit Fig 1 2 Attach the two upper handle bars to each other using one bolt and knob provided Tighten the knob to ensure a secure fit Fig 2 3 After assembling the handle line up the holes at the lower end of each handle arm with the short posts that extend from the side plates of the mower base Fig...

Страница 7: ...etween the blade reel and cutting bar then slowly turn the wheel by hand Fig 6 3 All the blades should slice the paper evenly along the entire length of the cutting bar while the reel is turned smoothly 4 If the mower cuts the paper intermittently adjustment should be made to the appropriate side of the blades to achieve optimal cutting performance Adjusting the Mower Blades 1 Each end of the cutt...

Страница 8: ...t growth maintain its health and encourage its natural ability to crowd out unwanted weeds Tall Grass Requires Incremental Cutting 1 For extremely tall grass set the cutting height at the mower s maximum setting for the first pass and then reset it to the desired height and mow a second or third time Fig 9 2 Removing too much of the turf s height especially in the heat of summer can cause root sho...

Страница 9: ... 2 Turn the mower on its side to clean the blade area mWARNING Do not place your hands inside or near the cutting area If grass cuttings are compacted in the blade area remove them using a wood or plastic cleaning tool appropriate for blade cleaning 3 Store the mower in a dry place Do not place other objects on top of the mower during storage Maintenance Tips Reel mowers are relatively low mainten...

Страница 10: ...10 NOTES ...

Страница 11: ...hall be construed as obligating Snow Joe Sun Joe to incorporate such design changes into previously manufactured products nor shall such changes be construed as an admission that previous designs were defective This warranty is intended to cover product defects only Snow Joe LLC is not liable for indirect incidental or consequential damages in connection with the use or misuse of the Snow Joe Sun ...

Страница 12: ...sunjoe com ...

Отзывы: