background image

10

3. 

Following this rule will stimulate the turf’s root growth, 
maintain its health, and encourage its natural ability to 
crowd out unwanted weeds.

Tall Grass Requires Incremental Cutting

1. 

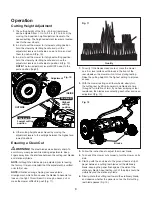
For extremely tall grass, set the cutting height at the 

mower's maximum setting for the first pass, and then 

reset it to the desired height and mow a second or third 
time (Fig. 17).

2. 

 Removing too much of the turf’s height, especially in the 

heat of summer, can cause root shock and weaken the 
lawn; bringing down the height by successive mowing 
over two or more days can avoid this damage and 
maintain the health of the turf.

3. 

If the lawn is overgrown (to higher than 4 inches) it may be 
necessary to use a brush cutter to remove the excess turf 
mass before resuming mowing at normal heights.

NOTE: 

Do not cover the grass surface with a heavy layer 

of clippings. Consider using a grass collection system and 
starting a compost pile.

Transporting the Mower 

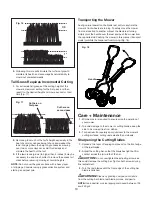
During normal operation, the blade reel will turn anytime the 
mower's front wheels are turning. To safely move the mower 
from one location to another without the blade reel turning, 
simply pivot the handle over the reel and push the mower from 
the opposite side. Pushing the mower in this manner (transport 
mode) prohibits the blade reel from turning (Fig. 18).

Care + Maintenance 

1. 

Minimum care is required to ensure smooth operation of 
your mower.

2. 

To avoid damage to the mower or cutting blades, keep the 
area to be mowed free from debris.

3. 

For best results, regularly apply lubricant to the mower’s 
cutting surfaces, cutting reel axle shaft, and wheels.

Sharpening the Cutting Blades

1. 

Spread a thin layer of lapping compound on the front edge 
of the reel blades.

2. 

Adjust the cutting bar so that the blade has light but firm 

contact across the full width of the bar. 

m

CAUTION!

 Do not overtighten the adjusting screws, as 

this could damage the cutting bar. Tighten both screws during 

final adjustment.

3. 

Turn the reel blades until the front edge of the cutting bar 
blade is polished.

m

WARNING!

 Clean any grinding compound or debris 

from the cutting bar blade, reel blade, pinions, and pawls.

NOTE: 

Use industrial or valve lapping compound between 100 

and 240 grit.

1/3

1"

Fig. 16

Cut here on 

first pass

Cut here on 
second pass

Fig. 17

Handle

Fig. 18

Содержание SUNJOE MJ1800M-RM

Страница 1: ...LLC All rights reserved Original instructions SAVE THESE INSTRUCTIONS 1 A Division of Snow Joe LLC OPERATOR S MANUAL Model MJ1800M RM Form No SJ MJ1800M RM 880E M V1 R MANUAL REEL MOWER 18 INCH 5 POSITION CUTTING HEIGHT ...

Страница 2: ...eel mower Always keep proper footing and balance when using this reel mower 5 Do not intentionally strike or hit trees fences or other objects Doing so can cause severe injuries or permanently damage the reel mower s mechanisms 6 Make sure that the reel mower is in proper working order prior to use Do not attempt to operate this reel mower if it is damaged Contact your authorized Snow Joe Sun Joe ...

Страница 3: ... presence of children Children are often attracted to the mower and the mowing activity Never assume that children will remain where you last saw them Keep children out of the mowing area and under the watchful care of a responsible adult other than the operator Stay alert and stop the reel mower if a child enters the area Never allow children access to the machine Use extra care when approaching ...

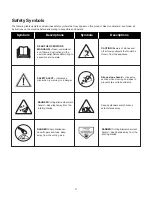
Страница 4: ...s and children a safe distance away DANGER Sharp blades can sever fingers and toes Keep away from the cutting area Slip on slope hazard Use extra caution when mowing on slopes to prevent slip and fall accidents CAUTION Beware of stones and other foreign objects that could be thrown from the appliance DANGER Cutting dismemberment hazard Keep hands away from the rotating blades Symbols Symbols Descr...

Страница 5: ...l Data Rotor 5 steel blades Cutting Width 18 in 45 8 cm Cutting Heights 1 1 in 3 2 in 2 7 cm 8 2 cm Wheel Size Front 10 in 25 cm Rear 6 in 15 cm Height Control 5 position manual height adjustment Weight 34 6 lbs 15 7 kg FRONT BACK 1 2 3 4 5 6 7 8 10 9 11 12 1 Foam grip 2 Upper handle frame 3 Handle shield knobs 4 4 Handle shield 5 Lower handle bar 2 6 Front wheel 2 7 Mower housing 8 Rear wheel 2 9...

Страница 6: ...als Properly dispose of these materials in accordance with local regulations IMPORTANT The equipment and packaging material are not toys Do not let children play with plastic bags foils or small parts These items can be swallowed and pose a suffocation risk Assembly Rear Wheel Assembly 1 Align one rear wheel with the hole on the end of the mower body and connect with one set of rear wheel washer b...

Страница 7: ...both sides of the mower body Fig 7 2 To assemble the handle assembly on the mower body insert the posts on both sides into the holes on the ends of the lower handle bars Fig 8 NOTE Some force may be needed to separate the handle legs so they fit over the posts 3 Insert the cotter pins in the original slots on the posts on both sides to secure the handle assembly Fig 9 Handle shield Fig 4 Handle sh...

Страница 8: ...ior to first use NOTE Vibrations during shipping can cause blade misalignment which often causes the blades to become too loose or too tight This will result in a rough uneven cut or make the mower difficult to push Fig 11 1 To verify if the blades make contact place the mower on a firm level surface with blocks in the front of the rear wheels so the mower will not move during testing Raise the cu...

Страница 9: ...re turned clockwise Fig 15 mWARNING Do not overtighten the adjustment screws as this could damage the cutting bar Both screws must be tight on final adjustment 3 To loosen the blades use the Allen wrench provided and turn both adjustment screws by an equal amount counterclockwise 4 To tighten the blades tighten both screws by an equal amount by turning them clockwise NOTE If you have any questions...

Страница 10: ...To safely move the mower from one location to another without the blade reel turning simply pivot the handle over the reel and push the mower from the opposite side Pushing the mower in this manner transport mode prohibits the blade reel from turning Fig 18 Care Maintenance 1 Minimum care is required to ensure smooth operation of your mower 2 To avoid damage to the mower or cutting blades keep the...

Страница 11: ...ructions Always keep the cutting bar properly adjusted Refer to the instruction manual for further directions Regularly clean and lubricate cutting edges with light spray oil IMPORTANT Reel mowers have difficulty cutting tall weeds such as dandelions and will often bend rather than cut such weeds Cut often to prevent this Service and Support If your Sun Joe MJ1800M RM manual reel mower requires se...

Страница 12: ...12 NOTES ...

Страница 13: ...13 NOTES ...

Страница 14: ...14 NOTES ...

Страница 15: ...hall be construed as obligating Snow Joe Sun Joe to incorporate such design changes into previously manufactured products nor shall such changes be construed as an admission that previous designs were defective This warranty is intended to cover product defects only Snow Joe LLC is not liable for indirect incidental or consequential damages in connection with the use or misuse of the Snow Joe Sun ...

Страница 16: ...sunjoe com ...
Отзывы: