background image

10

Downloading the Enigma

TM

 Camera Database


Please Note: You must register your Sapphire Plus 

  before you can perform a download.

Performing a download is simple.
 

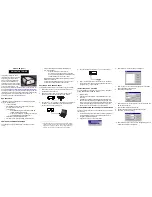
1. Switch on the Sapphire Plus by pressing and holding the power 
  button for 2 seconds.

2. Connect the computer to the Internet.

3. Double left click the ‘Sapphire Plus’ icon         located on your desktop.

4. Left click ‘Menu’ and then left click ‘Download Settings’.*

5. Select the files you wish to download (UK Cameras is selected by 
  default). Once you have selected the files you wish to download left 
  click the ‘OK’ button. *

6. Connect one end of the USB lead to your computer and plug the 
  other end of the lead into the Sapphire Plus in the socket marked 
  USB on the underside of the unit.

7. On the screen of the Sapphire Plus select ‘Micro-SD’ in the bottom 
  right hand corner of the display and wait for the serial number to be 
  displayed on the software.

8. When prompted, click ‘Go’ to start the download. The Sapphire Plus 
  software will then start to download the database files that you have 
  selected onto your unit. The download process is as follows:

 The software will connect to our database server and download** the 

 database.

 Once the data has been downloaded, the Sapphire Plus will then save the data received.

 The software will indicate that the download is complete and will instruct you to disconnect the Sapphire Plus from your PC.

*You only need to do these steps if you wish to change the data that is downloaded onto the Sapphire Plus. If you want the 
download settings to be the same as the previous download ignore these two steps.

**If you have a Firewall on your computer, the Firewall software may inform you that the Sapphire Plus Updater software is 
trying to access the internet. Please make sure that you grant/allow/permit access to the Sapphire Plus Updater program 
through the Firewall. 

Please read the messages supplied by your Firewall software carefully before choosing your option. If you do not allow the 
program to access the internet through the Firewall, the download process will fail. Please note: Windows XP SP2 and 
Windows Vista come with a built-in firewall as standard.

Connect the USB lead to

your Sapphire Plus

Return to contents

On/Off

Button

Содержание Sapphire Plus

Страница 1: ...USERMANUAL Developed by Mapping by...

Страница 2: ...ro SD slot When necessary upgrades to this mapping data will be made available for you once every twelve months As the EnigmaTM camera database changes daily regular updates to your Sapphire Plus are...

Страница 3: ...Change Language Setup 36 2D 3D North MPH KMH Arrival Time Remaining Time 37 Show POI Auto Scale Camera Alert Contents Page 38 Display Cameras Alert Sound Mute 39 School Alert GPS Status 40 Change Map...

Страница 4: ...indscreen suction cup bracket 1 x 12v DC to 5v DC Coiled power lead with cigarette lighter socket adaptor 1 x USB Data Cable 1 x Download Software Disc also includes electronic versions of the User Ma...

Страница 5: ...Features LCD Screen Power LED Return to contents On Off Button Battery Cover USB Cable Socket Loudspeaker Reset Button Stylus External Antenna Socket Unit Lock Facility Volume Control Headphone Socke...

Страница 6: ...day to Friday Your unit should normally be activated within one hour By Post If you would like to register by post send the completed registration form to us at the following address Performance Produ...

Страница 7: ...he cold start GPS time remain stationary 2 Bring up the main navigation menu by tapping the centre of the screen 3 Select 4 Select Tip The and arrows mean that there are more options to see on the scr...

Страница 8: ...e note The summary screen is only displayed for approximately 10 seconds before the unit automatically begins to provide you with turn by turn instructions 11 Press The navigation view will now be dis...

Страница 9: ...B of free disc space and a spare USB connection Software Requirements The software will only operate on the following Windows based operating systems Windows 2000 Windows XP or Windows Vista and will...

Страница 10: ...ase files that you have selected onto your unit The download process is as follows The software will connect to our database server and download the database Once the data has been downloaded the Sapp...

Страница 11: ...f the vehicle Call 0870 787 0700 and select Option 2 for further details PLEASE NOTE Be careful to choose a location that does not block the drivers view or where it might endanger the driver or passe...

Страница 12: ...ating the fuse in the cigarette lighter plug may have blown the Green LED on the cigarette lighter plug will not be illuminated If it has blown follow these steps and replace it with a 3 amp 6 x 30mm...

Страница 13: ...Y WHEN THE WEATHER IS WARM TO AVOID DAMAGE TO THE UNIT AND ALSO REDUCE THE RISK OF THEFT CAUTION THERE IS A RISK OF EXPLOSION IF THE BATTERY IS REPLACED WITH AN UNAPPROVED TYPE USING THE WRONG TYPE OF...

Страница 14: ...lf function is available within this sub menu Exit Navigation this button will allow you to exit the navigation program and have access to the other features on the unit To exit the main menu press th...

Страница 15: ...the alternate setting and vice versa However each time you power the device up the original setting will be displayed 2 3 The Sapphire Plus enables you to adjust the brightness of the display and sav...

Страница 16: ...ed to select the button in order to save your changes 3 Planning a route There are several ways to plan a route on the Sapphire Plus 3 1 Press the centre of the screen to access the Menu Press Press I...

Страница 17: ...on is complete you can either press Go to start navigation Simulation to see the actual route that will be taken Route Option to change the parameters of the route or Guide which will list the turn by...

Страница 18: ...name the Sapphire Plus will automatically prompt you with a list of possible matches similar to when searching for City described above When you see the road you require select it by pressing it with...

Страница 19: ...e these functions Once you have entered the home destination a new field is available for you to create a for the destination Press and a keyboard will be displayed with the road name you selected Pre...

Страница 20: ...hese functions Once you have entered the Office destination a new field is available for you to create a for the destination Press and a keyboard will be displayed with the road name you selected Pres...

Страница 21: ...ress to scroll to the next screen 3 6 The Sapphire Plus has the capacity to store up to 100 user locations To add your favourite locations see section 4 1 on page 29 To navigate to one of your stored...

Страница 22: ...ute parameters press Route Option see Route Options on page 43 for specific instructions To view the location of the recent destination press Map To return to the previous page press the return arrow...

Страница 23: ...right of the display to scroll up and down through the category options Once you find the category you are looking for select it with your finger Press If the name of your POI is displayed in the lowe...

Страница 24: ...ied radius and category will be displayed Use the arrows to the right hand side of the screen to scroll up and down through the options When you find the POI that you are looking for select it with yo...

Страница 25: ...n arrow to the top right hand corner of the display and a list of cities will be displayed then select your destination by touching on it Use the arrow keys on the right hand side of the display to sc...

Страница 26: ...gation Simulation to see the actual route that will be taken Route Option to change the parameters of the route or Guide which will list the turn by turn instructions of the journey The Summary Screen...

Страница 27: ...u Press Press twice Press the icon You can then choose how you would like to re route your journey from the selections shown on the display In order to use this function on your Sapphire Plus you will...

Страница 28: ...you wish to return to the original calculated route press the button and the original route plotted by the Sapphire Plus will be restored Once the re calculation of the original route is complete the...

Страница 29: ...maximum of 150 different destinations 4 1 1 Add a favourite destination Press the centre of the display to access the menu Press Press the icon Press You can now search for the destination using the f...

Страница 30: ...the display If the destination selected is not the one you wish to delete you can press the return arrow located in the bottom right hand corner of the display to go back to the list and reselect the...

Страница 31: ...user point save your changes by pressing the button at the bottom of the display The new user point information has now been stored 4 3 2 Changing the name of your user point You also have the facili...

Страница 32: ...urite menu you are able to change the Home location for example if you move house or to delete the Home location 4 4 1 To change the home location Press the centre of the display to access the menu Pr...

Страница 33: ...ing options displayed To find out how to use these options please refer to the applicable sections in this user manual Once you have entered your Office location details you also have the facility to...

Страница 34: ...ected will be displayed at the bottom of the display If this is not correct select the correct road with your finger Press and Press The Sapphire Plus will automatically save this location as your Hom...

Страница 35: ...n To reset the volume to the factory default press the icon Press at the bottom of the screen to save your setting Note The icon in the bottom right hand corner of the display will return you to the m...

Страница 36: ...he relevant tick box with your finger 5 4 2 This option allows you to switch the information on the Sapphire Plus between imperial and metric measurement To make your selection touch the relevant tick...

Страница 37: ...of the changes press the button at the bottom of the display If you wish to keep the settings unchanged you can exit the menu by pressing located in the bottom right hand corner of the display Press t...

Страница 38: ...options The unit will emit an audible alert when you approach a fixed speed safety camera No audible alert is emitted This function allows you to change the audible camera alert tone to either a or a...

Страница 39: ...lated route the Sapphire Plus will automatically recalculate a route without any user intervention To indicate rerouting is in progress the Sapphire Plus will emit an audible tone This function allows...

Страница 40: ...gh the different colour schemes There are nine colour schemes to choose from To save the changes press the button at the bottom of the display If you wish to keep the settings unchanged you can exit t...

Страница 41: ...t you wish to navigate to the following dialogue box will be displayed Press a summary screen will be displayed showing further information of the selected golf course To start the journey press Calcu...

Страница 42: ...ue box will be displayed Press Depending on the golf course you are using you will be offered a selection of tee colours similar to the screen on the right Select the coloured tee appropriate to the g...

Страница 43: ...oute that avoids any Toll Roads and Motorways if necessary There are a number of different options available to enable you to select either the most efficient route for you to take or to enable you to...

Страница 44: ...imated time of arrival and the estimated time it will take to complete your journey Please note The summary screen is only displayed for approximately 10 seconds before the unit automatically begins t...

Страница 45: ...n but want to go via a specific location along the way you can use this function Simply input the details of your final destination as usual but press the Route Option button in the summary screen and...

Страница 46: ...automatically If no other button on the drop down box is pressed the drop down box disappears after approximately three seconds From this menu you can Zoom closer in or zoom further out from the map M...

Страница 47: ...re the camera alerts press the top of the Sapphire s display to show the drop down menu and then press the icon Please note If you switch the unit off and then back on the display reverts to your prev...

Страница 48: ...indicating SPECS START and emitting an audible alert The display will indicate the speed limit at this point and then count down the remaining distance to the location of the camera The unit will the...

Страница 49: ...base and are shown as For more information on deleting user points please refer to the relevant sections in this user manual 9 5 Fixed Camera Pre Alert Setting The pre alert setting means that you wil...

Страница 50: ...the drop down menu b When the System Properties dialogue box opens the General tab is selected by default Under the heading of System the operating system is displayed If you do not have a My Compute...

Страница 51: ...blem connecting to the Performance Products server If you get an error message as described above this normally means that there is something blocking communication between the software most typically...

Страница 52: ...ire Do not expose your product to liquid or moisture or humidity Do not expose your product to extreme high or low temperatures Do not expose the battery to temperatures above 60 C 140 F Do not expose...

Страница 53: ...tails please contact our sales department on 0870 787 0700 Option 2 European Mapping Micro T Flash SD Card 149 99 Remote GPS extension antenna 5m 34 99 Coiled In car charger 12v DC to 5v DC adaptor 19...

Страница 54: ...phire Plus by special delivery and in suitable packaging to The Returns Dept Performance Products Limited Cleaver House Sarus Court Stuart Road Manor Park Runcorn WA7 1UL Tel 0870 787 0700 Fax 0870 78...

Отзывы: