SNBC BT-T080R Скачать руководство пользователя страница 39


BT-T080R User’s Manual


- 33 - 


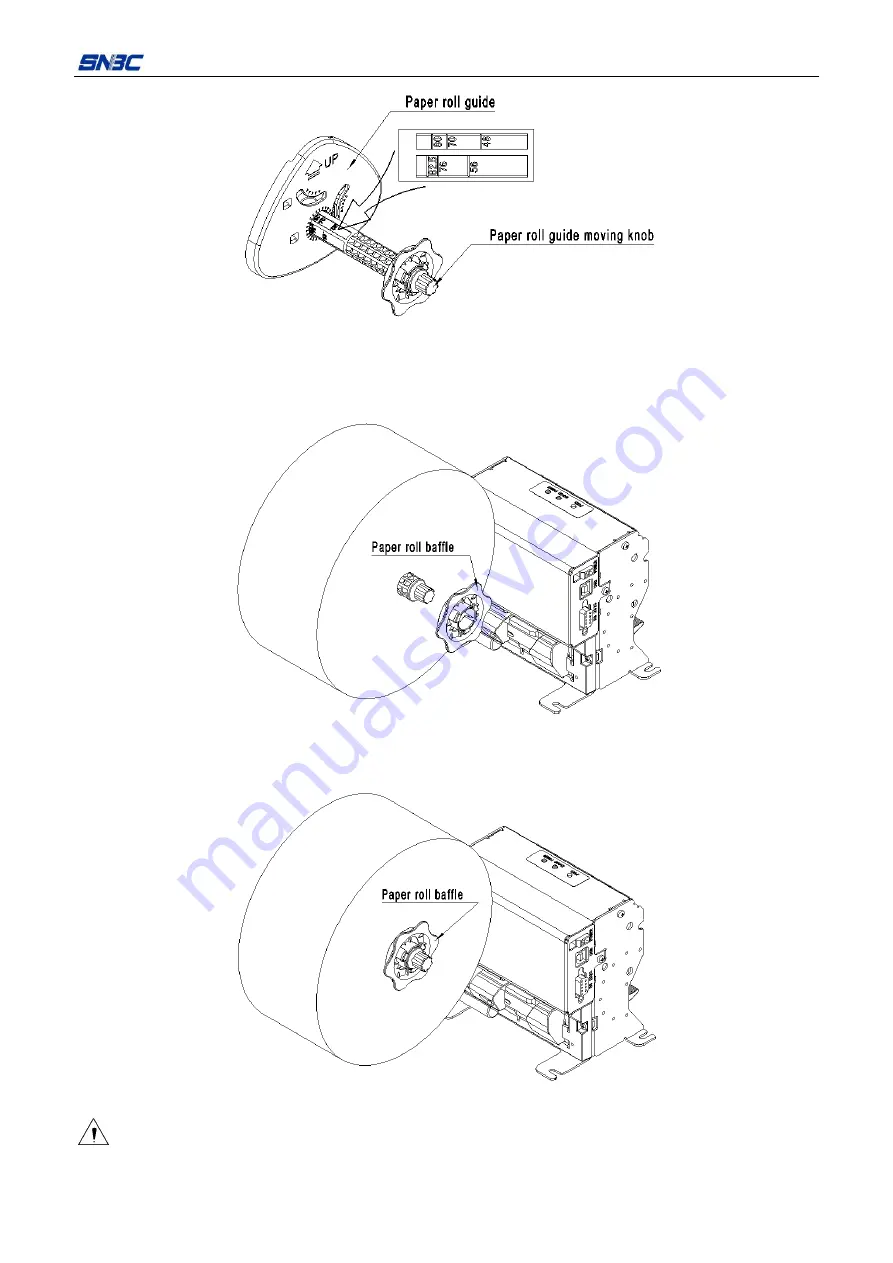
Figure 4.7.4 Adjusting paper roll guide 

4)  Remove the paper roll baffle, and install the paper roll onto the paper roll shaft to make one end face of 

the paper roll contact with the paper roll guide; 


Figure 4.7.5 Install the paper roll onto the paper roll shaft 

5)  Install the paper roll baffle onto the paper roll shaft and fix the position of the paper roll. 


Figure 4.7.6 Installing paper roll baffle 

Caution: 

¾

  While installing the paper roll baffle, you cannot tighten the paper roll and should reserve 1-3mm 

Содержание BT-T080R

Страница 1: ...User s Manual Embedded Printer BT T080R Shandong New Beiyang Information Technology Co ltd...

Страница 2: ...cal for any purpose without the express written permission of SNBC Copyright This manual was published in 2012 with copyright belonging to SNBC Printed in China Version 1 0 Trademark Our registered tr...

Страница 3: ...osed to vibration and impact 6 No dew condensation is allowed with the printer In case of such condensation do not turn on the power until it has completely gone away 7 Connect the AC power adapter to...

Страница 4: ...on 8 3 Appearance and modules 9 3 1 Appearance and modules 9 3 2 Overall size of printer 11 3 2 1 Without paper outlet module 11 3 2 2 With paper outlet module optional 11 3 2 3 With anti pull and ant...

Страница 5: ...talling and loading paper roll 32 4 7 1 Installing paper roll 32 4 7 2 Loading paper 34 4 8 Installing the driver 36 4 8 1 Typical installation 36 4 8 2 Advanced installation 38 5 Routine maintenance...

Страница 6: ...080R User s Manual 5 6 3 Power interface 43 7 Troubleshooting 44 7 1 Common errors and settlement 44 7 2 Solutions for common errors 46 Appendix 48 Appendix 1 Self test page 48 Appendix 2 Software too...

Страница 7: ...e high printing speed Support continuous paper and marked paper Do not recommend using inside paper because there is risk of paper jams Support paper width ranging from 48mm to 82 5mm Support paper ro...

Страница 8: ...E128 ITF UPC A UPC E EAN13 EAN8 CODE39 CODE93 CODABAR PDF417 Character set Standard ASCII compressed ASCII Optional Asian character set Simplified Chinese traditional Chinese Japanese Korean Character...

Страница 9: ...ata transmission speed print darkness print duty ratio control commands and input voltage which may be lower than that in the above table 2 2 Cutter technical parameters Item Parameter Remark Cut meth...

Страница 10: ...ric sensor 3 Print head position Microswitch 4 Print head temperature Thermal resistor Table 2 3 Status detection Figure 2 3 1 Mark sensor 1 Figure 2 3 2 Mark sensor 2 Note When the mark sensor is loc...

Страница 11: ...eter Remark Paper width 48 82 5mm Recommended 70 82 5mm Paper thickness 60 100 m Paper roll OD 180mm Paper roll ID 18 60mm Recommended 18 25 4mm Thermal layer position Inward outward The anti pull and...

Страница 12: ...rameter the position fixed by mark may have a tolerance of 1mm 2 4 3 Recommended paper Paper type Manufacturer TF50KS E2C Nippon Paper Industries CO LTD F240AC F220 VP Mitsubishi Paper Mill CO LTD KF0...

Страница 13: ...BT T080R User s Manual 7 z When the temperature goes up to 70 degrees paper will discolor So please be careful to the effect of temperature humidity and sunlight in environment...

Страница 14: ...gin Adjustable L3 Print right margin Adjustable L4 Top margin Recommend no less than 5mm Figure 2 5 1 Print width Note The path width of BT T080R is wider than that of paper While the paper is moving...

Страница 15: ...shaft module Figure 3 1 2 Print mechanism module 3 Button and LED 4 Mechanism spanner 5 Cutter 6 Tear off bar 7 Power interface 8 Communication interface serial interface plus USB Figure 3 1 3 Print...

Страница 16: ...10 Communication interface parallel interface optional 12 Paper out module paper outlet with LED optional Figure 3 1 5 Cantilever module 13 Cantilever 14 Buffer shaft 15 Paper roll shaft 16 Paper rol...

Страница 17: ...odule Figure 3 2 1 Overall size of printer without paper out module 3 2 2 With paper outlet module optional Figure 3 2 2 Overall size of printer with paper outlet module 3 2 3 With anti pull and anti...

Страница 18: ...LED Status Description ERROR flash off The printer is abnormal The printer is normal POWER on off The printer is powered on The printer is powered off 3 4 Paper outlet module with LED optional Figure...

Страница 19: ...the module works and stops feeding paper to avoid influencing user s use and mechanism lifetime caused by mechanism paper jams 2 When pulling paper in the horizontal or downwards direction the module...

Страница 20: ...e side While operating and maintaining the printer reserve the extreme space for paper roll installation according to the space explanation of 4 3 Installing cantilever module Furthermore you need to...

Страница 21: ...er should be placed horizontally Figure 4 2 2 Size of print mechanism installation Note Recommend using M4 8 pan head screw for fixing Figure 4 2 3 Paper out module avoidance space When assembling ant...

Страница 22: ...eye on the angle of the buffer shaft while adjusting and refer to 3 1 for the drawing of the buffer shaft The serial number of the part is 14 3 Please refer to 2 3 for the drawing of paper roll with t...

Страница 23: ...utward Figure 4 3 3 Module installation setting and size Position 1 for installing buffer Buffer shaft position 1 2 Paper roll with thermal layer inward Figure 4 3 4 Module installation setting and si...

Страница 24: ...oles marked by solid circle and the extreme size after installing the paper roll Following is the explanation for the modules corresponding with the paper roll with thermal layer outward and the paper...

Страница 25: ...section angle between the cantilever and the horizon is 60 The following drawing indicates the relative position of the print mechanism to fixing holes marked by solid circle and the extreme size afte...

Страница 26: ...er roll with thermal layer outward Figure 4 3 9 Module installation setting and size Position 1 for installing buffer Buffer shaft position 1 2 Paper roll with thermal layer inward Figure 4 3 10 Modul...

Страница 27: ...llowing drawing indicates the relative position of the print mechanism to fixing holes marked by solid circle and the extreme size after installing the paper roll Following is the explanation for the...

Страница 28: ...BT T080R User s Manual 22 Figure 4 3 12 Module installation setting and size Position 1 for installing buffer Buffer shaft position 1 2 Paper roll with thermal layer inward...

Страница 29: ...d below the print mechanism and the intersection angle between the cantilever and the horizon is 30 The following drawing indicates the relative position of the print mechanism to fixing holes marked...

Страница 30: ...ual 24 Figure 4 3 14 Installation position with the cantilever angle 30 1 Paper roll with thermal layer outward Figure 4 3 15 Module installation setting and size Position 1 for installing buffer Buff...

Страница 31: ...he intersection angle between the cantilever and the horizon is 60 The following drawing indicates the relative position of the print mechanism to fixing holes marked by solid circle and the extreme s...

Страница 32: ...r s Manual 26 Figure 4 3 18 Module installation setting and size Position 2 for installing buffer Buffer shaft position 1 2 Paper roll with thermal layer inward Figure 4 3 19 Module installation setti...

Страница 33: ...oll baffle 1 Paper roll baffle 2 Paper roll baffle connection film 2 Refer to the following figure install the baffle connecting film onto the print mechanism module Figure 4 3 21 Installing the baffl...

Страница 34: ...ng paper near end sensor The paper near end sensor module is located on the paper roll guide of the cantilever holder and we need to install the cantilever holder onto the print mechanism firstly Refe...

Страница 35: ...per length 100 m 2 4m 3 3m 5 9m 10m 15 5m Remaining paper roll diameter 34 1m m 40mm 47 1m m 54 7m m 60 m 2 7m 8 3m 16 4m 26 6m 70 m 2 3m 7 1m 14 1m 22 8m 80 m 2m 6 m 12 3m 19 9m 90 m 5 6m 10 9m 17 7m...

Страница 36: ...ng figure plug the power adapter cable pin into the power socket of print mechanism 3 Connect the AC power adapter to an electrical outlet Figure 4 5 1 Connecting power adapter Caution Use recommended...

Страница 37: ...er see Figure 4 6 1 3 Connect the other end of the interface cable to the host computer Figure 4 6 1 Connecting USB cable Figure 4 6 2 Connecting serial interface cable Caution Make sure the interface...

Страница 38: ...aper roll Steps for installing paper roll 1 Move the paper guide 1 and paper guide 2 left and right and make the path width mark on paper guide 2 move to the scale corresponding with paper width Figur...

Страница 39: ...face of the paper roll contact with the paper roll guide Figure 4 7 5 Install the paper roll onto the paper roll shaft 5 Install the paper roll baffle onto the paper roll shaft and fix the position o...

Страница 40: ...that the print paper head meets correct requirements and the paper head is flat Figure 4 7 7 Print paper head 3 Make sure that the path width mark on paper guide 2 moves to the scale corresponding wi...

Страница 41: ...tically and the printer starts printing after the printer finishes loading paper and the paper head stops at the normal print position Caution Before loading paper check and ensure that the position f...

Страница 42: ...he installation includes typical installation and advanced installation 4 8 1 Typical installation Steps for typical installation are shown as follows 1 Run the Setup exe in Setup_BT T080R_CN V1 0 and...

Страница 43: ...etup Type Typical and then click Next button 4 The driver identifies the current system type automatically and then click Next button 5 Set printer port and select USB_BT T080R_1 as the print port The...

Страница 44: ...ral USB printers driver Set the driving mode with the steps as follows 1 Run the Setup exe in the file Setup_BT T080R_CN V1 0 and then read the relative software license protocols If you accept all th...

Страница 45: ...ced and click Next button 4 The driver identifies the current system type automatically and then click Next button 5 Set the printer driving mode and printer port The system supports several USB insta...

Страница 46: ...before using 3 Wait for 5 10 minutes until the pure alcohol evaporates completely and then close the spanner in the reverse direction Caution If the print job is just over please wait until the print...

Страница 47: ...arity bit are set by EEPROM 6 1 2 Interface linking terminal distribution and signal function Printer signal and status is described as the following table Pin Signal name Signal direction Function 1...

Страница 48: ...ransmission Support USB 2 0 protocol Connector printer end USB B series socket Support connecting through USB HUB 6 2 2 Interface signal definition and functions Pin No Signal name Description 1 VBUS...

Страница 49: ...BT T080R User s Manual 43 6 3 Power interface Adopt the 2 pin single bend socket whose space is 4 2mm and pin width is 1 6mm Pin definition Pin Signal definition Cable color 1 24V Green 2 GND Black...

Страница 50: ...printing recovers automatically without losing print content Voltage is too high The voltage of the power is over 26 4V The voltage of the power is less than 21 6V Automatic recovery after the voltag...

Страница 51: ...igh The voltage of the power is over 26 4V Automatic recovery after the voltage is less than 26 4V Voltage is too low The voltage of the power is less than 21 6V Automatic recovery after the voltage i...

Страница 52: ...per path remove wastepaper and reload paper Printout is not clear The paper is loaded in wrong direction or its quality is poor Print head needs cleaning Print darkness is too low The input voltage is...

Страница 53: ...doesn t work after receiving commands Printer is in error status The communication cable is not connected well Interface setting is wrong Remove all errors Make sure the communication cable is connect...

Страница 54: ...re FV1 020 H W Parameters H W ID BT T080R U 1 Flash Memory Size 1M Bytes Flash Logos Fonts 64K Bytes Resolution 203 203DPI Print Width Max 80mm Print Width Real 78mm Fixed Left Margin 2mm Fixed Right...

Страница 55: ...ft Margin Printer left margin Fixed Right Margin Printer right margin Print Width Max Maximum print width Print Width Real Real print width Dark Scale Print darkness Print Speed Max Print speed Cutter...

Страница 56: ...gging and monitoring the printer and monitoring the voltage of every sensor It can send user defined command and support updating firmware online Meanwhile it provides EEpromSet tool which allows the...

Отзывы: