Страница 1: ... Rider with 50 Mower CE Export 5900681 5900682 5900685 5900768 5900760 355ZB2444 Snapper 24HP B S 355Z Zero Turn Rider with 44 Mower 355ZB2450 Snapper 24HP B S 355Z Zero Turn Rider with 50 Mower 355ZB2450CE Snapper 24HP B S 355Z Zero Turn Rider with 50 Mower CE Export 355ZB2654 DLR Snapper 26HP B S 355Z Zero Turn Rider with 54 Mower 360ZB2450CE Snapper 24HP B S 360Z Zero Turn Rider with 50 Mower C...
Страница 2: ...nit Model Number Unit SERIALNumber Mower Deck ModelNumber Mower DeckSERIALNumber DealerName DatePurchased iiiil liiiii EngineMake EngineModel EngineType Spec EngineCode SerialNumber See Page 8 for the location of Identification Numbers DATE PURCHASED IIIIIIIII Briggs Stratton Power Products Group LLC Copyright 2008 Briggs Stratton Corporation Milwaukee WI USA All rights reserved The Simplicity log...
Страница 3: ...l Filter 26 Check Engine Oil Filter 27 Engine Maintenance 27 Check Fill Transmission Oil 28 Transmission Oil Filter Change 28 Battery Maintenance 29 Storage 29 Troubleshooting Adjustments Service 30 Troubleshooting the Rider 30 Troubleshooting the Mower 31 Common Cutting Problems 32 Seat Adjustment 33 Ground Speed Control Lever Adjustment 33 Speed Balancing Adjustment 34 Cutting Height Adjustment ...
Страница 4: ... ask a professional contact your local authorized dealer ReadtheManual The operator s manual contains important safety information you need to be aware of BEFORE you operate your unit as well as DURING operation Safe operating techniques an explanation of the product s features and controls and maintenance information is included to help you get the most out of your equipment investment Be sure to...
Страница 5: ... These blades can pick up and throw debris that could seriously injure a bystander Be sure to clean up the area to be mowed and remove objects that could be thrown by the blade BEFORE you start mowing Do not operate this unit without the entire grass catcher or discharge guard deflector in place Also do not allow anyone in the area while the unit is running If someone does enter the area shut the ...
Страница 6: ...is hot or running Allow engine to cool for at least 3 minutes prior to adding fuel Do not add fuel indoors in an enclosed trailer garage or any other enclosed area that is not well ventilated Gasoline spills should be cleaned up promptly and before operation begins Gasoline should be stored only in sealed containers approved for fuel Proper maintenance is critical to the safety and performance of ...
Страница 7: ...er s recommendations for wheel weights or counterweights 20 Keep in mind the operator is responsible for accidents occurring to other people or property 21 All drivers should seek and obtain professional and practical instruction 22 Always wear substantial footwear and trousers Never operate when barefoot or wearing sandals 23 Before using always visually check that the blades and blade hardware a...
Страница 8: ... 15o Select slow ground speed before driving onto slope Use extra caution when operating on slopes with rear mounted grass catchers Mow across the face of slopes not up and down use caution when changing directions and DO NOT START OR STOP ON SLOPE TOWED EQUIPMENT RIDE ON UNITS 1 Tow only with a machine that has a hitch designed for towing Do not attach towed equipment except at the hitch point 2 ...
Страница 9: ...ne clamps further than necessary Ensure clamps grip hoses firmly over the filter after installation 12 Do not use gasoline containing METHANOL gasohol containing more than 10 ETHANOL gasoline additives or white gas because engine fuel system damage could result 13 If the fuel tank must be drained it should be drained outdoors 14 Replace faulty silencers mufflers 15 Maintain or replace safety and i...
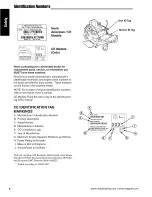
Страница 10: ...cation of engine identification numbers refer to the engine owner s manual CE Models Place the extra copy of the identification tag in the manual CE IDENTIFICATION TAG MARKINGS A Manufacturer s Identification Number B Product Description C Serial Number D Manufacturer s Address E CE Compliance Logo E Year of Manufacture G Maximum Engine Speed in Rotations per Minute H Power Rating in Kilowatts I M...
Страница 11: ...r and mower should be carefully read and obeyed Personal bodily injury can result when these instructions are not followed The information is for your safety and it is important The safety decals below are on your rider and mower If any of these decals are lost or damaged replace them at once See your local dealer for replacements These labels are easily applied and will act as a constant visual r...
Страница 12: ...uthorized dealer Under no circumstance should you attempt to defeat the purpose of the safety interlock system EXPORT MODELS ONLY SAFETY INTERLOCK SYSTEM This unit is equipped with safety interlock switches These safety systems are present for your safety do not attempt to bypass safety switches and never tamper with safety devices Check their operation regularly Operational SAFETY Checks Test 1 E...
Страница 13: ...ebris Keep bystanders away Warning Remove Key Before Servicing Remove the key and consult technical literature before performing repairs or maintenance Danger Machine Rollover Operating on steep slopes can cause sliding and loss of steering control and rollover Do not use this machine on slopes greater than 15 This limit was determined per CEN Standard EN 836 1997 Section 5 2 2 and is based on the...
Страница 14: ...m the neutral position the faster the drive wheel will turn See the OPERATION section for steering instructions _ Throttle Control The throttle controls engine speed Move the throttle forward to increase engine speed and back to decrease engine speed Always operate at FULL throttle Choke Close the choke for cold starting Open the choke once the engine starts A warm engine may not require choking M...
Страница 15: ... THE UNIT BY HAND for operational information Seat Adjustment Lever The seat can be adjusted forward and backward Move the adjustment lever towards the left slide the seat to the desired position and release the lever Fuel Tank Fuel Level Gauge To remove the cap turn counterclockwise The fuel gauge is mounted in the fuel tank and indicates the amount of fuel in the tank Mower Height of Cut Adjustm...
Страница 16: ...aves and excess grease Do not stop or park tractor over dry leaves grass or combustible materials Gasoline is highly flammable and must be handled with care Never fill the tank when the engine is still hot from recent operation Do not allow open flame smoking or matches in the area Avoid over filling and wipe up any spills CHECKS BEFORE STARTING Check that crankcase is filled to full mark on dipst...
Страница 17: ...situations For normal engine shut down follow the procedure given in STOPPING THE RIDER STOPPING THE RIDER AND ENGINE 1 Returning the ground speed control levers to the middle position will stop tractor movement Pivot the levers outward and lock them in NEUTRAL 2 Disengage the PTO by pushing down on the PTO switch 3 Engage the parking brake by pulling the handle up until it locks into position 4 M...
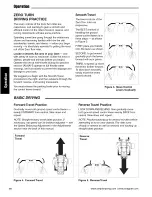
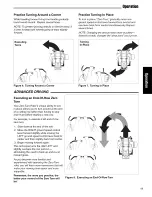
Страница 18: ...ever controls of the Zero Turn rider are responsive The BEST method of handling the ground speed control levers is in three steps as shown in Figure 3 FIRST place your hands onto the levers as shown SECOND to go forward gradually push the levers forward with your palms THIRD to speed up move the levers farther forward To slow down smoothly slowly move the levers toward neutral Figure 3 Move Contro...
Страница 19: ...Turn Your Zero Turn Rider s unique ability to turn in place allows you to turn around at the end of a cutting row rather than having to stop and Y turn before starting a new row For example to execute a left end of row zero turn 1 Slow down at the end of the row 2 Move the RIGHT ground speed control lever forward slightly while moving the LEFT ground speed control lever back to center and then sli...
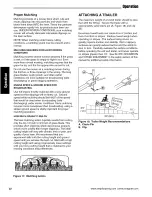
Страница 20: ...t Installation 44 50 Mower Decks 1 Disengage the PTO engage the parking brake turn off the ignition remove the key andwait for all moving parts to stop 2 Remove the cutting height pin and lower the attachment lift to its lowest position 3 Pivot the front wheels out of the way and slide the mower deck under the unit 4 Install the leveling links and hair pins I J C D 5 Lift the rear of the mower dec...
Страница 21: ...t wheels out of the way and slide the mower deck out from under right side of the unit Installation 54 Mower Decks 1 Disengage the PTO engage the parking brake turn off the ignition remove the key andwait for all moving parts to stop 2 Remove the cutting height pin and lower the attachment lift to its lowest position 3 Pivot the front wheels out of the way and slide the mower deck under the unit 4...
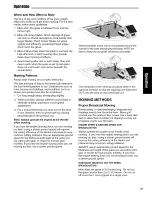
Страница 22: ...per mowing recommendations can improve the performance and life of your machine Figure 16 Incremental Cutting Height of Grass Often cutting height is a matter of personal preference Typically you should mow the grass when it is is between three and five inches high The proper cutting height range for a specific lawn will depend upon several factors including the type of grass the amount of rainfal...
Страница 23: ...er ground speed will improve the cutting efficiency of the blades and prevents many common cutting problems Use an appropriate ground speed for the thickness and height of the grass you are cutting 3rd gear or slower for manual gear models If you hear the engine slowing down you are mowing too fast use a slower ground speed Where possible make one or two passes around the outside of the area disch...
Страница 24: ...r ground speed is vitally important for proper mulching operation HOW MUCH GRASS TO MULCH The best mulching action typically results from cutting only the top 1 2 inch to 3 4 inch of grass blade This provides short clippings which decompose properly much more quickly than longer clippings The ideal cutting height will vary with climate time of year and quality of your lawn We recommend that you ex...
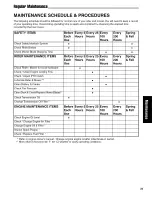
Страница 25: ...ery 25 Every Every Spring Each Hours Hours 100 200 Fall Use Hours Hours Check Rider Mower for loose hardware Check Clean Engine Cooling Fins Check Adjust PTO Clutch Lubricate Rider Mower Clean Battery Cables Check Tire Pressure Clean Deck Check Replace Mower Blades Check Transmission Oil Change Transmission Oil Filter ENGINE MAINTENANCE ITEMS Before Every 5 Every 25 Every Every Spring Each Hours H...
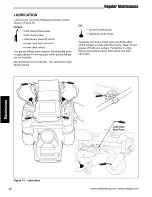
Страница 26: ...s to apply grease to moving parts when grease fittings are not installed Not all greases are compatible Use automotive type lithium grease Oil 41_ control handle pivots discharge chute hinge Generally all moving metal parts should be oiled where contact is made with other parts Keep oil and grease off belts and pulleys Remember to wipe fittings and surfaces clean both before and after lubrication ...
Страница 27: ...weld or straighten bent mower blades 1 Remove the mower blade from the unit See Removing the Blade 2 Inspect the mower blade Figures 21 22 Discard the mower blade if it has any of the below conditions A Has more than 5 12 7 mm of the mower blade metal removed from previous sharpening or wear D Figure 18 B The air lifts are excessively eroded B C Figure 22 and the notch C is 25 6 35 mm deep or grea...
Страница 28: ... mower blade If either end of the mower blade moves downward sharpen the heavy end until the mower blade is balanced See Sharpening the Mower Blades for proper sharpening instructions 4 Repeat the process until the mower blade remains in the horizontal position Reinstalling the Mower Blades AWARNING For your personal safety each mower blade mounting bolt must be installed with a hex spline washer ...
Страница 29: ...d fuel Using pliers open and slide the hose clamps from the fuel filter C Figure 27 Remove the hoses from the filter Install the new filter in the proper flow direction in the fuel line Secure with the hose clamps Reconnect the negative battery cable when finished Tire Pressure Front 40 psi 2 76 bar S N 20131269510 Below Front 25 psi 1 72 bar S N 20131269511 Above Rear 15 psi 1 03 bar Figure 26 Ch...
Страница 30: ...position route around to the front of the engine to retain the hose during normal operation 5 Place an absorbent shop cloth under the engine oil filter B Remove the oil filter and discard 6 Using a drop of oil see the engine operator s manual for oil recommendations on your finger tip wet the rubber gasket on the bottom of the new filter Turn the filter clockwise until the rubber gasket meets the ...
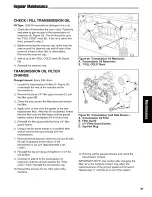
Страница 31: ... thread the new filter onto the filter base until the gasket makes contact then tighten 3 4 of a turn more 5 Reinstall the filter guard with the three 1 4 filter guard screws 6 Using a hex bit swivel socket or a modified allen wrench remove the top port plug from the transmissions 7 Remove the transmission reservoir cap and fill with oil until oil appears at the bottom of the transmission s top po...
Страница 32: ...m the following steps Disengage the PTO set the parking brake remove the key Perform engine maintenance and storage measures listed in the engine owner s manual This includes draining the fuel system or adding stabilizer to the fuel do not store a fueled unit in an enclosed structure see warning Battery life will be increased if it is removed put in a cool dry place and fully charged about once a ...
Страница 33: ...efill the fuel tank 4 Engine flooded 4 Move choke control to closed position 5 Fuse blown 5 Replace fuse 6 Battery terminals require 6 Clean the battery terminals cleaning Battery discharged or dead Wiring loose or broken 7 7 Recharge or replace 8 8 Visually check wiring replace broken or frayed wires Tighten loose connections 9 Solenoid or starter motor faulty 9 Repair or replace See authorized d...
Страница 34: ...zed service dealer for repair or damaged Engine stalls easily with 1 Engine speed too slow 1 Set to full throttle mower engaged 2 Ground speed too fast 2 Decrease Ground Speed 3 Cutting height set too low 3 Cut tall grass at maximum cutting height during first pass Cut grass with discharge pointing toward previously cut area Tighten to 70 ft lbs 94 Nm Check and replace as necessary Excessive mower...
Страница 35: ...not leveled correctly 2 Tires are not properly inflated 3 Blades are damaged 4 Deck shell is damaged 5 Mower spindle is bent or loose 6 Blades are installed incorrectly 1 Level the deck correctly 2 Check and inflate the tires 3 Replace the blades 4 Repair or replace the deck 5 Repair or replace the spindle 6 Reinstall the blades correctly Uneven Cutting Stingers 1 Deck is not leveled correctly 2 B...
Страница 36: ...R ADJUSTMENT The control levers can be adjusted in three ways The alignment of the control levers the placement of the levers how close the ends are to one another and the height of the levers can be adjusted To Adjust the Handle Alignment Loosen the mount bolts A Figure 33 and pivot the lever s C to align with each other To Adjust the Handle Placement Loosen the jam nuts and adjust the placement ...
Страница 37: ... Adjustment Bolt B Control Lever Base C Reverse Top Speed Adjustment Bolt CUTTING HEIGHT ADJUSTMENT The cutting height adjustment pin A Figure 35 controls the mower cutting height The cutting height is adjustable between 1 1 2 3 8 cm and 4 1 2 11 4cm Pulling the lever back fully locks the control in transport position To adjust cutting height 1 Pull the adjustment lever B back fully until it locks...
Страница 38: ...e ride according to operator s weight and operating conditions LESS PRE LOAD Light operator weight Softer more cushioned ride Best for relatively flat terrain MORE PRE LOAD Heavy operator weight Stiffer more rigid ride Better handling and greater stability on hilly terrain TO ADJUST THE SPRING PRE LOAD 1 Park machine on a flat level surface Disengage the PTO stop the engine and engage the parking ...
Страница 39: ...s inserted and removed and make any necessary adjustments by tightening or loosening the adjustment nuts NOTE The actual air gap between the rotor and armature may vary even after performing the adjustment procedure This is due to dimensional variations on component parts and is an acceptable condition Check the mower blade stopping time The mower blades and mower drive belt should come to a compl...
Страница 40: ...ce from the ground to the front tip of the center blade and from the ground to rear tips of left hand and right hand blades Figures 41 43 The front tip of the center blade should be 1 4 6mm higher than rear tips of left hand and right hand blades If not proceed with steps 8 11 8 Check the length of the hanging rods The rear D Figure 2 should be 15 38 1cm and is not adjusted To adjust the pitch of ...
Страница 41: ...To avoid damaging belts DO NOT PRY BELTS OVER PULLEYS 1 Park the rider on a smooth level surface such as a concrete floor Disengage the PTO engage the parking brake turn off the engine and remove the ignition key 2 Raise the mower deck to transport position Pull the lever A Figure 45 towards the rear of the machine to release tension on the mower belt Secure the lever in the guard notch B 3 Remove...
Страница 42: ... 4 Remove the old belt and replace it with the new one Make sure the V side of the belt runs in the grooves of the crankshaft pulley and transmission pulleys B C 5 Reinstall the anchor hook H into the anchor tab and loosely fasten the nut Adjust the spring until a measurement of 9 22 86cm is achieved from the outside of the spring hooks Tighten nut 6 Reinstall the PTO drive belt BATTERY CHARGING A...
Страница 43: ...orrected in accordance with SAE J1995 Revision 2002 05 Torque values are derived at 3060 RPM horsepower values are derived at 3600 RPM Actual gross engine power will be lower and is affected by among other things ambient operating conditions and engine to engine variability Given both the wide array of products on which engines are placed and the variety of environmental issues applicable to opera...
Страница 44: ...Notes 42 www simplicitymfg com I www snapper com ...
Страница 45: ...Size 20 x 8 00 10 Inflation Pressure 15 psi 1 03 bar Tire Size 11 x 4 00 5 Inflation Pressure 40 psi 2 76 bar BELTS AND BLADES TRACTOR Pump Drive Belt 5101033 44 MOWER Deck Drive Belt 5023256 Mower Blade 1704100 50 MOWER Deck Drive Belt 5023255 Mower Blade 1708229 54 MOWER Deck Drive Belt Mower Blades 5101405 1736044 1736043 Simplicilq MANUFACTURING INC 500 N Spring Street PO Box 997 Port Washingt...