background image

MOWING TIPS 

NOTE: A sharp blade will greatly enhance the performance of the mower, especially when cutting high grass. Be sure to 

check the blade and to sharpen it at least once per year, as described in the Maintenance section.

• Verify that the lawn is free of stones, sticks, wires, and other objects that could damage the blades or the motor. These 

objects could be accidentally thrown by the mower in any direction, and could cause serious personal injury to the 

operator and to others. In order to prevent electric shock, do not operate the mower in damp or wet conditions.

• Do not mow in circles. Travel back and forth across the lawn.
• When cutting thick grass, reduce walking speed in order to allow for a more effective cut and a proper discharge of the 

clippings.

• For a healthy lawn, always cut  off one-third or less of the total length of the grass. The average lawn should be 

approximately 1 1/2 to 2” (3.8 to 5 cm) long during cool months, and between 2" to 3 1/4" (5 cm to 8.3 cm) long during hot 

months. If there is growth, the lawn should be cut in the fall.

MULCHING TIPS

NOTE: INSPECT THE AREA WHERE THE MOWER IS TO BE USED, AND REMOVE ALL STONES, STICKS, WIRE, 

BONES, AND OTHER DEBRIS THAT MIGHT BE THROWN BY THE ROTATING BLADE.

• Release the bail lever to turn the mower OFF when crossing any graveled area (stones can be thrown by the blade).
• Set mower to the highest cutting height when mowing on uneven ground or in tall weeds.
• For effective mulching, do not cut wet grass, because it tends to stick to the underside of the deck, preventing proper 

mulching of grass clippings. New or thick grass may require a narrower cut. The ground speed should be adjusted to the 

condition of the lawn. If mowing has been delayed and the grass has been allowed to grow longer than 4" (10 cm), mow 

the lawn twice in order to reduce the grass height to a maximum of 3 1/4” (8.3 cm).

• Walk at a steady pace. Overlap the cutting rows. Do not let the grass get too tall. If the grass gets too long, start at the 

highest cutting position and work down to the desired cutting height.

W A R N I N G

If you strike a foreign object, stop the motor and remove the battery. Thoroughly inspect the mower for any damage. Repair 

any damage before operating the mower. Excessive vibration of the mower during operation is an indication of damage. 

Thoroughly inspect the mower and repair any damage before operating the mower. 

OPERATION

18

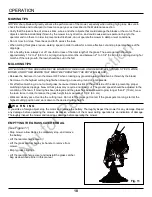
EMPTYING THE GRASS CATCHER BAG  

(See Figure 11) 

• Stop mower, allow blades to completely stop, and remove 

the battery.

• Lift the rear discharge cover. 
• Lift the grass catcher bag by its handle to remove from 

mower. 

• Empty grass clippings.
• Lift the rear discharge cover and reinstall the grass catcher 

bag as described earlier in this manual.

Fig. 11

Not 

for 

Reproduction

Содержание SXD21SPWM82

Страница 1: ...ules and instructions carefully before operating this tool Owner s Manual TOLL FREE HELPLINE 1 800 317 7833 www snapper com 21 82V Cordless Self propelled Mower 1696860 SXD21SPWM82 N o t f o r R e p r...

Страница 2: ...LLED MOWER Battery type 82 V Lithium ion No load speed 2800 RPM Self propelled speed 1 6 4 9 fps 0 5 1 5 m s Deck size 21 53 3 cm Height adjustments 1 3 8 3 3 4 3 5 9 5 cm Torque for the blade bolt 24...

Страница 3: ...rds shields switches etc in place and working Keep blades sharp Keep hands and feet away from cutting area Objects struck by the lawn mower blade can cause severe injuries to persons The lawn should a...

Страница 4: ...not operate machine while under the influence of alcohol or drugs Never operate mower in wet grass Always be sure of your footing walk never run Disengage the drive system if so equipped before start...

Страница 5: ...ded parts when necessary Mower blades are sharp and can cut Wrap the blades or wear gloves and use extra caution when servicing Maintain or replace safety and instruction labels as necessary W A R N I...

Страница 6: ...ds marked to comply with ANSI Z87 1 when operating this equipment Keep Hands and Feet Away Keep hands and feet away from blade and cutting area No Reach Do not reach hands or feet under mower deck No...

Страница 7: ...f various controls and adjustments Save this manual for future reference FEATURES AND CONTROLS 7 Lower handle Grass catcher bag Rear cover Height adjustment lever Battery door Side discharge cover Rea...

Страница 8: ...ct with damaged or missing parts could result in serious personal injury W A R N I N G Do not attempt to modify this product or create accessories not recommended for use with this product Any such al...

Страница 9: ...zed Service Dealer Pull and rotate the handle knobs 1 90 on both sides to loosen the lower handles 2 on both sides Move the lower handles to the operating position You may raise or lower the handle to...

Страница 10: ...gure 3 Align the mounting holes on the upper handle 1 and the lower handle 2 Insert the bolts 3 and use the knobs 4 to tighten them Repeat the operation on the other side ASSEMBLY 10 Fig 3 2 1 3 4 4 N...

Страница 11: ...ar cover so that the hooks 3 on the grass catcher 4 are seated on the door rod 5 Release the rear cover When installed correctly the hooks on the grass catcher will extend through the openings on the...

Страница 12: ...mulching plug Lift and pull the mulching plug out using the handle The mulching plug 3 is inserted at an angle so it requires some force to remove it The mulching plug must be removed in order to inst...

Страница 13: ...lign the grooves 2 on the discharge chute 3 with the pins 4 on the underside of the discharge cover 1 Lower the discharge chute until the hooks on the mower deck are secured in the openings in the dis...

Страница 14: ...ed and secure in the mower before beginning operation If the machine is not going to be used immediately remove the battery Close the door 14 TO REMOVE BATTERY PACK See Figure 7 Release the bail lever...

Страница 15: ...empt to override the operation of the safety lock out button or bail lever W A R N I N G The operation of any mower can result in foreign objects being thrown into the eyes which can cause severe eye...

Страница 16: ...en 2 and 3 1 2 5 cm to 8 3 cm during hot months To adjust the blade height To raise the blade height grasp the height adjustment lever 1 and move it toward the back of the mower To lower the blade hei...

Страница 17: ...balance release the blade motor control handle immediately The blade will stop rotating within 3 seconds Do not mow near drop offs ditches or embankments because you could lose your footing or balance...

Страница 18: ...g any graveled area stones can be thrown by the blade Set mower to the highest cutting height when mowing on uneven ground or in tall weeds For effective mulching do not cut wet grass because it tends...

Страница 19: ...ED Lights will illuminate in specific order to communicate the current battery status They are as follows LED STATUS DESCRIPTION Solid Green Fully Charged Blinking Green Charging Solid Red Over Temper...

Страница 20: ...er 4 5 in apart ensuring that they are vertically aligned 5 If fastening to drywall use wall anchors not included and screws to secure the charger to the wall 6 This power unit is intended to be corre...

Страница 21: ...socket loosen the bolt 1 and remove the blade 2 Turn the bolt COUNTERCLOCKWISE to loosen it and CLOCKWISE to tighten it Remove the bolt 1 and the blade 2 To re install the blade position the blade wit...

Страница 22: ...ent parts call the toll free helpline at 1 800 317 7833 The use of parts that do not meet the original equipment specifications may lead to improper performance and may compromise safety Before cleani...

Страница 23: ...I N G Always remove the battery from the mower before placing the unit in the vertical storage position STORAGE SWITCH When the handle is rotated into the fully locked storage position the mower is eq...

Страница 24: ...ttery pack DO NOT ATTEMPT TO REPAIR IT Follow these instructions in order to avoid injury and the risk of fire explosion or electric shock and to avoid damage to the environment Cover the battery s te...

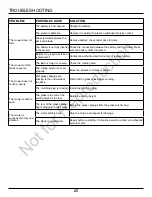
Страница 25: ...or uneven Check the mowing area The cutting height is not set properly Move the wheels to a higher setting The mower does not mulch properly Wet grass clippings are sticking to the underside of the d...

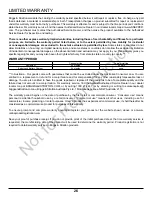
Страница 26: ...nths 90 days Battery and Battery Charger 24 months none In Australia Our goods come with guarantees that cannot be excluded under the Australian Consumer Law You are entitled to a replacement or refun...

Страница 27: ...equivalent Damage caused by lack of maintenance or use of non original parts is not covered by warranty Normal We ar and Tear Like most mechanical devices your unit is subject to wear even when proper...

Страница 28: ...TOLL FREE HELPLINE 1 800 317 7833 Briggs Stratton Corporation P O Box 702 Milwaukee WI 53201 388062367 Rev 00 07 18 17 N o t f o r R e p r o d u c t i o n...

Страница 29: ...re toutes les consignes de s curit et les instructions d utilisation Guide d utilisation LIGNE D ASSISTANCE SANS FRAIS 1 800 317 7833 www snapper com 21 PO Tondeuse Automotrice Sans Fil de 82V 1696860...

Страница 30: ...DE 82V Batterie 82 V Lithium ion Vitesse vide M P R 0 0 8 2 Vitesse pour avancement automatique s m 5 1 5 0 s p f 9 4 6 1 Dimensions du ch ssis 21 53 3 cm R glage de hauteur 1 3 8 3 3 4 3 5 9 5 cm 24...

Страница 31: ...Suivez les instructions pour lubrifier et modifier les accessoires V rifiez r guli rement l tat du cordon de la tondeuse faites r parer celui ci par un centre de r paration agr Gardez le guidon propre...

Страница 32: ...p rateur Arr tez la lame lorsque vous traversez des surfaces de gravier N utilisez pas l appareil sans que le sac herbe le protecteur de la d charge le protecteur arri re ou tout autre dispositif de p...

Страница 33: ...tondeuse N effectuez jamais d ajustements ou de r parations lorsque le moteur est en marche Retirez toujours le bloc piles de la tondeuse avant d effectuer un ajustement un nettoyage ou une r paration...

Страница 34: ...ins et les pieds l cart Garder les mains et les pieds l cart de la lame et de la zone de coupe Se tenir lion Ne pas mettre ses mains ou ses pieds en dessous du ch ssis de la tondeuse Eviter les pentes...

Страница 35: ...n future CARACT RISTIQUES ET CONTR LES 7 Levier de bail Commandes de la vitesse d entra nement Levier de l entra nement Bouton de verrouillage de s curit Partie sup rieure du guidon Partie inf rieure...

Страница 36: ...ces manquantes ou ab m es peut entra ner de graves blessures A V E R T I S S E M E N T Ne tentez pas de modifi er cet appareil ou de fabriquer des accessoires non recommand s pour l utilisation avec c...

Страница 37: ...irez et tournez les boutons de poign e 1 90 sur les deux c t s desserrer les poign es inf rieures 2 sur les deux c t s D placez les poign es inf rieures vers la position de fonctionnement Vous pouvez...

Страница 38: ...ez les trous de montage sur la poign e sup rieure 1 et la poign e inf rieure 2 Ins rez les boulons m caniques 3 et employez les boutons 4 afin de les serrer R p tez l op ration sur l autre c t ASSEMBL...

Страница 39: ...n ce que les crochets 3 sur le collecteur d herbe 4 s appuient sur la barre du couvercle 5 Rel chez le couvercle de la bouche d vacuation Si l installation est correcte les crochets sur le collecteur...

Страница 40: ...chiquetage soulevez le couvercle de la bouche d vacuation 2 L accessoire de d chiquetage 3 est ins r angle il faut donc exercer une certaine force pour l enlever Vous devez enlever l accessoire de d c...

Страница 41: ...les rainures 2 sur le d flecteur 3 avec les goupilles 4 sur le c t int rieur du couvercle 1 Abaissez le d flecteur jusqu ce que les crochets sur le ch ssis de la tondeuse soient bien ins r s dans les...

Страница 42: ...soit ins r e correctement avant de mettre la tondeuse en marche Si l appareil n est pas utilis dans l imm diat retirez la batterie Refermez le couvercle 14 POUR RETIRER LA BATTERIE Voir figure 7 Rel...

Страница 43: ...d passer l op ration du levier ou du bouton de marche A V E R T I S S E M E N T Une tondeuse peut projeter des objets en direction de vos yeux et vous blesser gravement Pendant l utilisation le r gla...

Страница 44: ...5 8 3 cm pendant les mois de temps chaud Pour r gler la hauteur de la lame Pour augmenter la hauteur de la lame attrapez le levier de r glage de la hauteur 1 et poussezle vers l arri re de la tondeus...

Страница 45: ...ame la lame cessera de tourner en trois secondes Ne tondez pas pr s d un d nivellement prononc d un foss ou du rebord d un talus vous pourriez perdre pied ou perdre l quilibre Ne tondez pas dans une p...

Страница 46: ...la lame pourrait projeter du gravier Pour tondre une zone o l herbe est longue ou en friche r glez la tondeuse la hauteur de coupe la plus lev e Pour un d chiquetage efficace ne tondez pas le gazon s...

Страница 47: ...ans un ordre particulier pour vous renseigner sur l tat de la batterie Leur comportement est le suivant 19 BATTERIE ET DU CHARGEUR Indication de d fectuosit Lorsque la pile est ins r e dans le chargeu...

Страница 48: ...3 cm entre chaque trou et assurezvous qu ils sont align s verticalement 5 Si la pose se fait sur des cloisons s ches utilisez des ancrages pour le mur non inclus et des vis pour maintenir solidement e...

Страница 49: ...S LE SENS INVERSE DES AIGUILLES D UNE MONTRE pour le desserrer et DANS LE SENS DES AIGUILLES D UNE MONTRE pour le serrer Enlevez le boulon 1 et la lame 2 Pour r assembler le tout positionnez la lame e...

Страница 50: ...sation de pi ces non conformes aux caract ristiques d origine de la tondeuse peut nuire au rendement de l appareil et compromettre la s curit des utilisateurs Avant de nettoyer r parer ou v rifier la...

Страница 51: ...la batterie dans la tondeuse avant de ranger celle ci en position verticale INTERRUPTEUR DE RANGEMENT La tondeuse est quip e d un interrupteur secondaire 1 qui emp chera la tondeuse de se mettre en m...

Страница 52: ...velle batterie NE TENTEZ PAS DE R PARER LA BATTERIE Suivez les consignes suivantes pour viter les blessures les risques d incendie d explosion et de choc lectrique ainsi que les dommages caus s l envi...

Страница 53: ...a on in gale La pelouse est in gale ou en friche V rifiez la zone de coupe La hauteur de coupe est mal r gl e D placez les roues un r glage plus lev La tondeuse ne d chiquette pas bien Des brins d her...

Страница 54: ...us pouvez obtenir un remplacement ou un remboursement en cas de d faillance majeure ou en compensation de toute perte ou de tout dommage survenu dans le cadre des conditions raisonnablement pr visible...

Страница 55: ...d pann ou r par en utilisant des pi ces d origine Briggs Stratton ou des pi ces quivalentes Les dommages caus s par un manque d entretien ou l utilisation de pi ces n tant pas d origine ne sont pas c...

Страница 56: ...388062367 Rev 00 07 18 17 LIGNE D ASSISTANCE SANS FRAIS 1 800 317 7833 Briggs Stratton Corporation P O Box 702 Milwaukee WI 53201 N o t f o r R e p r o d u c t i o n...

Страница 57: ...ente todas las reglas de seguridad y las instrucciones Manual del Propietario L NEA DE AYUDA GRATUITA 1 800 317 7833 www snapper com Podadora De C sped De 21 Pulgadas Inal mbrica Autoimpulsada de 82V...

Страница 58: ...ULSADA DE 82V Tipo de bater a 82 V Lithium ion Velocidad sin carga 2800 RPM Velocidad Auto propulsada 1 6 4 9 fps 0 5 1 5 m s Tama o de la cubierta 21 53 3 cm Ajustes de altura 1 3 8 3 3 4 3 5 9 5 cm...

Страница 59: ...e alerta No utilice el cortac sped cuando est cansado Preste atenci n a lo que est haciendo Utilice el sentido com n Guarde el cortac sped que no use en el interior Cuando no est en uso el cortac sped...

Страница 60: ...tar hacia el operador Detenga la hoja cuando pase por superficies con grava No manipule el aparato sin el dispositivo de colecci n de c sped completo el protector de descarga el protector trasero o cu...

Страница 61: ...r la podadora Nunca haga ajustes o reparaciones con el motor en marcha Retire siempre el paquete de bater as de las cortadoras antes de efectuar ajustes limpieza o reparaciones Compruebe los component...

Страница 62: ...ntenga las manos y los pies alejados de las cuchillas y del rea de corte No extenderse No extienda las manos o los pies por debajo de la cubierta de la podadora No utilizar sobre pendientes No utilice...

Страница 63: ...cia futura FUNCIONES Y CONTROLES 7 Bot n de bloqueo para seguridad Manija superior Palanca de control Manija inferior Bolsa colectora de c sped Puerta de descarga posterior Palanca para ajuste de altu...

Страница 64: ...as El uso de un producto al que le faltan piezas o cuyas piezas est n da adas puede producir lesiones personales graves A D V E R T E N C I A No intente midofi car este producto o crear accesorios que...

Страница 65: ...ado Tire y gire 90 las perillas de los mangos 1 que est n a los dos lados para aflojar los mangos inferiores 2 de los dos lados Mueva los mangos inferiores hasta la posici n de funcionamiento Puede el...

Страница 66: ...los agujeros para montar de la manija superior 1 y la manija inferior 2 Introduzca el perno 3 de cabeza de hongo y utilice las perillas 4 para apretarlos Repita la operaci n por el otro lado ENSAMBLA...

Страница 67: ...ior de modo que los ganchos 3 del receptor de hierba 4 queden asentados en la barra de la puerta 5 Suelte la puerta de descarga posterior Cuando est n correctamente instalados los ganchos del receptor...

Страница 68: ...o con hojarasca y s quelo mediante la manija El tap n de la funci n para cubrimiento con hojarasca 3 se inserta angulado por lo que es necesario ejercer un poco de fuerza para quitarlo Para instalar l...

Страница 69: ...arga lateral 1 Alinee las ranuras 2 del deflector 3 con los pasadores 4 de la Puerta de descarga lateral 1 Baje el deflector hasta que los ganchos del piso de la podadora est n asegurados en las abert...

Страница 70: ...a y asegurada en la podadora antes de empezar la operaci n Si la m quina no se va a utilizar inmediatamente retire la bater a Cierre la tapa 14 PARA RETIRAR LA BATER A Consulte la figura 7 Libere la p...

Страница 71: ...I N No intente anular el funcionamiento de la bot n de bloqueo para seguridad o palanca de control A D V E R T E N C I A Una operadora en funcionamiento puede arrojar objetos extra os a los ojos del o...

Страница 72: ...y entre 50 mm y 83 mm durante los meses c lidos Para ajustar la altura de la hoja Eleve la altura de la hoja sujetando la palanca de ajuste de altura 1 y movi ndola hacia la parte posterior de la poda...

Страница 73: ...l del motor cuchilla inmediatamente La cuchilla para de girar en 3 segundos No pode el pasto de precipicios zanjas o terraplenes podria perder la firmza de la postura o el equilibrio No pode el c sped...

Страница 74: ...la podadora en la altura de corte m s alta cuando pode suelos duros o malezas altas Para que la trituraci n sea efectiva no corte c sped h medo ya que tiende a pegarse en el lado inferior de la plataf...

Страница 75: ...del cargador se iluminan de acuerdo a un orden espec fico para indicar el estado actual de la bater a Ellos son los siguientes 19 BATER A Y EL CARGADOR Nota de defecto falso Cuando la bater a es inse...

Страница 76: ...ro a una distancia de 11 43 cm y aseg rese de que est n alineados verticalmente 5 Si la pared es de yeso utilice anclajes no incluidos y tornillos especiales para colgarlo 6 Este cargador de potencia...

Страница 77: ...uchilla 2 Gire la tuerca EN DIRECCI N CONTRARIA A LAS MANECILLAS DEL RELOJ para aflojarla y EN LA MISMA DIRECCI N QUE LAS MANECILLAS DEL RELOJ para ajustarla Retire la perilla 1 y la cuchilla 2 Para v...

Страница 78: ...gratuita al 1 800 317 7833 Si se utilizan piezas que no cumplen con las especificaciones del equipo original es posible que el rendimiento sea inadecuado y se vea comprometida la seguridad Antes de li...

Страница 79: ...e retire la bater a el cortac sped antes de colocar la unidad en la posici n de almacenamiento vertical INTERRUPTOR DE ALMACENAJE Cuando se gira completamente la manija a la posici n de almacenaje la...

Страница 80: ...E REPARARLA Obedezca las siguientes instrucciones para evitar lesiones y riesgos de incendio explosi n o choques el ctricos y para evitar da os al medio ambiente Para evitar lesiones y riesgo de incen...

Страница 81: ...podar La altura de corte no se ajust correctamente Mueva las ruedas a una configuraci n m s alta La podadora no trituramulch correctamente Hay recortes de c sped h medo pegados en el lado inferior de...

Страница 82: ...cubiertos por garant as ineludibles de acuerdo con la legislaci n sobre consumo de este pa s Tiene derecho a un recambio o devoluci n en caso de aver a grave y a una compensaci n por las posibles p r...

Страница 83: ...procedimientos y plazos establecidos en el manual del usuario y para el mantenimiento y las reparaciones se deben utilizar piezas Briggs Stratton originales o equivalentes La garant a no cubre los da...

Страница 84: ...388062367 Rev 00 07 18 17 L NEA DE AYUDA GRATUITA 1 800 317 7833 Briggs Stratton Corporation P O Box 702 Milwaukee WI 53201 N o t f o r R e p r o d u c t i o n...

Отзывы: