background image

8

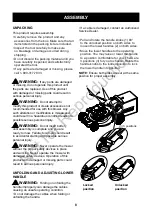
(3) 3 positions

1

2

ASSEMBLY

UNPACKING

This product requires assembly.
• Carefully remove the product and any 

accessories from the box. Make sure that all 

items listed in the packing list are included.

• Inspect the tool carefully to make sure 

no breakage or damage occurred during 

shipping.

• Do not discard the packing material until you 

have carefully inspected and satisfactorily 

operated the tool.

• If any parts are damaged or missing, please 

call 1-800-317-7833.


WARNING: 

If any parts are damaged 

or missing, do not operate this product until 

the parts are replaced. Use of this product 

with damaged or missing parts could result in 

serious personal injury.


WARNING: 

Do not attempt to 

modify this product or create accessories not 

recommended for use with this blower. Any 

such alteration or modification is misuse and 

could result in a hazardous condition leading to 

possible serious personal injury.


WARNING: 

Do not insert battery 

until assembly is complete and you are 

ready to mow. Failure to comply could result 

in accidental starting and possible serious 

personal injury. 


WARNING: 

Never operate the mower 

without the proper safety devices in place 

and working. Never operate the mower with 

damaged safety devices. Operation of this 

product with damaged or missing parts could 

result in serious personal injury.


UNFOLDING AND ADJUSTING LOWER 

HANDLE


WARNING: 

Folding or unfolding the 

handle improperly can damage the cables, 

causing an unsafe operating condition.


• Do not damage the cables when folding or 

unfolding the handle.


• If a cable is damaged, contact an Authorized 

Service Dealer.


• Pull and rotate the handle knobs (1) 90° 

to the unlocked position on both sides to 

loosen the lower handles (2) on both sides.

• Move the lower handles to the operating 

position. You may raise or lower the handle 

to a position comfortable for you. There are 

3 positions (3) for you to choose. Rotate the 

handle knobs to the locked position to lock 

the lower handle into position.

NOTE:

 Ensure both sides are set at the same 

position for proper assembly.

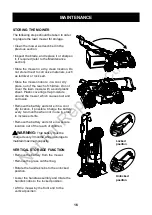
Locked

position

Unlocked

position

Not 

for 

Reproduction

Содержание SP60V

Страница 1: ...21 60V Lawn Mower Model SP60V Rev 01 11 20 15 SNAPPER IS A TRADEMARK OF BRIGGS STRATTON POWER PRODUCTS GROUP LLC AND IS USED UNDER LICENSE N o t f o r R e p r o d u c t i o n...

Страница 2: ...rrent Type or a characteristic of current No Load Speed Rational speed at no load Double Insulation Double insulated appliance min Per Minute Revolutions strokes surface speed orbits etc per minute We...

Страница 3: ...perty damage SYMBOL SIGNAL MEANING SPECIFICATIONS Motor 60V Brushless No load speed 2800 RPM Height adjustments 1 3 8 3 3 4 3 5 9 5 cm Functions 3 in 1 Mulch side discharge or rear bag Weight with 4Ah...

Страница 4: ...o not wear loose clothing or jewelry that can get caught in moving parts The wearing of protective gloves and safety footwear is recommended Many injuries occur as a result of the mower being pulled o...

Страница 5: ...rs of age and older must read and understand the operating instructions and safety rules in this manual and must be trained and supervised by a parent Stay alert and turn the mower off if a child or a...

Страница 6: ...isk of electric shock use only the charger that is provided by the manufacturer to charge the battery DO NOT ABUSE THE CHARGE CORD Never carry the charger by the cord Do not disconnect the charger fro...

Страница 7: ...RT NO Lawn Mower 1 Mulching Plug 1 Side Discharge Chute 1 Grass Catcher Bag 1 Handle Knob 4 Handle Bolt 4 60V Battery Model SBA460V 1 60V Charger Model SCH60V 1 Owner s Manual 1 Quick Start Guide 1 N...

Страница 8: ...omplete and you are ready to mow Failure to comply could result in accidental starting and possible serious personal injury WARNING Never operate the mower without the proper safety devices in place a...

Страница 9: ...rectly the hooks on the grass catcher will extend through the openings on the rear discharge door NOTE When using the grass catcher do not install either the side discharge deflector or the mulching p...

Страница 10: ...alled TO INSTALL BATTERY PACK Lift and hold up the battery door 1 Align the battery 2 with the mower s battery port Make sure the battery release button 3 snaps in place and that battery is fully seat...

Страница 11: ...oduct familiarize yourself with all operating features and safety rules OPERATION Height adjustment lever Bail lever Grass catcher bag Lower handle Side discharge chute Rear chute cover Handle knobs F...

Страница 12: ...in foreign objects being thrown into the eyes which can cause severe eye damage Always wear safety glasses while operating the mower and while performing any adjustments or repairs WARNING Ensure tha...

Страница 13: ...r and to others In order to prevent electric shock do not operate the mower in damp or wet conditions Do not mow in circles Travel back and forth across the lawn When cutting thick grass reduce walkin...

Страница 14: ...and remove the battery Lift the rear discharge cover Lift the grass catcher bag by its handle to remove from mower Empty grass clippings Lift the rear discharge cover and reinstall the grass catcher...

Страница 15: ...wn Using a 27 mm socket or wrench turn the blade nut CLOCKWISE in order to secure the blade NOTE Be sure to replace the parts in the exact order in which they were removed When installing the cutting...

Страница 16: ...ound the mower which causes rust and corrosion Remove the battery and store it in a cool dry location if possible Charge the battery every two months when not in use in order to increase its life Remo...

Страница 17: ...with care Keep the mower blade sharp and clean Mower blades are sharp and can cut Wrap the blades or wear gloves and use extra caution when servicing Keep all nuts bolts and screws tight in order to...

Страница 18: ...it and replace it with a new battery pack DO NOT ATTEMPT TO REPAIR IT Follow these instructions in order to avoid injury and the risk of fire explosion or electric shock and to avoid damage to the env...

Страница 19: ...he cutting height is too low The rear of the grass catcher bag is dragging in thick grass The motor shaft is bent The blade is unbalanced Charge the battery Replace the switch call the tollfree helpli...

Страница 20: ...e valid Brushless motor carries a ten 10 year motor warranty against defects in workmanship and materials Items not covered by warranty 1 Any part that has become inoperative due to misuse commercial...

Страница 21: ...VIEW 1 2 7 9 19 10 10 33 14 16 18 11 27 24 8 12 13 3 5 6 17 17 18 18 4 22 24 29 23 32 30 30 30 30 30 34 28 31 31 35 31 21 21 21 20 3 4 25 26 26 37 38 39 40 29 18 18 15 11 36 N o t f o r R e p r o d u...

Страница 22: ...justment bracket left 1 17 322011519 Screw 2 18 322021519 Screw 8 19 333051519 Height adjustment bracket right 1 20 3220951 Screw 5 21 32204113 Screw 6 22 311141519 Height adjustment bar assembly 1 23...

Отзывы: