background image


7.


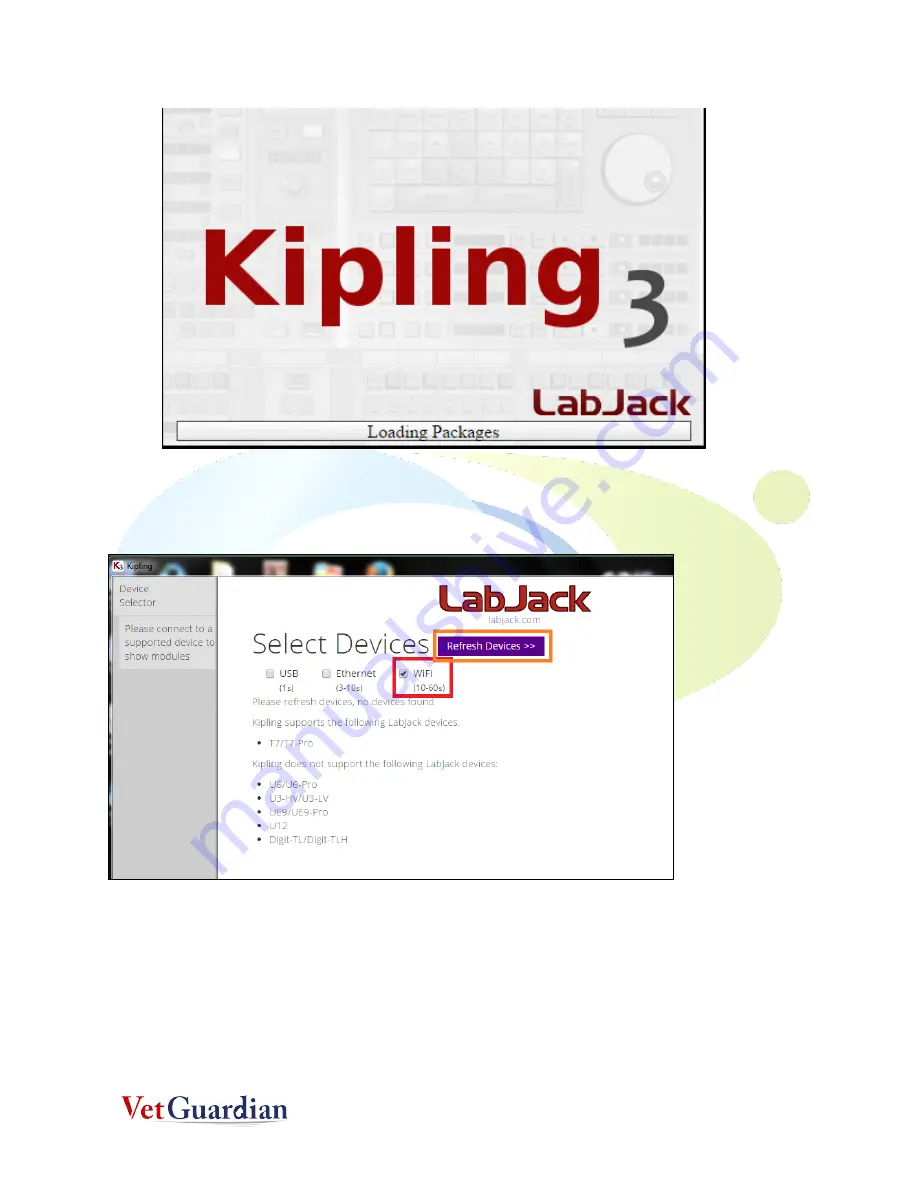
After the program loads, you may see the below page.  Make sure the 

wifi 

is option checked 

and then click on 

Refresh Devices


8.


If the refresh is successful, you will see the screen below. (

DO NOT CLICK ON THE 

DISCONNECT BUTTON

).  If it's not successful, please keep refreshing as shown in step 6, until 

you get the screen below. If it still does not work after a couple of tries, call 305-799-3075 for 

support.  

Содержание VetGuardian

Страница 1: ...A DEVICE SETUP AND OPERATION STRUCTURED MONITORING PRODUCTS...

Страница 2: ...ON 2017 Structured Monitoring Products Inc Orlando Florida All rights reserved to Structured Monitoring Products This document was designed prepared and submitted by Structured Monitoring Products to...

Страница 3: ...hange Control 2 2 Equipment Statements 3 3 Setting up the VetGuardian 6 4 Install Driver 8 4 1 Running the Kipling Program 8 5 VetGuardian 11 5 1 Install the Vetguardian Software per the installer fil...

Страница 4: ...2 1 REVISION HISTORY AND CHANGE CONTROL Date Reason for Change Version 10 1 18 Initial Version for Production Release A 12 20 18 Updated Per Review B...

Страница 5: ...ee that interference will not occur in a particular installation If this equipment does cause harmful interference to radio or television reception which can be determined by turning the equipment off...

Страница 6: ...device complies with Part 15 of the FCC Rules Operation is subject to the following two conditions 1 this device may not cause harmful interference and 2 this device must accept any interference recei...

Страница 7: ...e of 20 cm or more should be maintained between the antenna of this device and persons during operation To ensure compliance operation at closer than this distance is not recommended The antenna s use...

Страница 8: ...OES NOT connect to anything else 4 Unpack VetGuardian Contained in the smaller box and mount the bottom of the device to the Device Arm 5 Warning The screw insert of the VetGuardian is glued in So be...

Страница 9: ...ian along with the Device Arm and the Pirhana Lox on to the Kennel Gear with the VetGuardian outside the cage with the camera lens facing the animal 8 Plug in the VetGuardian using the adapter provide...

Страница 10: ...s an Access Point Turn on VetGuardian 3 A Green LED Light indicates that the device is on 4 Wait for a few seconds and the Camera the Yellow light and the flashing blue light will appear on the camera...

Страница 11: ...click on Refresh Devices 8 If the refresh is successful you will see the screen below DO NOT CLICK ON THE DISCONNECT BUTTON If it s not successful please keep refreshing as shown in step 6 until you...

Страница 12: ...Yellow light also starts flickering on the VetGuardian 10 After this step close the Kipling Software 11 Some other errors you may encounter are shown below In this case click on the Green Wifi Button...

Страница 13: ...ction to disconnect 2 Make sure Kipling is closed 3 Open the VetGuardian application only after step 7 of Section 4 2 running Kipling software is successful 4 Please make sure you click VG Application...

Страница 14: ...12 5 When the application opens up you will be seeing the screen below 6 Select Animal and then choose the animal to be monitored such as CAT or DOG etc...

Страница 15: ...iate between noise and signal After Calibration The application understands that if there is no movement it will assign 0 for RR and HR 9 Calibration Window open and after Calibration is completed Cli...

Страница 16: ...notes etc can be entered 14 To open the Saved animal file 15 Choose the file to open and view the saved HR and RR readings 16 To see the physical location of the files open this Root Directory C DataC...

Страница 17: ...15...

Отзывы: