background image


CE 3.2E ELLIPTICAL TRAINER 


www.smoothfitness.de


45

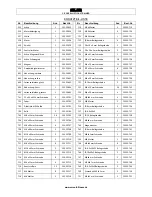
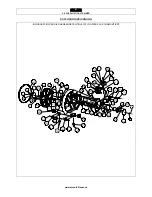
ANBAUTEILE 


ANBAUTEILE 

 
Zu Ihrer Unterstützung haben wir alle Anbauteile aufgeführt, die beim Aufbau dieses Produktes benötig werden. Diese 
Übersicht soll Ihnen dabei helfen, Einzelteile zu identifizieren, die Sie eventuell nicht zuordnen können. 


NR BESCHREIBUNG 

ANZ.


315

305

306

308

307

523

524

316

320


308 Abdeckung; 

links 

307 Abdeckung; 

rechts 

306  Abdeckung; obere #1 

305  Abdeckung; obere #2 

315 Abdeckung; 


316 Abdeckung; 

innere 

320 Abdeckkappe 

524 Abdeckung; 

vordere 

523 Abdeckung; 

untere 


Содержание CE 3.2E

Страница 1: ...TRAINER MODEL NUMBER CE 3 2E USER WEIGHT LIMITATION 300 lbs 135kg MAXIMALES BENUTZERGEWICHT 135 kg UK TOLL FREE CUSTOMER SERVICE NUMBER 0800 097 2100 DE SERVICENUMMER 49 911 8105924 SERIAL NUMBER foun...

Страница 2: ...CE 3 2E ELLIPTICAL TRAINER Table of Contents Inhaltsverzeichnis 1 ENGLISH P 2 2 DEUTSCH P 41...

Страница 3: ...The Elliptical Trainer should not be used by persons weighing more than 300 lbs 135kg Never allow more than one person on the Elliptical Trainer at a time Wear appropriate exercise clothing when using...

Страница 4: ...conditions or from other appliances being turned on or off To reduce the possibility of Elliptical Trainer damage always use a surge protector not included with your Elliptical Trainer Surge protecto...

Страница 5: ...ill save time and make the assembly quick and hassle free Clear your work area Make sure that you have cleared away a large enough space to properly assemble the unit Make sure the space is free from...

Страница 6: ...nfamiliar to you NO DESCRIPTION QTY 730 731 B C D E A 732 709 710 722 719 729 708 8 2 7 1 0 7 701 15 x 92 x M14 Bolt 2 708 M8 x 60mm Allen Head Bolt 2 709 M10 x 94mm Bolt 2 710 M8 x 65mm Allen Head Bo...

Страница 7: ...provided to help you identify those items that may be unfamiliar to you NO DESCRIPTION QTY 315 305 306 308 307 523 524 316 320 308 Side Upright Upper Cover L 2 307 Side Upright Upper Cover R 2 306 Si...

Страница 8: ...CE3 2E 304 501 Frame 1 CE3 2E 501 305 Side Upright Upper Cover 2 2 CE3 2E 305 502 Crank Disk 2 CE3 2E 502 306 Side Upright Upper Cover 1 2 CE3 2E 306 503 Crank 2 CE3 2E 503 307 Side Upright Bottom Co...

Страница 9: ...me Outside Cover Right 1 CE3 2E 605 733 M6 x 20mm Bolt 4 CE3 2E 733 701 15 x 92x M14 mm Bolt 2 CE3 2E 701 734 M8x20 mm Screw 4 CE3 2E 734 702 Spring 1 CE3 2E 702 735 M8 Nut 2 CE3 2E 735 703 Aluminium...

Страница 10: ...AL TRAINER Visit us at www smoothfitness co uk 9 PARTS DIAGRAM A MAJORITY OF THE PARTS SHOWN HERE HAVE BEEN PREASSEMBLED AT THE FACTORY 731 731 101 203 733 106 107 103 104 102 205 204 108 202 202 201...

Страница 11: ...WN HERE HAVE BEEN PREASSEMBLED AT THE FACTORY 309 321 310 311 726 732 305 306 710 102 317 313 312 301 732 728 316 728 728 314 313 308 307 732 750 318 749 319 722 708 320 719 303 315 310 302 311 321 30...

Страница 12: ...PREASSEMBLED AT THE FACTORY 707 41 8 701 320 412 419 705 413 71 6 417 72 6 417 72 6 715 737 415 414 402 734 736 735 718 717 407 404 412 403 404 40 5 406 409 715 40 8 706 705 409 715 408 70 6 73 6 407...

Страница 13: ...Y 747 748 743 746 720 741 736 744 738 52 9 53 0 52 7 72 3 531 524 730 71 6 702 525 521 52 0 721 50 1 724 50 9 52 1 523 52 6 715 70 5 703 51 6 517 51 4 71 2 50 6 70 4 72 0 51 5 726 50 7 519 53 2 508 50...

Страница 14: ...LLIPTICAL TRAINER Visit us at www smoothfitness co uk 13 PARTS DIAGRAM A MAJORITY OF THE PARTS SHOWN HERE HAVE BEEN PREASSEMBLED AT THE FACTORY 727 605 726 726 602 601 716 603 726 727 604 727 727 726...

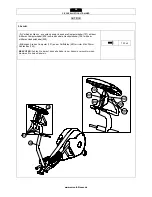
Страница 15: ...he Wire Harness Middle 204 and Wire Harness Lower 522 as shown below B Attach the Front Upright Frame 201 to the Frame 501 and secure using two M10 x 94 mm Bolts 709 two ID 10mm Curve Washers 731 and...

Страница 16: ...107 with Wire Harness Middle 204 and Hand Pulse Sensor Wire Upper 106 with Hand Pulse Sensor Wire Middle 205 as shown below B Attach the Computer 101 to the Front Upright Frame 201 using four M6 x 20m...

Страница 17: ...at www smoothfitness co uk 16 ASSEMBLY STEP 3 A Slide the Handlebar Left 301 and Handlebar Right 302 onto the Front Upright Frame 201 B Connect the Hand Pulse Sensor Wire Middle 205 with Hand Pulse Se...

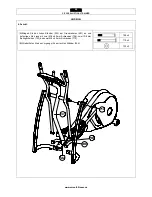
Страница 18: ...EMBLY STEP 4 A Attach the Left Upright 303 to the Frame 501 and secure using two M8 x 60mm Allen Head Bolts 708 two ID 8mm Curve Washers 722 and two M8 x 65 mm Allen Head Bolt 710 B Repeat the procedu...

Страница 19: ...R Visit us at www smoothfitness co uk 18 ASSEMBLY STEP 5 A Slide the 15 x 92 x M14mm Bolt 701 through the Pedal Arm Right 401 and Handlebar Right 302 and secure with M14 Nut 719 as shown 701 x 1 719 x...

Страница 20: ...R Visit us at www smoothfitness co uk 19 ASSEMBLY STEP 6 A Slide the 15 x 92 x M14 mm Bolt 701 through the Pedal Arm Left 402 and Handlebar Left 301 and secure with M14 Nut 719 as shown 701 x 1 719 x...

Страница 21: ...hfitness co uk 20 ASSEMBLY STEP 7 A Attach the Pedal Arm Front Pivot Cover 320 into the ends of the Handlebar Right 302 and Pedal Arm Right 401 B Repeat the procedure on the Pedal Arm Left 402 and Han...

Страница 22: ...uk 21 ASSEMBLY STEP 8 A Attach the Front Frame Cover Upper 524 and Front Frame Cover Lower 523 to the Frame 501 B Secure with Fixing Inserts 716 and M4 x 50mm Screw 730 NOTE The Fixing Insert 716 has...

Страница 23: ...ndlebar Right 302 and secure with four M4 x 19mm Screws 732 B Then attach two Handlebar Inside Cover 316 from the back side of the Handlebar Right 302 to the Handlebar Cover 315 Secure the Handlebar I...

Страница 24: ...P 10 A Attach the Side Upright Bottom Cover Left 308 and Side Upright Bottom Cover Right 307 to Right Upright 304 using four M4 x 19mm Screw 732 B Repeat this procedure on Left Upright 303 with Side U...

Страница 25: ...Right Upright 304 using one Fixing Insert 716 and four M4 x 19mm Screw 732 B Repeat this procedure on Left Upright 303 with Side Upright Upper Cover 1 306 and Side Upright Upper Cover 2 305 NOTE The F...

Страница 26: ...CE3 2E ELLIPTICAL TRAINER Visit us at www smoothfitness co uk 25 Serial Number Location of Serial Number...

Страница 27: ...T To adjust the level of the CE 3 2E Elliptical Trainer simply rotates the Level Adjusters right or left to move them in or out of the Uprights Tilt the Elliptical Trainer to access stabilizers stabil...

Страница 28: ...oothfitness co uk 27 TRANSPORT INSTRUCTIONS TRANSPORT INSTRUCTIONS The casters located on the rear of the unit allow for easy transport Simply lift the front of the unit until the wheels touch the flo...

Страница 29: ...co uk 28 COMPUTER INSTRUCTIONS A B D C E F G J H I MODE Button A B STOP Button METRIC ENGLISH Display C D RPM SPEED WATTS Window TIME DISTANCE LEVEL Window E F PULSE CALORIES TENSION Window PROFILE W...

Страница 30: ...from 1 to 16 DISTANCE Count up this measure the total distance from 0 to 99 9 Km Mile Count down if you have set the target distance the computer will count down from that preset distance down to zer...

Страница 31: ...ercising or when the computer can sense the speed you can press the STOP button two times to stop P2 TARGET DISTANCE After you have selected P2 TARGET DISTANCE the DISTANCE display will show the defau...

Страница 32: ...will just do 12 sections P6 INTERVAL After you have selected P6 INTERVAL the TIME display will show the default workout time setting of 32 00 minutes Press the UP DOWN button to adjust workout time t...

Страница 33: ...nce in order that the body exercises at higher levels of intensity The profile ends with a lower level of intensity to reduce the Heart rate There is one profile with 8 levels of Intensity The resista...

Страница 34: ...ause the program whilst exercising or when the computer can sense the speed you can press the STOP button two times to stop WARM UP TARGET HEART RATE After completing the TIME set up and starting the...

Страница 35: ...you want to change from ENGLISH to METRIC or METRIC to ENGLISH please follow the procedure below 2 When the computer is in the power on status press and holds the STOP button as 5 seconds The PROFILE...

Страница 36: ...judgment under the circumstances but that the advice is used at your sole risk Procedure for Obtaining Your Remedy Under This Warranty To obtain service on a Smooth Fitness product please call the Smo...

Страница 37: ...y you may be able to exercise only for a few minutes in your target zone However your aerobic fitness will improve over the next six to eight weeks Don t be discouraged if it takes longer It s importa...

Страница 38: ...y your age and physical condition To determine your target zone consult the chart we have provided FIND YOUR TARGET HEART RATE HEART RATE in beats per minute 200 180 160 140 120 100 80 20 25 30 35 40...

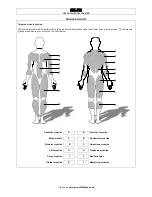
Страница 39: ...his product will develop the upper and lower body muscle groups These muscle groups are shown in grey colour on the chart below Shoulder muscles A B Pectoral muscles Bicep muscle C D Abdominal muscles...

Страница 40: ...ng more oxygen to your muscles At the end of your workout repeat these exercises to reduce sore muscle problems We suggest the warm up and cool down exercises on the following pages Toe Touch Slowly b...

Страница 41: ...your groin as possible Gently push your knees towards the floor Hold for 15 counts Side Stretch Open your arms to the side and continue lifting them until they are over your head Reach your right arm...

Страница 42: ...Der Elliptical Trainer sollte nicht von Personen benutzt werden die mehr als 135kg 300lbs wiegen Erlauben Sie nur jeweils einer Person die Benutzung des Elliptical Trainers Tragen Sie angemessene Tra...

Страница 43: ...schalten anderer Elektroger te im selben Haushalt entstehen Verwenden Sie immer einen Spannungsschutz um die Gefahr der Besch digung zu verringern Entsprechende Spannungssch tzer k nnen im Fachhandel...

Страница 44: ...von statten gehen R umen Sie sich eine Arbeitsfl che frei Stellen Sie sicher dass Sie gen gend Fl che frei ger umt haben um den Aufbau korrekt durchzuf hren Entfernen Sie alle Gegenst nde an denen man...

Страница 45: ...e nicht zuordnen k nnen NR BEZEICHNUNG ANZ 730 731 B C D E A 732 709 710 722 719 729 708 8 2 7 1 0 7 701 15 x 92 x M14 Schraube 2 708 M8 x 60mm Schraube 2 709 M10 x 94mm Schraube 2 710 M8 x 65mm Schra...

Страница 46: ...ig werden Diese bersicht soll Ihnen dabei helfen Einzelteile zu identifizieren die Sie eventuell nicht zuordnen k nnen NR BESCHREIBUNG ANZ 315 305 306 308 307 523 524 316 320 308 Abdeckung links 2 307...

Страница 47: ...r links 1 CE3 2E 303 419 Kunststofflager Pedal 2 CE3 2E 419 304 St nder rechts 1 CE3 2E 304 501 Grundrahmen 1 CE3 2E 501 305 Abdeckung obere 2 2 CE3 2E 305 502 Schwungscheibenschutz 2 CE3 2E502 306 Ab...

Страница 48: ...CE3 2E 605 733 M6 x 20mm Schraube 4 CE3 2E 733 701 15 x 92 x M14 mm Schraube 2 CE3 2E 701 734 M8x20 mm Schraube 4 CE3 2E 734 702 Feder 1 CE3 2E 702 735 M8 Mutter 2 CE3 2E 735 703 Aluminium Scheibe 1...

Страница 49: ...IPTICAL TRAINER www smoothfitness de 48 EXPLOSIONSZEICHNUNG EIN GROSSTEIL DER HIER ABGEBILDETEN TEILE IST VON WERK AUS VORMONTIERT 731 731 101 203 733 106 107 103 104 102 205 204 108 202 202 201 709 7...

Страница 50: ...DETEN TEILE IST VON WERK AUS VORMONTIERT 309 321 310 311 726 732 305 306 710 102 317 313 312 301 732 728 316 728 728 314 313 308 307 732 750 318 749 319 722 708 320 719 303 315 310 302 311 321 309 313...

Страница 51: ...N WERK AUS VORMONTIERT 707 41 8 701 320 412 419 705 413 71 6 417 72 6 417 72 6 715 737 415 414 402 734 736 735 718 717 407 404 412 403 404 40 5 406 409 715 40 8 706 705 409 715 408 70 6 73 6 407 73 5...

Страница 52: ...748 743 746 720 741 736 744 738 52 9 53 0 52 7 72 3 531 524 730 71 6 702 525 521 52 0 721 50 1 724 50 9 52 1 523 52 6 715 70 5 703 51 6 517 51 4 71 2 50 6 70 4 72 0 51 5 726 50 7 519 53 2 508 50 3 74...

Страница 53: ...3 2E ELLIPTICAL TRAINER www smoothfitness de 52 EXPLOSIONSZEICHNUNG EIN GROSSTEIL DER HIER ABGEBILDETEN TEILE IST VON WERK AUS VORMONTIERT 727 605 726 726 602 601 716 603 726 727 604 727 727 726 726 7...

Страница 54: ...mputerkabel 204 mit dem unteren Computerkabel 522 B Befestigen Sie die Griffst tze 201 am Grundrahmen 501 mit zwei M10 x 94 mm Schrauben 709 zwei ID 10mm Beilegscheiben 731 und zwei M10 Muttern 729 BE...

Страница 55: ...kabel 107 mit dem mittleren Computerkabel 204 sowie das obere Handpulskabel 106 mit dem mittleren Handpulskabel 205 B Bringen Sie den Computer 101 an der Griffst tze 201 mit vier M6 x 20mm Schrauben 7...

Страница 56: ...R www smoothfitness de 55 AUFBAU 3 Schritt A Schieben Sie den linke und rechte Handgriffstange 301 302 auf die Griffst tze 201 B Verbinden Sie wie unten gezeigt das mittlere Handpulskabel 205 mit dem...

Страница 57: ...n Sie den linken St nder 303 am Grundrahmen 501 an und befestigen Sie diese mit zwei M8 x 60mm Schrauben 708 zwei ID 8mm Beilegscheiben 722 and zwei M8 x 65 mm Schrauben 710 B Wiederholen Sie den Vorg...

Страница 58: ...s de 57 AUFBAU 5 Schritt A Schieben Sie die 15 x 92x M14mm Schraube 701 durch die rechte Fu st tze 401 und die rechte Handgriffstange 302 und befestigen Sie diese wie unten gezeigt mit einer M14 Mutte...

Страница 59: ...ss de 58 AUFBAU 6 Schritt A Schieben Sie eine 15 x 92 x M14 mm Schraube 701 durch die linke Fu st tze 402 und die linke Handgriffstange 301 befestigen Sie diese wie unten gezeigt mit einer M14 Mutter...

Страница 60: ...FBAU 7 Schritt A Bringen Sie die Abdeckkappen 320 an den Enden der rechten Handgriffstange 302 und der rechten Fu st tze 401 an B Wiederholen Sie den Vorgang mit der linken Fu st tze 402 und der linke...

Страница 61: ...U 8 Schritt A Bringen Sie die obere und untere Abdeckung 524 523 am Grundrahmen 501 an B Befestigen Sie diese mit den Kunststoffpins 716 und einer M4 x 50mm Schraube 730 BEACHTEN Die Kunststoffpins 71...

Страница 62: ...nge 302 an und befestigen Sie diese mit vier M4 x 19 mm Schrauben 732 B Bringen Sie dann zwei Abdeckungen 316 von der R ckseite der rechten Handgriffstange 302 an der Abdeckung 315 an Befestigen Sie d...

Страница 63: ...10 Schritt A Befestigen Sie die linke Abdeckung 308 und die rechte Abdeckung 307 am rechten St nder 304 mit vier M4 x 19 mm Schrauben 732 B Wiederholen Sie den Vorgang am linken St nder 303 mit der l...

Страница 64: ...chten St nder 304 mit einem Kunststoffpin 716 und vier M4 x 19 mm Schrauben 732 B Wiederholen Sie den Vorgang am linken St nder 303 mit der oberen Abdeckung 1 306 und der oberen Abdeckung 2 305 BEACHT...

Страница 65: ...CE 3 2E ELLIPTICAL TRAINER www smoothfitness de 64 SERIENNUMMER Seriennummer befindet sich hier...

Страница 66: ...t gekippt werden muss um an die Stabilisatoren heran zu kommen Kippen Sie das Ger t nach links oder rechts Sie sehen jetzt die Verstellschrauben an den Unterseiten der St nder Drehen Sie die Verstell...

Страница 67: ...ANSPORTHINWEISE TRANSPORTHINWEISE Die Rollen an der R ckseite des Ger tes erm glichen einen einfachen Transport Heben Sie einfach die Vorderseite des Ger tes an so dass die Rollen den Boden ber hren S...

Страница 68: ...ness de 67 COMPUTER INSTRUCTIONS A B D C E F G J H I MODE Taste A B STOP Taste METRISCH ENGLISCH C D RPM GESCHWINDIGKEIT WATT ZEIT GESCHWINDIGKEIT H RTEGRAD E F PULS KALORIEN WIDERSTAND PROFIL G H AUF...

Страница 69: ...90 vornehmen k nnen RESISTANCE Widerstand Zeigt von 1 bis 16 den aktuellen Grad des Widerstandes an DISTANCE Strecke Z hler Der Z hler misst die Gesamtstrecke von 0 bis 99 9 Km Miles Countdown Wenn Si...

Страница 70: ...P Taste zweimal um das Programm zu beenden P2 STRECKENVORGABE Wenn Sie Programm P2 ausw hlen wird der Monitor die voreingestellte Strecke von 0 0 km anzeigen Mit den AUF AB Tasten k nnen Sie Ihre gew...

Страница 71: ...Zeit nach der folgenden bersicht in 16 Bl cke mit verschiedenen Widerstandsgraden einteilen Bei einer Eingabe von 32 Minuten betr gt jeder Block z B 2 Minuten Wenn der Benutzer eine Trainingszeit von...

Страница 72: ...dass der K rper immer intensiver beansprucht wird Das Programm endet schlie lich mit einem geringeren Widerstand um den Puls wieder zu senken Der Widerstand wird nach dem folgenden Muster w hrend des...

Страница 73: ...mit der Bewegung aufgeh rt haben Um im Programm fort zu fahren dr cken Sie die START Taste Bitte beachten Solange Sie noch in Bewegung sind oder der Computer Geschwindigkeit registriert k nnen Sie das...

Страница 74: ...ein Falls sie dennoch zwischen den Systemen wechseln m ssen beachten sie bitte die folgenden Anweisungen 1 Wenn der Computer eingeschaltet ist dr cken und halten Sie die STOP Taste f r 5 Sekunden Der...

Страница 75: ...er erfolgten Beratung geschieht jedoch auf eigenes Risiko Einl sen der Garantieleistungen Im Garantiefall kontaktieren Sie bitte das Smooth Fitness Service Center unter Tel 49 911 8105924 Um den Vorga...

Страница 76: ...fangs sind Sie vielleicht nur einige Minuten dazu in der Lage in Ihrem Zielpuls zu trainieren Ihre Fitness sollte sich jedoch bereits in den ersten 6 8 Wochen steigern Seien Sie jedoch nicht entt usch...

Страница 77: ...ren eigenen Zielpuls zu ermitteln Ermitteln Sie Ihren Zielpuls HERZFREQUENZ in Schl gen pro Minute 200 180 160 140 120 100 80 20 25 30 35 40 45 50 55 60 65 70 ALTER IN JAHREN KRAFT AUSDAUER Sportliche...

Страница 78: ...beren und unteren Muskelgruppen des K rpers ausgerichtet Diese Muskelgruppen sind in der folgenden bersicht grau hinterlegt Schultermuskeln A B Brustmuskeln Bizeps Muskeln C D Unterleibsmuskeln Untera...

Страница 79: ...Trainings um Muskelschmerzen vorzubeugen Wir empfehlen die Aufw rm und Abk hl bungen auf den folgenden Seiten Zehen ber hren Beugen Sie sich langsam aus der Taille nach vorne Lassen Sie Ihren R cken...

Страница 80: ...st nah an Ihren Scho heran Mit den Ellebogen dr cken Sie nun vorsichtig Ihre Knie in Richtung Boden Halten Sie die Stellung f r 15 Sekunden Seiten dehnen ffnen Sie Ihre Arme und f hren Sie diese ber I...

Страница 81: ...d Kingdom Phone 0800 09 72 100 e mail info smoothfitness co uk Website www smoothfitness co uk Smooth Fitness LLC Sandrartstrasse 28 90419 N rnberg Germany Tel 49 911 8105924 Fax 49 911 36 68 05 93 e...

Отзывы: