Smooth Fitness CE 2.1 Скачать руководство пользователя страница 27


CE  2.1 ELLIPTICAL TRAINER 


Visit us at: 

www.smoothfitness.com


27

COMPUTER INSTRUCTIONS 


P9:  TARGET HEART RATE 
 

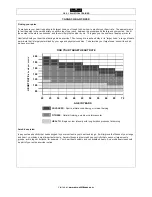
After you have selected P9 TARGET HEARTRATE, The HEART RATE display will show the Target Heart Rate base on your 
age.  Your Target Heart Rate has been set whilst you were setting USER AGE up with a user number e.g. U1 to U9.  Please 
note the user TARGET HEART RATE will be adjusted with the user AGE according to the factory setting.  The factory 
TARGET HEART RATE setting is based on 85% of the maximum heart rate.  The maximum heart rate is calculated as 220 
minus the user age.  For a 35-year old, the maximum user heart rate should be 185 and 85% of user heart rate.  If you wish 
to alter your Target Heart Rate, press the UP/DOWN button to adjust the TARGET HEART RATE.  Then the TIME display 
will show the default workout time of setting 32:00 minutes.  Press the UP/DOWN button to adjust workout time then press 
ENTER to confirm.  Press START to begin the exercise program. 
 

NOTE: Please always consult your doctor to your proper workout target heart rate.


 To increase or decrease the resistance whilst exercising, press the UP/DOWN button. 

 
To pause the program whilst exercising, press the STOP button.  To resume exercising, press the START button. 
 
If the STOP button is pressed after pausing the program, the computer returns to Power on Status. 


WARM UP – TARGET HEART RATE 
 

After completing the TIME set up and starting the program, there is a 3 minute WARM UP program to help you reach the 
minimum target workout heart rate.  The resistance will start from 2.  If the actual user’s pulse does not reach 65% of the 
maximum heart rate ((220-age) x 65%), the resistance will increase one level every 15 seconds.  The computer will detect 
user heart rate per 15 seconds.  When the computer detects 2 times that actual pulse rate reaches the minimum target 
workout heart rate, the resistance will stop increasing and continue at the same resistance until the 3 minute warm up is 
complete and then go into the HEART RATE CONTROL main program. 
 
If you cannot reach the minimum target workout heart rate in 3 minutes, the program will continue the second 3 minute 
WARM UP program.  If during the second WARM UP the user still cannot reach the minimum target workout heart rate, the 
computer will continue on to the third WARM UP procedure for 3 minutes.  If the third WARM UP program still cannot bring 
up the actual pulse rate to the minimum target workout heart rate, the program will stop and TIME display will show FAIL. 
 

HEART RATE CONTROL MAIN PROGRAM 

 
After the actual pulse rate reaches the minimum target workout heart rate and completes the warm up program, the computer 
will go into the main program and the time will count down from the pre-set time.  During the main program, the computer will 
detect the user heart rate per 15 seconds.  If the actual pulse rate cannot reach the Target Heart Rate, the resistance level 
will be increased by 1 level every 15 seconds until the pulse rate reaches the Target Heart Rate or the resistance level will 
increase by 16 levels.  If the actual pulse is higher than the Target Heart Rate, then the resistance will be reduced 1 level 
every 15 seconds until the actual heart rate meets the Target Heart Rate.  If the actual pulse is higher than the Target Heart 
Rate over 3 minutes, the computer would stop HEART RATE CONTROL program then begin the COOL DOWN function. 
 

COOL DOWN – TARGET HEART RATE 
 

After completing the HEART RATE CONTROL program and the time counts down to zero start the one-minute Cool Down 
program.  The TIME display will show ‘COOL’ and start blinking.  The resistance will return to level 1 as the time counts down 
from 1:00. 
 

ENGLISH to METRIC conversion: 
 

The computer display can show both ENGLISH and METRIC information.  If you want to change from ENGLISH to METRIC 
or METRIC to ENGLISH, please follow the procedure below:  
 

1.  When the computer is in the power on status, press and holds the STOP button as 5 seconds.  The LCD display will 

shows KM/H or ML/H. 

2. 

Press the UP or DOWN buttons to switch between METRIC (KM/H) or ENGLISH (ML/H) then press the STOP 
button to confirm the selection and return to POWER ON status.


Содержание CE 2.1

Страница 1: ...USER S MANUAL SMOOTH CE 2 1 ELLIPTICAL TRAINER MODEL NUMBER CE 2 1 USER WEIGHT LIMITATION 300 lbs TOLL FREE CUSTOMER SERVICE NUMBER 1 888 800 1167 SERIAL NUMBER found on frame...

Страница 2: ...sure that you have gathered all the necessary tools you may require to assemble the unit properly Having all of the necessary equipment at hand will save time and make the assembly quick and hassle f...

Страница 3: ...e unfamiliar to you NO DESCRIPTION QTY 30 30 x 91 x M14 Bolt 2 77 M8 x 60mm Allen Head Bolt 2 78 M10 x 90mm Bolt 2 79 M8 x 80mm Allen Head Bolt 2 88 M14 Nut 2 91 ID 8mm Curve Washer 2 97 M4 x 12mm Scr...

Страница 4: ...1 012 41 Adjuster Motor 1 CE2 1 041 13 Handlebar Cover 2 CE2 1 013 42 Spiral Shaft 1 CE2 1 042 14 Handlebar Inside Cover 4 CE2 1 014 43 Motor Bracket 1 CE2 1 043 15 Bearing 6004zz 4 CE2 1 015 44 Volu...

Страница 5: ...71 Frame Inside Cover Left 1 CE2 1 071 101 ID 10mm Curve Washer 2 CE2 1 101 72 Frame Inside Cover Right 1 CE2 1 072 102 M4 x 15mm Screw 8 CE2 1 102 73 Frame Outside Cover Right 1 CE2 1 073 103 Wire H...

Страница 6: ...39 29 33 37 38 84 36 35 95 24 25 31 30 18 29 74 40 85 95 95 85 29 95 29 28 101 28 18 98 30 31 32 26 26 87 76 27 91 87 26 91 32 101 26 77 27 74 86 25 16 75 97 79 83 5 23 88 18 78 22 102 97 12 15 13 6 1...

Страница 7: ...S SHOWN HERE HAVE BEEN PREASSEMBLED AT THE FACTORY 69 51 95 95 72 85 96 95 95 96 71 85 95 70 74 74 84 50 49 52 50 49 74 64 80 56 57 95 95 85 67 95 96 95 85 73 95 61 89 68 67 68 95 81 66 81 66 63 80 62...

Страница 8: ...nnect the Wire Harness Middle 103 and Wire Harness Lower 104 as shown below Attach the Front Upright Frame 2 to the Frame 99 and secure using two M10 x 90mm Bolts 78 two ID 10mm Curve Washers 101 and...

Страница 9: ...Upper 109 with Wire Harness Middle 103 and Hand Pulse Sensor Wire Upper 110 with Hand Pulse Sensor Wire Middle 108 as shown below Attach the Computer 1 to the Front Upright Frame 2 using four M6 x 20...

Страница 10: ...www smoothfitness com 10 ASSEMBLY STEP 3 Slide the Handlebar Left 16 and Handlebar Right 17 onto the Front Upright Frame 2 Connect the Hand Pulse Sensor Wire Middle 108 with Hand Pulse Sensor Wire Low...

Страница 11: ...at www smoothfitness com 11 ASSEMBLY STEP 4 Attach the Left Upright 5 and Right Upright 6 to the Frame 99 and secure using two M8 x 60mm Allen Head Bolts 77 two ID 8mm Curve Washers 91 and two M8 x 80...

Страница 12: ...IPTICAL TRAINER Visit us at www smoothfitness com 12 ASSEMBLY STEP 5 Slide the 20 x 91 x M14mm Bolt 30 through the Pedal Arm Right 34 and Handlebar Right 17 and secure with M14 Nut 88 as shown B 88 17...

Страница 13: ...LIPTICAL TRAINER Visit us at www smoothfitness com 13 ASSEMBLY STEP 6 Slide the20 x 91 x M14mm Bolt 30 through the Pedal Arm Left 33 and Handlebar Left 16 and secure with M14 Nut 88 as shown C 30 33 1...

Страница 14: ...www smoothfitness com 14 ASSEMBLY STEP 7 Attach the Pedal Arm Front Pivot Cover 18 into the ends of the Handlebar Right 17 and Pedal Arm Right 34 Repeat the procedure on the Pedal Arm Left 33 and Hand...

Страница 15: ...com 15 ASSEMBLY STEP 8 Attach the Front Frame Cover Upper 59 and Front Frame Cover Lower 60 to the Frame 99 Secure with Fixing Inserts 85 and M4 x 50mm Screw 100 NOTE The Fixing Insert 85 has been pre...

Страница 16: ...nt side of Handlebar Right 17 and secure with four M4 x 15mm Screws 102 Then attach two Handlebar Inside Cover 14 from the back side of the Handlebar Right 17 to the Handlebar Cover 13 Secure the Hand...

Страница 17: ...Y STEP 10 Attach the Side Upright Bottom Cover Left 3 and Side Upright Bottom Cover Right 4 to Right Upright 6 using four M4 x 15mm Screw 102 Repeat this procedure on Left Upright 5 with Side Upright...

Страница 18: ...ght Upright 6 using one Fixing Insert 85 and four M4 x 15mm Screw 102 Repeat this procedure on Left Upright 5 with Side Upright Upper Cover 1 7 and Side Upright Upper Cover 2 8 NOTE The Fixing Insert...

Страница 19: ...T To adjust the level of the CE 3 2 Elliptical Trainer simply rotate the Level Adjusters right or left to move them in or out of the Uprights Tilt the Elliptical Trainer to access stabilizers stabiliz...

Страница 20: ...moothfitness com 20 TRANSPORT INSTRUCTIONS TRANSPORT INSTRUCTIONS The casters located on the rear of the unit allow for easy transport Simply lift the front of the unit until the wheels touch the floo...

Страница 21: ...CE 2 1 ELLIPTICAL TRAINER Visit us at www smoothfitness com 21 COMPUTER INSTRUCTIONS A B C F D E MODE Button A B STOP Button LCD Display C D UP DOWN Buttons START Button E F ENTER Button...

Страница 22: ...o 16 DISTANCE Count up this measures the total distance from 0 to 99 9 Km Mile Count down if you have set the target distance the computer will count down from that preset distance down to zero as soo...

Страница 23: ...exercising press the START button If the STOP button is pressed after pausing the program the computer returns to Power on Status P2 TARGET DISTANCE After you have selected P2 TARGET DISTANCE the DIST...

Страница 24: ...e If user sets workout time above 16 minutes the computer will average the workout time in 16 sections as following Resistance Profile i e input 32 minutes the computer will do 2 minutes each section...

Страница 25: ...et the workout time less than 16 minutes the computer will run one minute for one section till time out i e input 12 minutes the computer will just do 12 sections Levels Resistance 1 1 9 9 1 1 9 9 1 1...

Страница 26: ...the computer will do 2 minutes each section If user set the workout time less than 16 minutes the computer will run one minute for one section till time out i e input 12 minutes the computer will jus...

Страница 27: ...n go into the HEART RATE CONTROL main program If you cannot reach the minimum target workout heart rate in 3 minutes the program will continue the second 3 minute WARM UP program If during the second...

Страница 28: ...odel name or number from the cover of the manual Serial number located on the frame of the unit and The part description and the order number Limitations on Warranty This Warranty will only apply to t...

Страница 29: ...you may be able to exercise only for a few minutes in your target zone However your aerobic fitness will improve over the next six to eight weeks Don t be discouraged if it takes longer It s importan...

Страница 30: ...your age and physical condition To determine your target zone consult the chart we have provided FIND YOUR TARGET HEART RATE 200 180 160 140 120 100 HEART RATE in beats per minute 80 20 25 30 35 40 4...

Страница 31: ...his product will develop the upper and lower body muscle groups These muscle groups are shown in gray color on the chart below Shoulder muscles A B Pectoral muscles Bicep muscle C D Abdominal muscles...

Страница 32: ...g more oxygen to your muscles At the end of your workout repeat these exercises to reduce sore muscle problems We suggest the warm up and cool down exercises on the following pages Toe Touch Slowly be...

Страница 33: ...your groin as possible Gently push your knees towards the floor Hold for 15 counts Side Stretch Open your arms to the side and continue lifting them until they are over your head Reach your right arm...

Страница 34: ...Smooth Fitness 112 Gaither Drive Mt Laurel NJ 08054 Toll Free Customer Service 1 888 800 1167 Website www smoothfitness com...

Отзывы: