background image

23 

6.17


MOTORIZD


TREADMILL


UNFOLDING INSTRUCTION 


How To Unfold The Treadmill: 


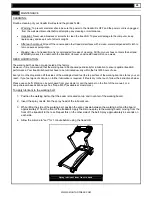
Deck release lever


Push the deck release lever and gently pull on the deck. Once the deck begin to lower, let it fall by itself. 


WWW.SMOOTHFITNESS.COM


Содержание 6.17 MOTORIZED TREADMILL

Страница 1: ...USER S MANUAL 6 17 MOTORIZED TREADMILL USER WEIGHT LIMITATION 350LBS 150KGS SERIAL NUMBER Found on Frame ...

Страница 2: ...he treadmill at all times The treadmill should not be used by persons weighing more than 350 LBS 150 kgs Never allow more than one person on the treadmill at a time Wear appropriate exercise clothing when using the treadmill Do not wear loose clothing that could become caught in the treadmill Athletic support clothes are recommended for both men and women Always wear athletic shoes Never use the t...

Страница 3: ...ons or from other appliances being turned on or off To reduce the possibility of treadmill damage always use a surge protector not included with your treadmill This treadmill must be grounded to reduce the risk of electrical shock Grounding provides a path of least resistance for electric current should the treadmill malfunction This treadmill comes with an electrical cord having an equipment grou...

Страница 4: ...ure there is a comfortable amount of free area around the unit for unobstructed operation Invite a Friend Some of the assembly steps may require heavy lifting It is recommended that you obtain the assistance of another person when assembling this product User Weight Limitation Please note that there is a weight limitation for this product If you weigh more than 350LB Approx 150 Kg It is not recomm...

Страница 5: ...t 4 805 M8x51mm Allen Head Cap Bolt 2 806 Φ4x14mm Screw 4 830 M8x18mm Allen Head Cap Bolt 4 304 Hand bar Cover LL 1 305 Hand bar Cover LR 1 307 Hand bar Cover RL 1 308 Hand bar Cover RR 1 604 Upright Base Cover L Back 1 607 Upright Base Cover R Back 1 104 Safety Key 1 A 6mm Allen key 1 B 6mm Allen key 1 C Screw Driver 1 D Oil Can 1 E Power Cord 1 F 5mm Allen Wrench 1 WWW SMOOTHFITNESS COM 1 x B A ...

Страница 6: ...1 6 17 302 303 2 Pin Safety Key Wire 1 6 17 303 304 Handbar Cover LL 1 6 17 304 305 Handbar Cover LR 1 6 17 305 306 Upright Connect Frame Left 1 6 17 306 307 Handbar Cover RL 1 6 17 307 308 Handbar Cover RR 1 6 17 308 309 Upright Connect Frame Right 1 6 17 309 310 Screw Cover 2 6 17 310 311 Upright Right 1 6 17 311 400 401 Main Frame 1 6 17 401 402 Front Roller 1 6 17 402 403 Front Roller Shaft 1 ...

Страница 7: ...02 603 Upright Base Cover L R 1 6 17 603 604 Upright Base Cover L Back 1 6 17 604 605 Upright Base Cover R L 1 6 17 605 606 Upright Base Cover R L 1 6 17 606 607 Upright Base Cover L Back 1 6 17 607 608 Power Switch Plate Base 1 6 17 608 609 Power Breaker 1 6 17 609 610 Power Switch 1 6 17 610 611 Power Switch Board 1 6 17 611 612 Electric Outlet 1 6 17 612 613 Rubber Cushion 4 6 17 613 614 Fold U...

Страница 8: ...815 816 M 10x28mm Allen Head Cap Bolt 2 6 17 816 817 M 8 Nut 6 6 17 817 818 M 10x43mm Allen Head Cap Bolt 1 6 17 818 819 Φ 10 Washer 2 6 17 819 820 M 8x47mm Bolt 1 6 17 820 821 M 8x85mm Motor Adjustment Bolt 1 6 17 821 822 Φ 35x6mm Spring Washer 2 6 17 822 823 Φ 25x12mm PU Cushion 1 6 17 823 824 M 8x12mm Allen Head Cap Screw 2 6 17 824 825 M 10x116mm Allen Head Bolt 1 6 17 825 826 M 10x66mm Allen ...

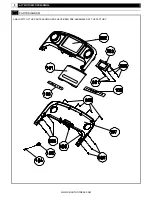
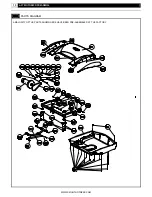
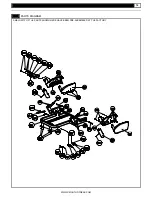
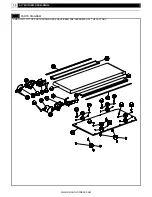
Страница 9: ...9 6 17 MOTORIZD TREADMILL PARTS DIAGRAM A MAJORITY OF THE PARTS SHOWN HERE HAVE BEEN PRE ASSEMBLED AT THE FACTORY WWW SMOOTHFITNESS COM ...

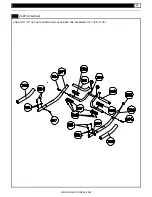
Страница 10: ...6 17 MOTORIZD TREADMILL 10 PARTS DIAGRAM A MAJORITY OF THE PARTS SHOWN HERE HAVE BEEN PRE ASSEMBLED AT THE FACTORY WWW SMOOTHFITNESS COM ...

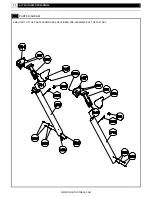
Страница 11: ...11 6 17 MOTORIZD TREADMILL PARTS DIAGRAM A MAJORITY OF THE PARTS SHOWN HERE HAVE BEEN PRE ASSEMBLED AT THE FACTORY WWW SMOOTHFITNESS COM ...

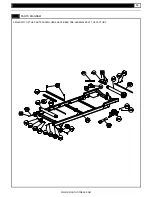
Страница 12: ...6 17 MOTORIZD TREADMILL 12 PARTS DIAGRAM A MAJORITY OF THE PARTS SHOWN HERE HAVE BEEN PRE ASSEMBLED AT THE FACTORY WWW SMOOTHFITNESS COM ...

Страница 13: ...13 6 17 MOTORIZD TREADMILL PARTS DIAGRAM A MAJORITY OF THE PARTS SHOWN HERE HAVE BEEN PRE ASSEMBLED AT THE FACTORY WWW SMOOTHFITNESS COM ...

Страница 14: ...6 17 MOTORIZD TREADMILL 14 PARTS DIAGRAM A MAJORITY OF THE PARTS SHOWN HERE HAVE BEEN PRE ASSEMBLED AT THE FACTORY WWW SMOOTHFITNESS COM ...

Страница 15: ...15 6 17 MOTORIZD TREADMILL PARTS DIAGRAM A MAJORITY OF THE PARTS SHOWN HERE HAVE BEEN PRE ASSEMBLED AT THE FACTORY WWW SMOOTHFITNESS COM ...

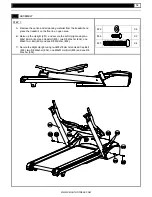
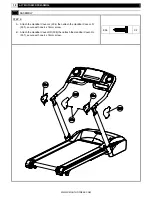
Страница 16: ... an open area B Raise up the Upright 301 and secure the Left Upright using two M8x18mm Allen Head Cap Bolt 830 two Φ8 Washer 802 one M8x51mm Bolt 805 and one Φ8 Washer 802 C Secure the Right Upright using two M8x18mm Allen Head Cap Bolt 830 two Φ8 Washer 802 one M8x51mm Bolt 805 and one Φ8 Washer 802 802 X 6 805 X 2 830 X 4 WWW SMOOTHFITNESS COM ...

Страница 17: ...sembly 203 up and hold while the bolts are inserted B Secure the Right Handbar with two M8x45mm Allen Head Cap Bolt 804 and two Φ8 Washer 802 C Secure the Left Handbar with two M8x45mm Allen Head Cap Bolt 804 and two Φ8 Washer 802 802 X 4 804 X 4 WWW SMOOTHFITNESS COM ...

Страница 18: ...age 22 A Fold up the running deck until it locks in correct position B Attach Right Upright base cover back 604 to the right upright secure with one 4 x 14mm screw 806 C Attach Left Upright base cover back to the left upright secure with one 4 x 14mm screw 806 X 2 WWW SMOOTHFITNESS COM ...

Страница 19: ...TEP 4 A Attach the Handbar Cover LL 304 then attach the Handbar Cover LR 305 secure with one 4 x 14mm screw B Attach the Handbar Cover RR 308 then attach the Handbar Cover RL 307 secure with one 4 x 14mm screw 806 X 2 WWW SMOOTHFITNESS COM ...

Страница 20: ...ecuring bolts using the 6mm Allen key and push the Handlebar down until the handlebar covers are fully seated in the uprights B Tighten the Handlebar securing bolts C Insert the Screw covers 310 to the uprights as shown the Close up 3 310 X 2 WWW SMOOTHFITNESS COM ...

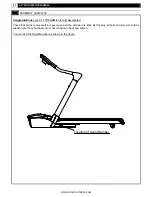
Страница 21: ...ssembled Check that all the components are secure and all the hardware is tight By this step all bolts and screw should be wrench tight If any hardware is not wrench tight go back and tighten You can find the Serial Number as shown in the photo Location of Serial Number WWW SMOOTHFITNESS COM ...

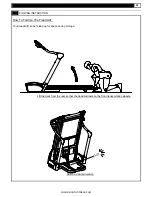
Страница 22: ...TRUCTION How To Fold Up The Treadmill Your treadmill can be folded up for space saving storage Lift the deck from the rear so that the treadmill rests on the front transportation wheels CLICK Roll to a desired location WWW SMOOTHFITNESS COM ...

Страница 23: ...ORIZD TREADMILL UNFOLDING INSTRUCTION How To Unfold The Treadmill Deck releaselever Push the deck release lever and gently pull on the deck Once the deck begin to lower let it fall by itself WWW SMOOTHFITNESS COM ...

Страница 24: ...ANSPORT INSTRUCTION To roll away for storage simply grab the rear deck lift slightly and roll to desired location When the rear of the frame is rotated high enough The rear wheel will automatically move into position for transport WWW SMOOTHFITNESS COM ...

Страница 25: ...r Repeat the above procedure until the walking belt is centered It may be necessary to set walking belt tension once you have completed this procedure if the belt feels like it is slipping while walking Refer below to the Walking belt slipping instructions Walking belt has shifted to the right First unplug the power cord from the surge protector Using the hex key provided turn the right rear rolle...

Страница 26: ...our treadmill should not have to be lubricated usually within the first 400 hours of use Every 2 months of operation lift the sides of the walking belt and feel the top surface of the walking board as far as you can reach If you feel signs of silicone no further lubrication is required If it feels dry to the touch follow the instructions below Please use Lube N Walk can be purchased from your deal...

Страница 27: ... only for a few minutes in your target zone However your aerobic fitness will improve over the next six to eight weeks Don t be discouraged if it takes longer It s important to work at your own pace Ultimately you ll be able to exercise continuously for 30 minutes And the better your aerobic fitness the harder you will have to work to stay in your target zone But remember these essentials Contact ...

Страница 28: ...f it has tripped reset or have an electrician replace the breaker in home 4 Have an electrician check for inadequate voltage at the outlet Treadmill looses power during use A Check the circuit breaker reset switch located on the front of the treadmill Turn the power off wait 5 minutes then press the rest switch B Check the house electrical breaker box and the circuit breaker for the room the tread...

Страница 29: ...eight is 68 kg 150 lbs The speed display range is from 0 0 to 200 5 Km h mph display The speed display is in km h mph 6 Height Pulse display The height display range is from 50 to 250 cm 1 08 to 8 03 The initial height is 160 cm 5 3 The pulse display range is from 40 to 250 bpm 7 Program Text display Display of the program text 8 Time display The time display range is from 00 00 to 99 59 9 Speed D...

Страница 30: ... c Press this button to save settings before you START SPEED UP button a Press this button to increase exercise speed by 0 1 mph km h b Press this button to increase the current assigned value in PROGRAM MODE c Hold the button to rapidly increase the current assigned value release to stop SPEED DOWN button a Press this button to decrease exercise speed by 0 1 mph km h b Press this button to decrea...

Страница 31: ...n the computer is in the SLEEP MODE SAFETY KEY The safety key must be inserted into the slot on the console in order to operate the treadmill Always insert the safety key and attach the clip to your clothing at your waist before beginning your workout If you should encounter problems and need to stop the motor quickly simply pull on the cord to disengage the safety key from the console To continue...

Страница 32: ...assign the user ID shown SET USER AGE After setting the User ID The LCD will display the current or default setting for Age 35 Press the INPUT UP and INPUT DOWN button to set the user Age and press ENTER to save SET USER WEIGHT After setting the user Age The LCD will display the current or default setting for Weight 68 kg 150 lbs Press the INPUT UP and INPUT DOWN buttons to set the user Weight and...

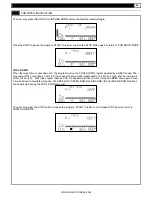
Страница 33: ...ER button to set up that program Details on each of the Programs follow P1 TARGET TIME PROGRAM If user selects P1 and presses the ENTER the user must next select the target time min and then press ENTER to confirm the setting The user may then press the START button to begin the program Time will count down from the defined target time with an initial speed with 3 2km hr 2 0 mph The user may press...

Страница 34: ...y a BEEP sound The program will then count down from 1 00 the speed will return to the initial speed of 3 2 km hr 2 mph and the incline will return to zero L0 When the counter reaches 0 00 the treadmill will then come to a stop and BEEP once again Pulse Time and Calorie counters will pause The SPEED UP SPEED DOWN and INCLINE UP and INCLINE DOWN buttons are deactivated during the COOL DOWN program ...

Страница 35: ...d Pause COOL DOWN or STOP as described P3 TARGET CALORIES PROGRAM If the user selects the P3 program and presses ENTER the LCD will begin blinking 0 calories the user must next use INPUT UP and INPUT DOWN to setup Target Calories and then press ENTER to confirm the setting The user may then Press START to initiate the program P3 TARGET CALORIES At program star the Calories will count down from the...

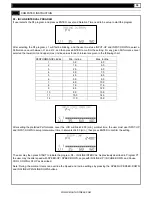
Страница 36: ... 0 0 4 0 2 1 0 5 0 3 2 0 6 0 4 3 0 7 0 5 4 0 8 0 6 5 0 9 0 7 6 0 10 0 8 7 0 11 0 9 8 0 12 0 10 9 0 13 0 11 10 0 14 0 12 11 0 15 0 After setting the preferred Performance Level the LCD will blink 24 00 min workout time the user must use INPUT UP and INPUT DOWN to setup total workout time in intervals of 4 00 min then press ENTER to confirm the setting The user may then press START to initiate the p...

Страница 37: ... h 1 1 8 3 1 2 9 5 0 2 2 0 3 4 3 2 5 4 3 2 2 3 8 3 5 6 1 4 2 4 4 2 3 8 6 7 5 2 6 4 6 4 2 7 4 6 2 8 5 0 4 5 8 0 7 3 0 5 4 4 8 8 6 8 3 2 5 8 5 1 9 3 9 3 4 6 2 5 4 9 9 10 3 6 6 6 5 8 10 6 11 3 8 7 0 6 1 11 2 12 4 0 7 2 6 4 11 5 After setting the preferred Performance level the LCD will display a blinking 24 00 min workout time The user must then use INCLINE UP and INCLINE DOWN buttons to adjust the t...

Страница 38: ...lects P6 and presses ENTER L1 will first be blinking and the user must select a Performance Level between L1 and L12 using INPUT UP and INPUT DOWN to set the min and max speed and incline settings as per intervals shown in the table below PERFORMANCE Min Speed km mi Max Speed km mi Min Incline Max Incline 1 2 6 1 6 4 5 2 9 0 3 2 2 9 1 8 4 8 3 1 0 4 3 3 2 2 0 5 1 3 3 1 5 4 3 5 2 2 5 4 3 5 1 6 5 3 8...

Страница 39: ... 5 00 min and then press ENTER to confirm the setting The User may the press START to initiate the program P6 WEIGHT LOSS As previously described in Program P1 the user may the alter speed with SPEED UP SPEED DOWN angle with INCLINE UP INCLINE DOWN and Pause COOL DOWN or STOP as described Note During the workout Users can override the Speed and Incline settings by pressing the SPEED UP SPEED DOWN ...

Страница 40: ...Time and Calories begin to count up from 0 The Incline Level follows the factory pre set profile and Distance will gradually count down from 5 km 3 mi As previously described in Program P1 the user may the alter speed with SPEED UP SPEED DOWN angle with INCLINE UP INCLINE DOWN and Pause COOL DOWN or STOP as described Note During the workout Users can override the Speed and Incline settings by pres...

Страница 41: ...he incline level will not change when the program can not detect the heart rate Phase 2 Speed Adjust In the second Phase the user s heart rate will be monitored continuously and at 30 second intervals counting down from 3 00 min if the Target Heart Rate is not met the Speed of the treadmill will be increase at 0 8 km hr 0 5 mph increments The treadmill will continue to increase Speed in this phase...

Страница 42: ...9 P9 CUSTOM COURSE 1 C1 PROGRAM If the user selects the P9 program and presses ENTER the LCD will display the previously saved Speed Profile or Preset Profile The program can maintain settings for a total workout period of 60 minutes The user may then press START to initiate the program P9 CUSTOM COURSE 1 The user can adjust speed and incline intervals using SPEED UP SPEED DOWN and INCLINE UP INCL...

Страница 43: ...recorded session for use The Save screen as shown below stays open for access over a coupe of 10 seconds Should the counter be permitted to count down to zero then a 1 min COOL DOWN Program is initiated first The user may still interrupt the COOL DOWN sequence by pressing STOP sequentially To Save the last set of 1 min intervals executed the user must now simply press ENTER This will overwrite any...

Страница 44: ...arranted for the unexpired portion of the Warranty applying to the original product Any technical advice furnished before or after delivery in regard to the use or application of Smooth Fitness products is furnished without charge and on the basis that it represents Smooth Fitness best judgment under the circumstances but that the advice is used at your sole risk Procedure for Obtaining Your Remed...

Страница 45: ... conditioning or interval training FITNESS Optimal training aerobic or cardiovascular HEALTH Beginner low intensity with long duration produces fat burning You can calculate the target heartrate for your training as follows Maximum heartrate 220 minus age For the different trainingtargets you should train with the following percentage of your maximum heartrate HEALTH 50 70 of your max heartrate FI...

Страница 46: ...upper and lower body muscle groups These muscle groups are shown in gray color on the chart below Shoulder muscles A B Pectoral muscles Bicep muscles C D Abdominal muscles Forearm muscles E F Quadricep muscles Calf muscles G H Trapezius muscles Tricep muscles I J Back muscles Gluteal muscles K L Hamstring muscles WWW SMOOTHFITNESS COM ...

Страница 47: ...s At the end of your workout repeat these exercises to reduce sore muscle problems We suggest the warm up and cool down exercises on the following pages Toe Touch Slowly bend forward from your waist letting your back and shoulders relax as you stretch toward your toes Reach down as far as you can and hold for 15 counts Shoulder Lift Lift your right shoulder up toward your ear for one count Then li...

Страница 48: ...y push your knees towards the floor Hold for 15 counts Side Stretch Open your arms to the side and continue lifting them until they are over your head Reach your right arm as far upward toward the ceiling as you can for one count Feel the stretch up your right side Repeat this action with your left arm Calf Achilles Stretch Lean against a wall with your left leg in front of the right and your arms...

Страница 49: ...49 6 17 MOTORIZD TREADMILL Smooth Fitness 780 Fifth Avenue Suite 200 King of Prussia PA 19406 Toll Free Customer Service 1 888 800 1167 Website www smoothfitness com WWW SMOOTHFITNESS COM ...

Отзывы: