background image


SMOOTH 5.15P MOTORIZED TREADMILL 


Visit us at: 

www.smoothfitness.com


18 

MAINTENANCE 


CLEANING

 
Routine cleaning of your treadmill will extend the product's life.  
 

?


Warning

: To prevent electrical shock, be sure the power to the treadmill is OFF and the power cord is unplugged 

from the wall electrical outlet before attempting any cleaning or maintenance.   


?


Important

: Never use abrasives or solvents to clean the treadmill.  To prevent damage to the computer, keep 

liquids away and keep it out of direct sunlight. 


?


After each workout

:  Wipe off the console and other treadmill surfaces with a clean, water dampened soft cloth to 

remove excess perspiration.   


?


Weekly

:  Use of a treadmill mat is recommended for ease of cleaning.  Dirt from your shoes contacts the belt and 

eventually makes it to underneath the treadmill.  Vacuum underneath treadmill once a week. 


DECK LUBRICATION

 
The walking belt has been pre-lubricated at the factory.  However, it is recommended that the walking board be checked 
periodically for lubrication to ensure optimal treadmill performance.  Your treadmill should not have to be lubricated usually 
within the first year or 500 hours of use.  Please call 888-800-1167 for service. 
 
Every 3 months of operation lift the sides of the walking belt and feel the top surface of the walking board as far as you can 
reach.  If you feel signs of silicone, no further lubrication is required.  If it feels dry to the touch, follow the instructions below. 
 
Please use Lube 'N Walk (can be purchased from your dealer or call the number on the front of the manual), or a non-
petroleum based silicone such as "Napa 8300" (available at most stores). 
 

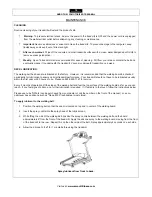
To apply lubricant to the walking belt


1.  Position the walking belt so that the seam is located on top and in center of the walking board. 


2.  Insert the spray nozzle into the spray head of the lubricant can. 


3.  While lifting the side of the walking belt, position the spray nozzle between the walking belt and the board 

approximately 6" from the front of the treadmill.  Apply the silicone spray to the walking board, moving from the front 
of the treadmill to the rear.  Repeat this on the other side of the belt.  Spray approximately 4 seconds on each side. 


4.  Allow the silicone to "set" for 1 minute before using the treadmill. 


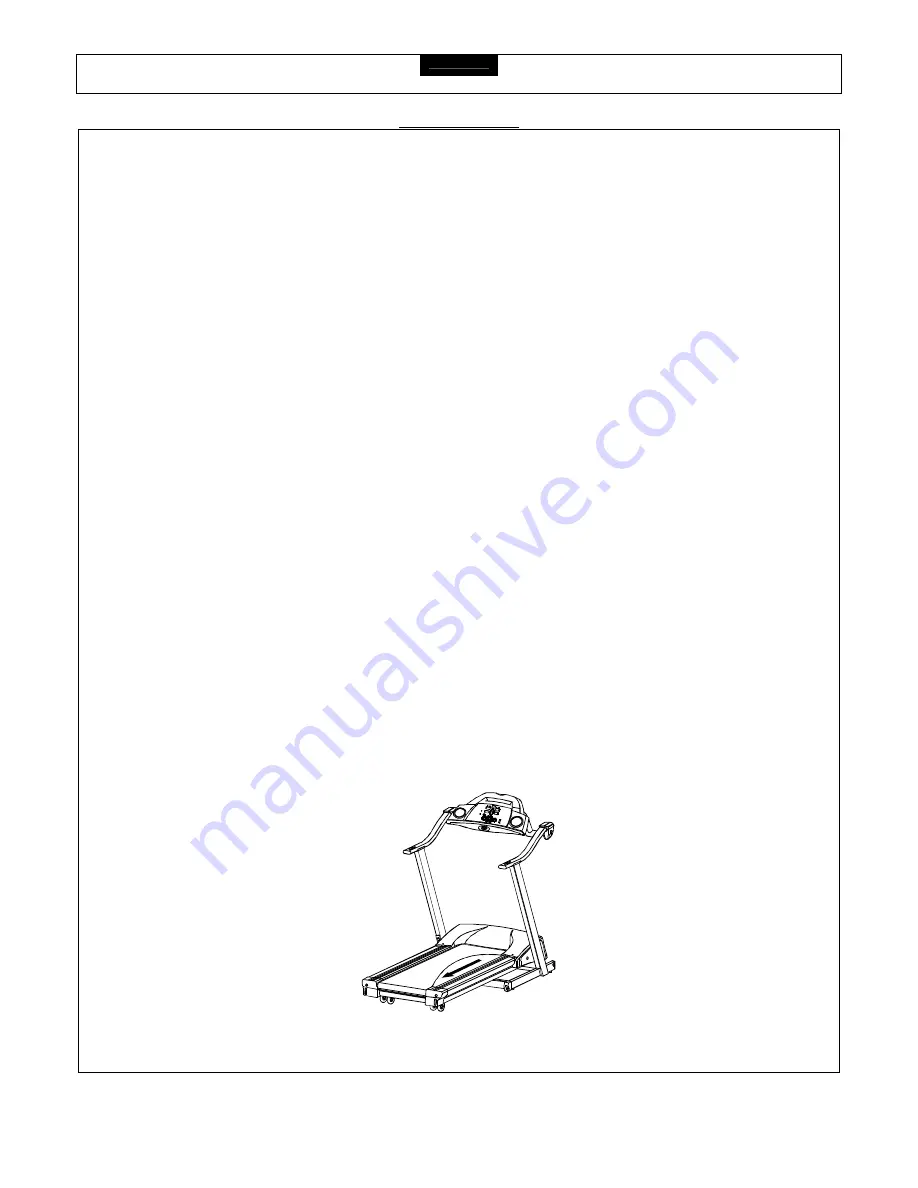
Spray lubricant from front to back. 

Содержание 5.15P

Страница 1: ...USER S MANUAL 5 15P MOTORIZED TREADMILL MODEL NUMBER 5 15P USER WEIGHT LIMITATION 275lbs TOLL FREE CUSTOMER SERVICE NUMBER 1 888 800 1167 SERIAL NUMBER found on frame...

Страница 2: ...ldren under the age of 12 and pets away from the treadmill at all times The treadmill should not be used by persons weighing more than 275lbs Never allow more than one person on the treadmill at a tim...

Страница 3: ...se a surge protector not included with your treadmill Surge protectors can be purchased at most hardware stores The manufacturer recommends a single outlet surge protector with a UL 1449 rating as a T...

Страница 4: ...l save time and make the assembly quick and hassle free Clear your work area Make sure that you have cleared away a large enough space to properly assemble the unit Make sure the space is free from an...

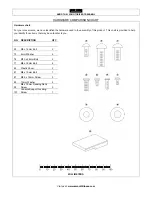
Страница 5: ...he assembly of this product This chart is provided to help you identify those items that may be unfamiliar to you NO DESCRIPTION QTY 29 M5 x 14mm Bolt 2 73 8mm Washer 4 76 M10 x 26mm Bolt 2 77 M8 x 18...

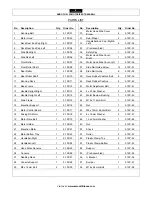
Страница 6: ...P 40 12 Base Frame 1 5 15P 12 41 Motor Adjustment Bolt 1 5 15P 41 13 Handle Upright Right 1 5 15P 13 42 8 x 23mm Washer 2 5 15P 42 14 Handle Upright Left 1 5 15P 14 43 Motor Bumper Bushing 1 5 15P 43...

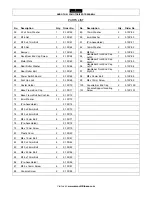
Страница 7: ...ller Bolt 2 5 15P 67 97 Handlebar Front End Cap Right 2 1 5 15P 97 68 Power Switch Board 1 5 15P 68 98 M8 x 36mm Bolt 2 5 15P 98 69 Foot Up Lock 1 5 15P 69 99 M4 x 15mm Screw 3 5 15P 99 70 Caster Hold...

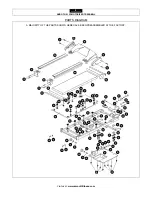
Страница 8: ...SMOOTH 5 15P MOTORIZED TREADMILL Visit us at www smoothfitness com 8 PARTS DIAGRAM A MAJORITY OF THE PARTS SHOWN HERE HAVE BEEN PREASSEMBLED AT THE FACTORY...

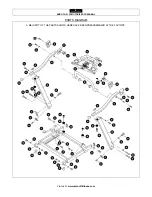
Страница 9: ...SMOOTH 5 15P MOTORIZED TREADMILL Visit us at www smoothfitness com 9 PARTS DIAGRAM A MAJORITY OF THE PARTS SHOWN HERE HAVE BEEN PREASSEMBLED AT THE FACTORY...

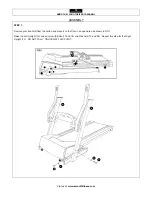
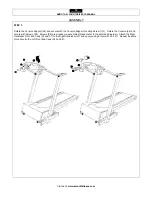
Страница 10: ...ASSEMBLY STEP 1 Remove your treadmill from the carton and place it on the floor in an open area as shown in FIG1 Raise the Left Upright 14 and secure with Bolts 77 and 76 and Washers 73 and 89 Repeat...

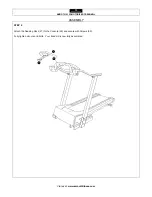
Страница 11: ...Visit us at www smoothfitness com 11 ASSEMBLY STEP 2 Attach the Left Handlebar 24 and Right Handlebar 23 using Bolt 77 and Washer 73 Attach the Plastic Cover 80 to the bottom of the Left Upright 24 an...

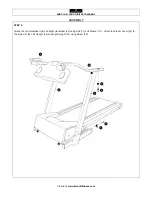
Страница 12: ...e Console Support Locating Screw 101 Rotate the Console 26 and secure with Screws 88 Screws 88 are already pre assembled please refer to the exploded diagram Attach the Right Handlebar Front End Caps...

Страница 13: ...OTORIZED TREADMILL Visit us at www smoothfitness com 13 ASSEMBLY STEP 4 Attach the Reading Rack 27 to the Console 26 and secure with Screws 99 Fully tighten all nuts and bolts Your treadmill is now fu...

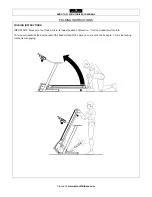
Страница 14: ...RUCTIONS FOLDING INSTRUCTIONS IMPORTANT Make sure the Treadmill is in its lowest position of Elevation If not the treadmill will not fold To fold your treadmill stand at the rear of the treadmill and...

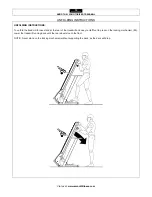
Страница 15: ...INSTRUCTIONS To unfold the treadmill for use stand at the rear of the treadmill and use your left foot to press on the locking mechanism 69 Lower the treadmill running deck until the rear wheels touch...

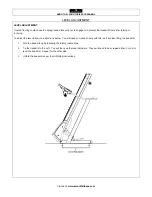
Страница 16: ...inclining To adjust the level follow the instructions below You will need someone to help with this as it involves lifting the treadmill 1 Fold the treadmill up by following the folding instructions...

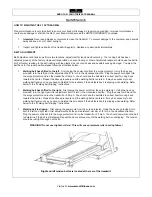
Страница 17: ...oving back towards the center Repeat the above procedure until the walking belt is centered It may be necessary to set walking belt tension once you have completed this procedure if the belt feels lik...

Страница 18: ...ormance Your treadmill should not have to be lubricated usually within the first year or 500 hours of use Please call 888 800 1167 for service Every 3 months of operation lift the sides of the walking...

Страница 19: ...used at your sole risk Procedure for Obtaining Your Remedy Under This Warranty To obtain service call your local Smooth Retailer To help them assist you please have the following information ready Mo...

Страница 20: ...ally you may be able to exercise only for a few minutes in your target zone However your aerobic fitness will improve over the next six to eight weeks Don t be discouraged if it takes longer It s impo...

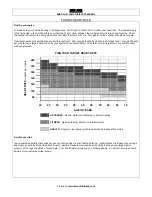
Страница 21: ...d by your age and physical condition To determine your target zone consult the chart we have provided FIND YOUR TARGET HEART RATE 200 180 160 140 120 100 HEART RATE in beats per minute 80 20 25 30 35...

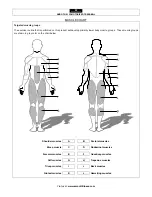
Страница 22: ...on this product will develop primarily lower body muscle groups These muscle groups are shown in gray color on the chart below Shoulder muscles A B Pectoral muscles Bicep muscle C D Abdominal muscles...

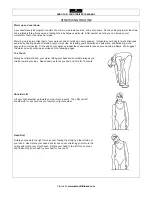
Страница 23: ...ering more oxygen to your muscles At the end of your workout repeat these exercises to reduce sore muscle problems We suggest the warm up and cool down exercises on the following pages Toe Touch Slowl...

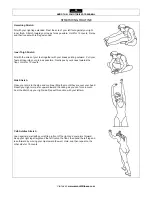
Страница 24: ...nto your groin as possible Gently push your knees towards the floor Hold for 15 counts Side Stretch Open your arms to the side and continue lifting them until they are over your head Reach your right...

Страница 25: ...inadequate voltage at the outlet Treadmill looses power during use 1 Check the circuit breaker reset switch located on the front of the treadmill Turn the power off wait 5 minutes then press the rest...

Страница 26: ...Copyright 2003 Smooth Fitness 112 Gaither Drive Mt Laurel NJ 08054 Toll Free Customer Service 1 888 800 1167 Website www smoothfitness com...

Отзывы: