background image

Instructions for the installer

46

10.6 Adjusting the minimum setting for LPG

To adjust the minimum setting with LPG, you must tighten the screw inside or
next to the tap rod (depending on the model) fully in a clockwise direction.
The diameters of the by-passes for the individual burners are given in the table
“10.3 Burner and nozzle characteristics tables”.

After adjustment with a gas other than the preset one, replace the label on the
casing of the appliance with the label corresponding to the new gas. The label is
inserted inside the pack together with the nozzles.

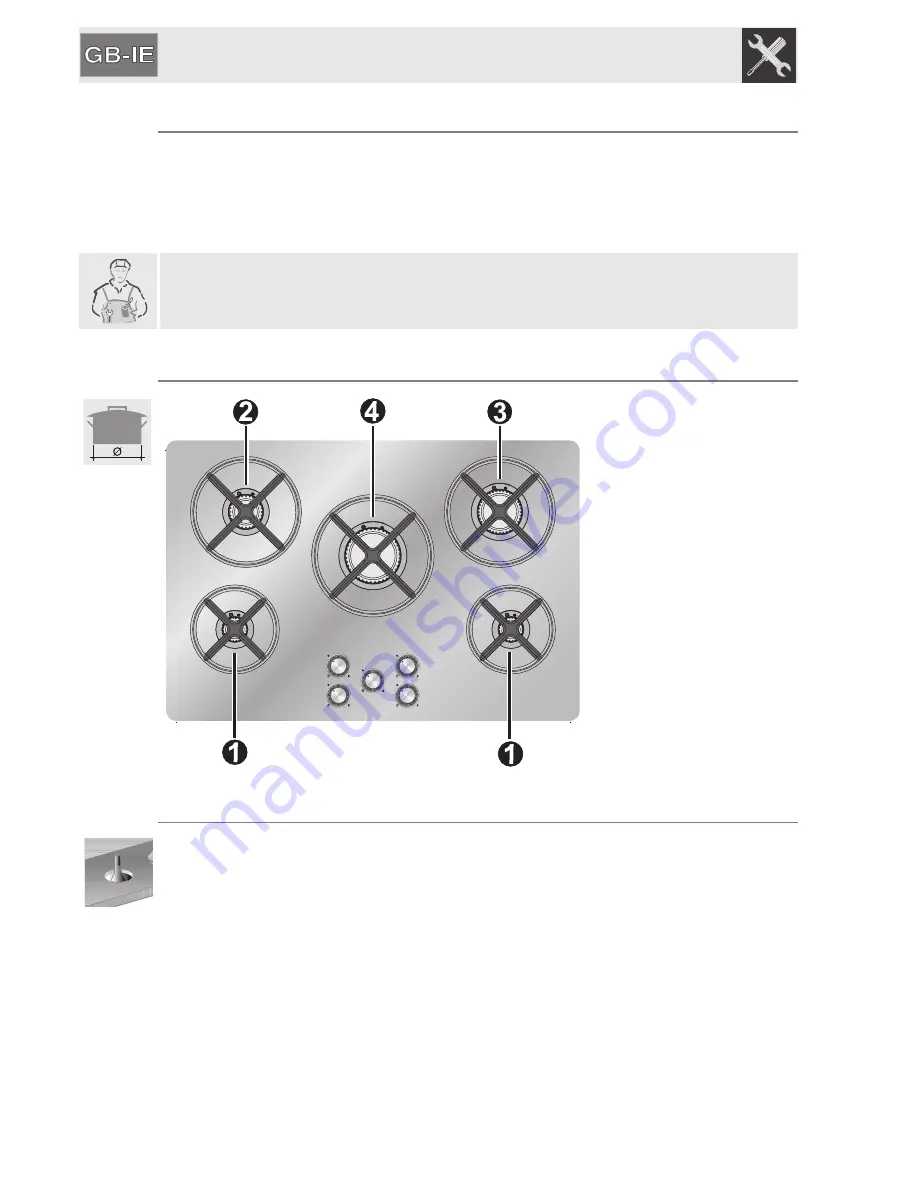
10.7 Arrangement of the burners on the hob

Type of burner

1 Auxiliary
2.  Semi-rapid
3 Medium Rapid
4 Large Rapid

10.8 Lubrication of gas taps

Over time the gas taps may become difficult to turn and get blocked. Clean them
internally and replace the lubrication grease. 

This procedure must be carried out by a specialised technician

.

Содержание P755SB

Страница 1: ...leaning and maintenance of the appliance INSTRUCTIONS FOR THE INSTALLER these are intended for the qualified technician who must install the appliance set it functioning and carry out an inspection te...

Страница 2: ...ER THAN AS INDICATED IF THE APPLIANCE IS INSTALLED ON BOATS OR IN CARAVANS DO NOT USE IT AS A ROOM HEATER DO NOT USE THIS APPLIANCE FOR HEATING ROOMS THIS APPLIANCE IS MARKED ACCORDING TO EUROPEAN DIR...

Страница 3: ...AT THE CONTROL KNOBS ARE IN THE OFF POSITION WHEN YOU FINISH USING THE HOB NEVER PLACE PANS WITH BOTTOMS WHICH ARE NOT PERFECTLY FLAT AND SMOOTH ON THE COOKING HOB RACKS NEVER USE CONTAINERS WHICH PRO...

Страница 4: ...ING OUT INSTALLATION MAINTENANCE WORK MAKE SURE THAT THE APPLIANCE IS NOT CONNECTED TO THE POWER GRID THE PLUG TO BE CONNECTED TO THE POWER SUPPLY CABLE AND ITS SOCKET MUST BE OF THE SAME TYPE AND CON...

Страница 5: ...COULD REACH THE ELECTRONICS DAMAGING THEM AND CAUSING SHORT CIRCUITS DO NOT MODIFY THIS APPLIANCE DO NOT SPRAY ANY SPRAY PRODUCTS NEAR THE ELECTRICAL APPLIANCE WHILE IT IS IN OPERATION DO NOT USE SPR...

Страница 6: ...results in the application of administrative sanctions The product does not contain substances in quantities sufficient to be considered hazardous to health and the environment in accordance with cur...

Страница 7: ...at the centre front CONTROL ZONE KNOB DESCRIPTION To light the flame press the knob and at the same time turn it anticlockwise to the maximum flame symbol To adjust the flame turn the knob to the zone...

Страница 8: ...igniter and thermocouple on the hob should fit into the 2 holes on the burner 5 1 Positioning the racks The racks are provided unassembled on the hob To position each rack correctly on its burner fol...

Страница 9: ...ence notches A with the cavities B on the hob After positioning check that the rack feet are all resting on the same level Make sure that the racks are simply centred on their respective burners witho...

Страница 10: ...tally after about 20 seconds a safety device will be tripped cutting off the gas supply even if the gas tap is open 5 3 Practical tips for using the burners For better burner performance and minimum g...

Страница 11: ...Instructions for the user 35 5 4 Pan diameters BURNERS 1 Auxiliary 2 Semi rapid 3 Medium Rapid 4 Large Rapid min and max in cm 7 18 10 24 18 24 20 26...

Страница 12: ...the stainless steel surfaces always use only specific products that do not contain abrasives or chlorine based acids How to use pour the product onto a damp cloth and wipe the surface rinse thoroughly...

Страница 13: ...the cooking hob These components must not be washed in the dishwasher 6 2 3 Flame spreader crowns The flame spreader crowns are removable Wash them with lukewarm water and non abrasive detergent maki...

Страница 14: ...ainst walls higher than the work surface on condition that a distance of X be kept between the appliance and the wall as shown in the figure so as to avoid damage from overheating Make sure that there...

Страница 15: ...in the figure bearing in mind that for both models the long front side must brush against the hole Fix the hob to the unit using the appropriate brackets A supplied Carefully trim the surplus away fro...

Страница 16: ...qual to or greater than 3 mm in an easily accessible position close to the appliance Avoid use of adapters and shunts If the power cable is replaced the cross section of wires in the new cable must be...

Страница 17: ...natural gas G20 2H at a pressure of 20 mbar To set it up for supply using other types of gas see Chapter 10 ADAPTATION TO DIFFERENT TYPES OF GAS The gas inlet connection is threaded for external gas...

Страница 18: ...nts protected by grills must be the right size to comply with current regulations and positioned so that no part of them is obstructed not even partially The room must be kept adequately ventilated in...

Страница 19: ...nobs 1 by pulling them upwards Remove the racks 2 by lifting them upwards Lift all the burner components off the hob 3 4 Unscrew the screws 5 that secure the burner supports Having removed all the com...

Страница 20: ...ed capacity W Capacity g h G30 Capacity g h G31 Auxiliary 1 05 48 400 76 75 Semi rapid 1 65 62 500 120 118 Medium Rapid 2 5 76 750 182 179 Large Rapid 3 4 87 1050 247 243 Burner Rated heating capacity...

Страница 21: ...air is too high B The flame is opaque dull or has yellow tips and wraps around the burner the primary air is too low C The flame is blue clear and stable does not detach or wrap around the burner the...

Страница 22: ...tables After adjustment with a gas other than the preset one replace the label on the casing of the appliance with the label corresponding to the new gas The label is inserted inside the pack together...

Отзывы: