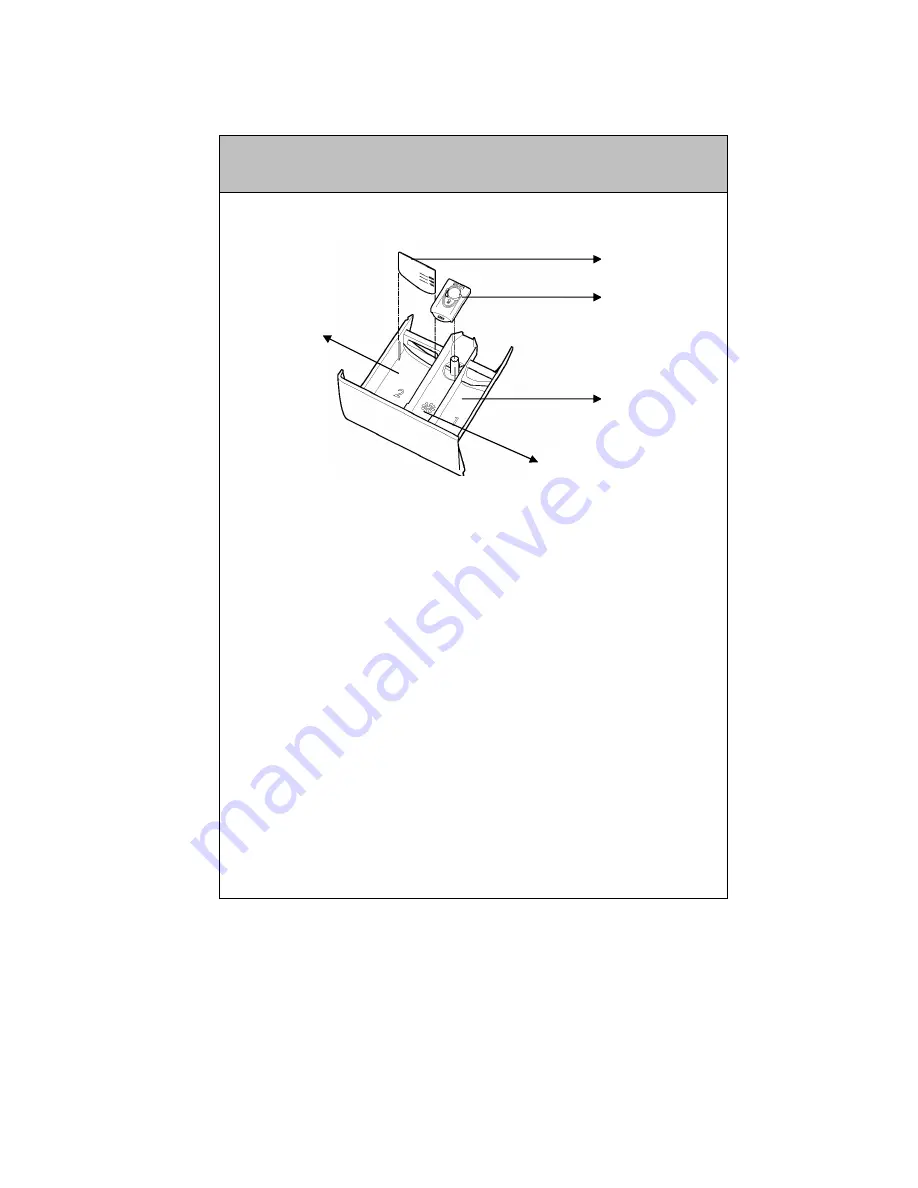
A. Prewashing compartmentB. Main washing compartmentC. Softener compartmentD. Siphon coverE. Liquid level detergent plate
17
CHAPTER 5: CONTROL PANELDETERGENT DRAWER
A
B
C
D
E
Страница 1: ...FULLY AUTOMATIC ELECTRONIC WASHING MACHINE USER MANUAL BEFORE USING THE WASHING MACHINE YOU SHOULD CERTAINLY READ THE INFORMATION IN USER S MANUAL ...
Страница 2: ...ob 18 Electronic display 19 CHAPTER 6 OPERATING YOUR MACHINE 20 Selecting programme 20 Auxiliary functions 20 Starting the programme 29 Adding Removing laundry 30 Child lock 31 Cancelling programme 32 Finishing programme 33 CHAPTER 7 ELECTRONIC DISPLAY WARNING SYMBOLS 34 Warning of water cut off low mains water pressure 34 Warning of clogged pump fitler 35 CHAPTER 8 MAINTENANCE AND CLEANING OF YOU...
Страница 3: ... 7 7 7 3 CHAPTER 1 TECHNICAL SPECIFICATIONS 1 Detergent drawer 2 Upper tray 3 Programme knob 4 Electronic display 5 Door 6 Cover of pump filter 7 Transport safety screw 8 Power cable 9 Discharging hose 10 Water inlet valve ...
Страница 4: ...urrent A 10 Water pressure Mpa Maximum 1 Mpa Minimum 0 1 MPa Total power W 2200 Maximum dry laundry capacity kg 9 Spinning revolution rev min 1000 Programme number 15 Dimensions Height x Width x Depth mm 845 x 597 x 582 4 CHAPTER 1 TECHNICAL SPECIFICATIONS ...
Страница 5: ... temperatures while running do not touch the drain hose and water during draining In case of any failure first unplug the device and close the water tap Do not attempt to repair Please apply to the nearest authorised service station Do not forget that the packing material of your machine may be hazardous for children Do not let your children play with the washing machine Keep your pet away from yo...
Страница 6: ...y people including children with reduced physical sensory or mental capabilities or lack of experience and knowledge unless they have been given supervision or instruction concerning use of the appliance by a person responsible for their safety Children should be supervised to ensure that they do not play with the appliance If you do not need to use your machine for a long time unplug it close the...
Страница 7: ...d not harmful You must pay attention to the following issues before using your washing machine Transportation screws which are located at the back of the machine must be removed before running the machine Loosen the screws by rotating counterclockwise by a suitable wrench 7 CHAPTER 3 SETTING UP REMOVING TRANSPORT SAFETY SCREWS ...
Страница 8: ...ws have been removed insert the plastic transport screw taps found in the accessories bag The transportation screws that have been removed should be kept for future use if the machine needs to be transported elsewhere 8 CHAPTER 3 SETTING UP REMOVING TRANSPORT SAFETY SCREWS ...
Страница 9: ...an adjust the feet of your machine to stabilise the balance First loosen the plastic adjustment nut Adjust by rotating the feet upwards or downwards After the balance has been reached tighten the plastic adjustment nut again by rotating it upwards Never put cartons wooden blocks or similar materials under the machine to achieve balance 9 CHAPTER 3 SETTING UP ADJUSTING FEET FOR BALANCE ...
Страница 10: ... hot and cold water inlet To prevent leakage from the connection joints 1 valid for cold water inlet or 2 valid for machines with hot and cold water inlet seals are included in the hose packing Fit these seals at the end of water inlet hoses on the tap side Connect the white headed hose to the water inlet valve with white filter and connect the red headed hose to the water inlet valve with red fil...
Страница 11: ... mounted at a height of minimum 60 cm maximum 100 cm from the ground The end of the water drain hose may directly be fitted to the dirty water outlet hole or a special apparatus mounted on the outlet bracket of the wash stand Never attempt to extend the water drain hose by adding extra parts 11 CHAPTER 3 SETTING UP WATER DRAIN CONNECTION ...
Страница 12: ... of your clothes remove if there are any Zip up and or button up your clothes Remove plastic or metal hooks from curtains or place them inside a washing bag and tie Pull items like trousers knitted fabrics t shirts and sweat shirts inside out Wash small clothes like socks and handkerchiefs in a washing bag Normal washing Maximum washing temperature is 90 C Maximum washing temperature is 60 C Maxim...
Страница 13: ...00 C No ironing Dry cleaning available No dry cleaning Leave on a flat place Hang when wet Dry by hanging Drying by twirling is not allowed Dry cleaning in gas oil pure alcohol and R113 is allowed Perchloroethylen e R11 R113 Petroleum Perchlorinetyhlene R11 R113 Gas oil 13 CHAPTER 4 PRELIMINARY PREPARATION FOR LAUNDERING SEPARATING LAUNDRY ...
Страница 14: ...ad each item separately When you shut the door of your machine be careful that no cloth is jammed between the cover and the gasket Shut the door of your machine tightly otherwise your machine will not start the washing process 14 CHAPTER 4 PUTTING LAUNDRY IN THE MACHINE ...
Страница 15: ...ng As the hardness of your water increases the amount of the detergent to be consumed will also increase As the amount of your clothes increases the amount of the detergent to be consumed will also increase Put softener in the softener compartment in the detergent drawer Do not exceed the MAX level Otherwise the softener will diffuse in the washing water via the siphon Concentrated softeners shoul...
Страница 16: ...16 CHAPTER 5 CONTROL PANEL 1 Detergent drawer 2 Programme knob 3 Electronic display and auxiliary functions 1 2 3 ...
Страница 17: ...A Prewashing compartment B Main washing compartment C Softener compartment D Siphon cover E Liquid level detergent plate 17 CHAPTER 5 CONTROL PANEL DETERGENT DRAWER A B C D E ...
Страница 18: ...our Laundry through programme knob You may set the programme selection operation by rotating the programme knob in both direction Ensure that the programme knob is exactly on the programme you want to select 18 CHAPTER 5 CONTROL PANEL PROGRAMME KNOB ...
Страница 19: ...ure spinning revolution speed of your machine the amount time your machine will continue washing the auxiliary functions you have selected and whether the door of your machine is locked or not Furthermore electronic display will warn you by means of fault symbols on the display when a fault occurs on your machine and notify you of the completion of the washing programme by revealing expression of ...
Страница 20: ...rting the programme you can optionally select an auxiliary function Press on the button of auxiliary function you like to select If auxiliary function symbol on electronic display flashes continuously the auxiliary function you have selected will be activated If auxiliary function symbol on electronic display blinks the auxiliary function you have selected will not be activated Reason for non acti...
Страница 21: ...in your machine your machine will run so as to save washing time water consumption and energy in some programmes White cotton 95 Colourfast cotton 60 Non colourfast cotton 40 When half load function is active the machine can complete the programme you have set in a shorter time 21 CHAPTER 6 OPERATING YOUR MACHINE Half load detection system ...
Страница 22: ...ramme for any kind of Laundry 9 HAND WASH 30 2 2 5 Sensitive and woollen Laundry with non machine wash label recommended to be washed by hand 10 SPORTS WEAR 30 2 3 5 Sportswear 11 MIX WASH 30 2 3 5 Dirty cotton synthetic colour and flax textiles can be washed together 12 SHIRTS BLOUSES 60 2 4 Dirty cotton synthetic and synthetic mixed shirts and blouses can be washed together 13 BABY WEAR 50 2 3 5...
Страница 23: ... use this programme for any kind of Laundry 9 HAND WASH 87 30 C 92 0 32 Sensitive and woollen Laundry with non machine wash label recommended to be washed by hand 10 SPORTS WEAR 48 30 C 79 0 2 Sportswear 11 MIX WASH 53 30 C 92 0 39 Dirty cotton synthetic colour and flax textiles can be washed together 12 SHIRTS BLOUSES 46 60 C 110 1 02 Dirty cotton synthetic and synthetic mixed shirts and blouses ...
Страница 24: ...cted by pressing revolution speed setting button If you have skipped the spinning revolution you want to set you can re switch to the revolution by keeping the revolution setting button pressed If you will not unload your Laundry upon completion of the programme and you want them not wrinkle in your machine you can use the auxiliary function of soaking In programmes where auxiliary function of soa...
Страница 25: ...ting button when your machine is soaking your Laundry in the latest rinsing water If you want to take your Laundry out press on Start Pause button Your machine will empty the water in it and finish the programme after spinning your Laundry through the spinning revolution you have selected b Switch the programme knob to 0 Select spinning programme on programme knob You can optionally reduce the rev...
Страница 26: ...d cold washing by pressing washing water temperature adjustment button If you have missed the washing water temperature you wanted you can return to the intended temperature by continuously pressing the washing water temperature adjustment button 3 Auxiliary function prewash You can expose your very dirty laundry to prewashing operation prior to main washing by using this auxiliary function When u...
Страница 27: ...gramme you have selected will wash your Laundry in a shorter time to consume less energy and water If your machine detects half load symbol will automatically flash on electronic display To cancel it pressing on the auxiliary function of quick washing for once will be enough However selection of auxiliary function of quick washing is not possible in course of the same washing operation 5 Auxiliary...
Страница 28: ...hour for the first 2 hours 1 hour for 3 hours to 23 hours If you have accidentally skipped the time delay you want to set by pushing the time delay timer button more than needed keep pressing on delay timer button until you set the correct time delay If you want to cancel the delay timer you are required to press the delay timer button once If you want to cancel the delay timer you are required to...
Страница 29: ...ry function is active your machine will perform an extra rinsing operation on your Laundry prior to latest rinsing operation Note Anti Allergic auxiliary function is selected automatically only in Baby wear programme 29 CHAPTER 6 OPERATING YOUR MACHINE AUXILIARY FUNCTIONS ...
Страница 30: ...elected will be available on electronic display Temperature of washing water Revolution speed If you have selected symbols of auxiliary functions Programme ending time or programme delay time based on your selection Symbol of open or locked door Note The flashing symbol for Open Door will come on This will be replaced by the Locked Door symbol within a minute of pressing Start Pause button again O...
Страница 31: ... Door Unlocked symbol will flash and you can safely open the door to remove laundry Note If symbol blinks on the electronic display it means that your machine cannot carry out the operation of laundry adding or removing as your machine has passed the steps in question Upon completion of laundry adding or removing function close the door of your machine and press on Start Pause button Your machine ...
Страница 32: ...ronic display when activated If any button is pressed while child lock is active symbol will blink on the electronic display When any of the programmes is running and child lock is active if another programme is selected after programme knob is switched to 0 position the programme already running will resume To deactivate it it will be sufficient to press on the same buttons for more than 3 second...
Страница 33: ...peration and the programme will be cancelled To get rid of the water accumulated in the machine switch the programme knob to any programme Your machine will perform the necessary discharge operation and cancel the programme You can run your machine by selecting a new programme 33 CHAPTER 6 OPERATING YOUR MACHINE CANCELLING PROGRAMME ...
Страница 34: ... display to save energy It will re flash when pressed on a button of any auxiliary function When the Door Unlocked symbol flashes on the electronic display this indicates the door can be safely opened to remove laundry Leave the door of your machine open to allow the inner part of your machine to dry after removing your Laundry Switch the programme knob to 0 Unplug your machine Turn the water tap ...
Страница 35: ... after the mains water is supplied Mains water pressure may be low Check Water inlet hose may be twisted Check Water inlet hose may be clogged Clean water inlet hose filters Valve inlet filter may be clogged Clean the valve inlet filters See the chapter regarding maintenance and cleaning of your machine 35 CHAPTER 7 ELECTRONIC DISPLAY WARNING SYMBOLS WARNING OF WATER CUT OFF LOW MAINS WATER PRESSU...
Страница 36: ...er may be clogged Clean the pump filter Discharging hose may be clogged or twisted Check the discharging hose See the chapter regarding maintenance and cleaning of your machine 36 CHAPTER 7 ELECTRONIC DISPLAY WARNING SYMBOLS WARNING OF CLOGGED PUMP FILTER ...
Страница 37: ...er inlet valve using pliers and wash thoroughly with a brush Clean the filters of the water inlet hoses located on the tap side by removing manually together with the washer After you clean the filters you can fit them the same way as you have removed them CAUTION Filters of water inlet valves may be clogged due to contaminated water tap or lack of necessary maintenance or valves may be broken dow...
Страница 38: ...er place a shallow dish in front to contain overflow of water left in the machine Loosen the filter cover by rotating it counter clockwise and drain the water Remove the foreign materials from the filter Check for the rotation of the pump manually After you have cleaned the pump fit the filter cover by rotating clockwise Fit the kickplate cover in place If the filter cover is not fitted properly i...
Страница 39: ...WARNING Danger of being scalded Since the water inside the pump maybe hot wait for it to cool 39 CHAPTER 8 MAINTENANCE AND CLEANING OF YOUR MACHINE PUMP FILTER ...
Страница 40: ...r to the end DIAGRAM 1 Press the blue siphon plug in the drawer and continue to pull the drawer until it is removed DIAGRAM 2 Wash with a small brush and plenty of water Ensure that any detergent residue does not drop into your machine After drying the detergent drawer replace it in the housing in the same way that you pulled it out DIAGRAM 1 DIAGRAM 2 40 CHAPTER 8 MAINTENANCE AND CLEANING OF YOUR...
Страница 41: ...that will not damage the cabinet After rinsing with clean water wipe it with a soft and dry cloth The Drum Do not leave metal items like needles staples or coins inside your machine These pieces cause rust stains in the drum To eliminate these stains use a suitable cleaning substance and follow the recommendations of the cleaning substance producer When cleaning rust stains never use scouring pads...
Страница 42: ...on it Chocolate and cocoa By leaving your clothes in cold water and rubbing with soap or detergent wash it in the highest temperature that the type of your cloth can endure Tomato paste After scraping the dried pieces without ruining the cloth leave in cold water for about 30 minutes and wash by rubbing with detergent Meat broth egg Eliminate the dried stain residues and wipe with a sponge or soft...
Страница 43: ...portion of 3 Ink Hold the stained area under cold water and wait until the inky water completely runs off Then rub with water diluted with lemon juice and detergent wash after waiting for 5 minutes Fruit Stretch the stained area of your clothes on the top of a container and pour cold water on it Do not pour hot water on the stain Wipe with cold water and apply glycerine Wait for 1 2 hours and rins...
Страница 44: ...ce agent FAILURE PROBABLE CAUSE METHODS OF ELIMINATION Your machine does not operate It is unplugged Insert the plug into the socket Your fuse is defective Change your fuse The electric power is off Check the electric power Start pause button has not been pressed Press the start pause button The programme knob is in O off status Put the programme knob on the required status The door is not shut pr...
Страница 45: ... the click Your machine is not draining water The drain hose is obstructed or bent Check the drain hose The pump filter is obstructed Clean the pump filter The clothes are not placed inside the machine in a well balanced manner Distribute the load more evenly inside the machine Your machine is vibrating The feet of your machine are not adjusted Adjust the feet Transportation screws are not removed...
Страница 46: ...s been used Press the start pause button In order to stop the foam dilute one table spoon of softener in half litre of water and pour it in the detergent drawer Press the start pause button after 5 10 minutes Arrange the amount of the detergent properly in the next washing process Wrong detergent has been used Use only the detergents produced for fully automatic machines The washing result is bad ...
Страница 47: ...ording to the machine Place the water drain hose in an appropriate height No water is seen in the drum during washing No failure The water is at the lower part of the drum There are residues of detergent on the clothes The pieces of some detergents which do not dissolve in water may stick to your clothes as white stains By calibrating your machine for Rinsing programme make an additional rinsing o...
Страница 48: ...No failure The unbalanced load control works in that way The load control system will automatically attempt to balance the load before a spin cycle starts It is important when loading the machine to distribute laundry evenly so that the drum load is balanced for spinning 48 CHAPTER 10 TROUBLESHOOTING ...
Страница 49: ...nd contact the nearest authorised service immediately E03 Pump is faulty or pump filter is clogged or electrical connection of the pump is faulty Clean the pump filter If the problem persists contact the nearest authorised service E04 Your machine has excessive amount of water Your machine will discharge water by itself Pursuant to discharging operation turn off your machine and unplug it Turn off...
Страница 50: ...nlet hose may be clogged Clean water inlet hose filters Valve inlet filter may be clogged Clean the valve inlet filters If the problem persists unplug your machine turn off your tap and contact the nearest authorised service Pump is faulty or pump filter is clogged or electrical connection of the pump is faulty Pump filter may be clogged Clean the pump filter Discharging hose may be clogged or twi...
Страница 51: ... additional function selection voltage fluctuations It will reduce energy and water consumption to use your machine with the laundry capacity proposed for the selected programme wash your Laundry less dirty or daily Laundry in short programmes carry out cleaning and maintenance periodically use your machine in convenient time intervals specified by electricity vendor ...
Страница 52: ...tial negative results regarding environment and human health which will arise due to wrong waste procedure for the product by ensuring that this product is annihilated properly Recycling materials will help natural resources be preserved For more detailed information regarding recycling of this product please contact local municipality domestic waste annihilation service or the shop you have purch...