en
en
Cleaning and care
Interior and Exterior Surfaces
Attention
Always unplug the power cable or switch
off the circuit breaker before cleaning.
Clean the exterior using lukewarm water and
a mild detergent.
Never use detergents, abrasive or acidic
agents.
Wipe the inside compartment dry.
Be careful to prevent water from getting into
contact with the electrical connections of the
temperature control or the interior light.
If the device is not going to be used for a long
period of time, switch it off and remove all food.
Clean the device and keep the door open.
To preserve the appearance of your device,
you can polish the exterior and the door
accessories with a silicone wax.
Clean the condenser at the back of the device
once a year using a brush or a vacuum cleaner.
Dust build-up leads to increased energy
consumption.
Inspect the door gasket at regular intervals.
Clean with water only, and wipe totally dry.
Cleaning of the accessories
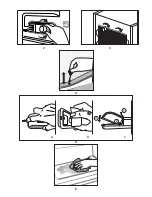
Door shelves:
Remove all food from the door shelves.
Lift the cover of the shelf upwards and pull it
off sideward.
Remove the bottom of the door shelf by
pushing it upwards.
Collecting container (Pan):
Make sure that the pan at the back of the
device is always clean.
Gently release the snap of the pan from the
compressor by pushing it using a tool (like
screwdriver), so that the pan can be removed.
Lift the pan, clean it and wipe it dry.
Re-assemble in reverse order.
Crisper or Drawers:
To clean a drawer, pull it out as far as possible,
tilt it upwards and then pull it out completely.
7
Replacing the interior light
bulb
(
Fig. 5)
Should the light fail to work switch off at the
socket outlet and pull out the mains plug.
Follow the below instructions to check if the
light bulb has worked itself loose.
If the light still fails to work obtain a replacement
E14 screw cap type 15 Watt (Max) bulb from
your local electrical store and then fit it as
follows:
1.
Switch off at the socket outlet and pull out
the mains plug. You may find it useful to
remove shelves for easy access.
2.
Remove the light diffuser cover as shown
in figure (a-b).
3.
Replace the burnt-out light bulb.
4.
Reassemble the light diffuser cover as
shown in figure (c).
“Push firmly to ensure cover is fitted properly.”
5.
Carefully dispose of the burnt-out light bulb
immediately.
"Replacement light bulb can easily be obtained
from a good local electrical or DIY store."
Содержание FD250 AP1
Страница 1: ...en it Instruction Manual Manuale di istruzioni FD250 AP1 FD250 APS1 ...
Страница 3: ...1 1 2 3 5 5 5 6 8 4 7 A B 10 9 10 10 ...
Страница 4: ...6 2 5 4 3 a b c 1 2 3 5 ...
Страница 5: ...7 6 7 6 5 4 5 12 13 14 15 2 1 8 3 9 11 10 23 16 22 22 23 21 45 180 19 26 28 28 25 24 27 20 18 17 ...


