background image

Always disconnect the appliance from the power supply before replacing the light bulb. Then 

follow the instructions based on the type of light bulb for your product.

Replace the light bulb with one with the same features, available from the Technical Assistance 

Service and authorised sellers.

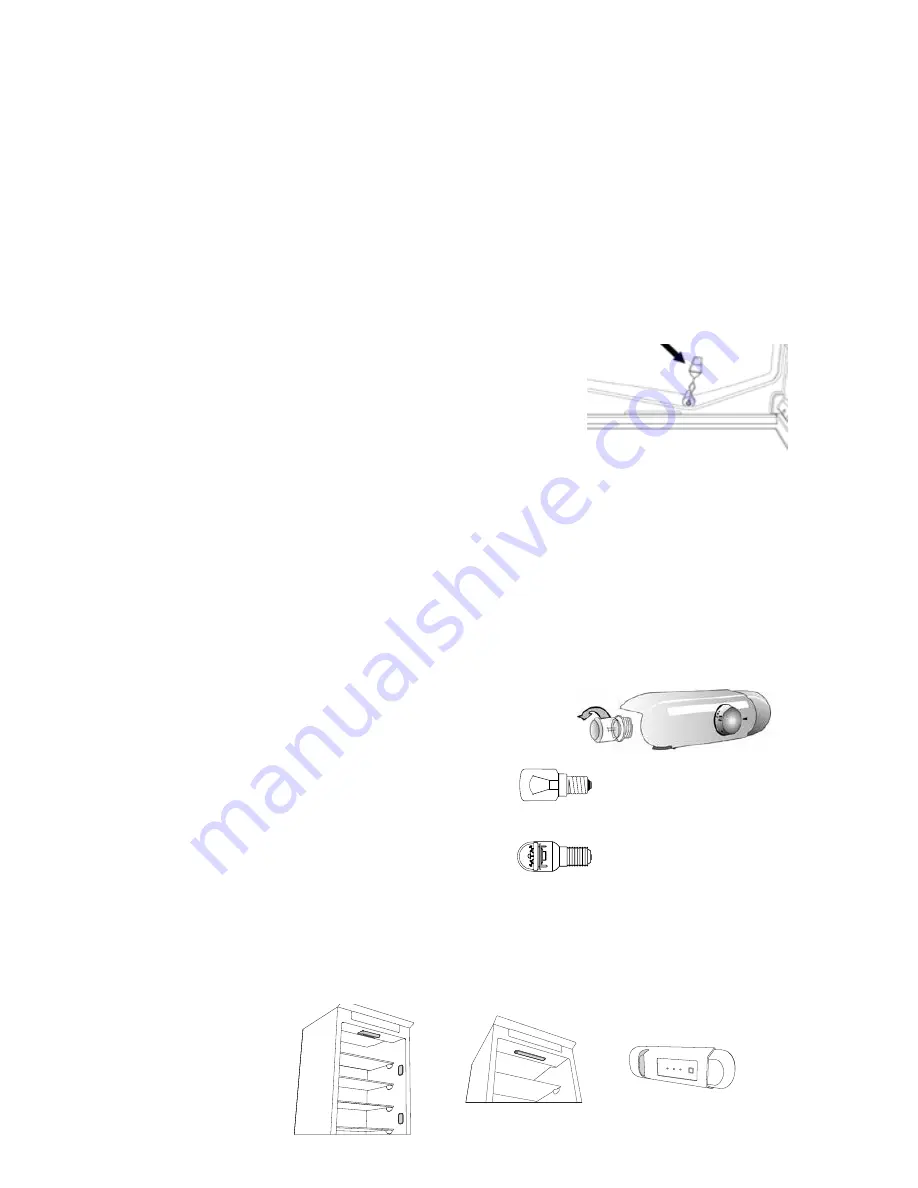
Light type 1)

To remove the light bulb, unscrew it in an anti-clockwise direction, as 

shown in the figure. Wait 5 minutes before reconnecting the appliance.

- traditional light bulb (max 25W)
or
-  LED light bulb (with the same features)  

only available from the Technical Assistance Service

Light type 2)

If the product has LED lights, as demonstrated in the figures below, contact the Technical 

Assistance Service if you need a replacement.
LEDs last longer than traditional light bulbs, improve internal visibility and are environmentally-

friendly.

4

Clean the appliance occasionally with a cloth and a solution of warm 

water and neutral cleaning agents specifically for cleaning the inside 

of the refrigerator. Do not use abrasive cleaning agents. To ensure 

the constant and correct flow of the defrosting water, regularly clean 

the inside of the drain situated in the back wall of the refrigerator 

compartment near the fruit and vegetable drawer using the utensil 

provided (see figure).

Before carrying out any maintenance or cleaning, take the plug out of the socket or disconnect the 

appliance from the power supply.

Connect the appliance to the power supply.

In models with electronics, a sound signal may be emitted, which means that the temperature 

alarm has been activated: press the sound alarm off button. Where provided, position the 

antibacterial anti-odour filter in the fan as demonstrated in the filter packaging.

Note:

 After turning the appliance on, you must wait for 4-5 hours for the correct storage 

temperature to be reached for a normally filled appliance.

USING FOR THE FIRST TIME

MAINTENANCE AND CLEANING  

OF THE APPLICANCE

REPLACING THE LIGHT bULb OR LED


(depending on the model)

Light bulb

LED light bulb

LED- strip

Dragon

et2

Содержание CR324PNF1

Страница 1: ...ode d emploi Gebruiksaanwijzing Istruzioni per l uso Brugsanvisning Bruksanvisning K ytt ohje Manual de utiliza o Instrucciones para el uso Instrukcje u ytkowania Haszn lati utas t s N vod k pou it N...

Страница 2: ...l energy consumption will depend on how the appliance is used and where it is located FREEZER CAPACITY 63 l STAR RATING 4 REFRIGERATOR CAPACITY 201 l TEMPERATURE OF SPECIAL COMPARTMENT C FROST FREE SY...

Страница 3: ...f the fan is OFF or it will flash 3 times if the fan in ON If the ambient temperature exceeds 27 C or if drops of water are present on the glass shelves it is essential that the fan is on to ensure th...

Страница 4: ...ng Sidan 37 SUOMI K ytt ohje Sivu 41 NORSK Bruksanvisning Side 45 DANSK Brugervejledning Side 49 POLSKI Instrukcja obs ugi Strona 53 ESKY N vod k pou it Strana 57 SLOVENSKY N vod na pou vanie Strana 6...

Страница 5: ...eutral cleaning agents specifically for cleaning the inside of the refrigerator Do not use abrasive cleaning agents To ensure the constant and correct flow of the defrosting water regularly clean the...

Страница 6: ...ot clean refrigerator accessories in a dishwasher Note the ambient temperature how often the doors are opened and the position of the appliance may affect the internal temperatures in the two compartm...

Страница 7: ...s a normal occurrence The quantity and speed of frost accumulation varies depending on the ambient conditions and how often the door is opened It is advisable to set the temperature colder or if avail...

Страница 8: ...ccessory is jammed or difficult to remove do not keep trying to remove it but proceed with the complete defrost of the freezer compartment Close the door to the freezer compartment Remove the frost on...

Страница 9: ...special functions is not selected Stand by Cooling Off Vacation if present in this case remove the food contained in it Note if the symbol does not light up when you turn on the compartment check that...

Страница 10: ...owing steps to make it easier to remove the compartment we recommend that you empty and possibly remove the lower door shelves turn off the compartment remove the compartment by rotating it upwards re...

Страница 11: ...5019 600 00814 07 11 FR DE IT NL...

Отзывы: