background image

1

2

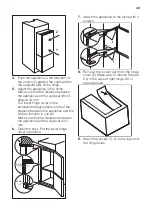
4.

Push the appliance in the direction of

the arrows (2) against the cupboard on

the opposite side of the hinge.

5.

Adjust the appliance in the niche. 

Make sure that the distance between

the appliance and the cupboard front-

edge is 44 mm.

The lower hinge cover (in the

accessories bag) makes sure that the

distance between the appliance and the

kitchen furniture is correct.

Make sure that the clearance between

the appliance and the cupboard is 4

mm.

6.

Open the door. Put the lower hinge

cover in position.

4 mm

44 mm

7.

Attach the appliance to the niche with 4

screws.

I

I

8.

Remove the correct part from the hinge

cover (E). Make sure to remove the part

DX, in the case of right hinge, SX in

opposite case.

9.

Attach the covers (C, D) to the lugs and

the hinge holes.

49

Содержание C3172NP

Страница 1: ...wijzing Koel vries combinatie User Manual Fridge Freezer Käyttöohje Jääpakastin Questo manuale d istruzione è fornito da trovaprezzi it Scopri tutte le offerte per Smeg C3172NP o cerca il tuo prodotto tra le migliori offerte di Frigoriferi e Congelatori ...

Страница 2: ...om 8 years and above and persons with reduced physical sensory or mental capabilities or lack of experience and knowledge if they have been given supervision or instruction concerning use of the appliance in a safe way and understand the hazards involved Do not let children play with the appliance Cleaning and user maintenance shall not be made by children without supervision Keep all packaging aw...

Страница 3: ...ction supplied with the appliance Always be careful when you move the appliance because it is heavy Always wear safety gloves Make sure the air can circulate around the appliance Wait at least 4 hours before connecting the appliance to the power supply This is to allow the oil to flow back in the compressor Do not install the appliance close to radiators or cookers oven or hobs The rear of the app...

Страница 4: ...ble products or items that are wet with flammable products in near or on the appliance Do not touch the compressor or the condenser They are hot Do not remove or touch items from the freezer compartment if your hands are wet or damp Do not freeze again food that has been thawed Obey the storage instructions on the packaging of frozen food Care and cleaning WARNING Risk of injury or damage to the a...

Страница 5: ...ime the button is touch the set temperature is moved to 1 position Corresponding LED will blink for a while Touch the setting button until the required temperature is selected The set will be fixed Coldest setting 2 C Warmest setting 8 C A medium setting is generally the most suitable However the exact setting should be chosen keeping in mind that the temperature inside the appliance depends on ro...

Страница 6: ...ified on the rating plate a label located on the inside of the appliance The freezing process lasts 24 hours during this period do not add other food to be frozen When the freezing process is completed return to the required temperature see FastFreeze Function In this condition the refrigerator compartment temperature might drop below 0 C If this occurs reset the temperature regulator to a warmer ...

Страница 7: ...time in the event of a power cut or breakdown Thawing Deep frozen or frozen food prior to being used can be thawed in the refrigerator compartment or at room temperature depending on the time available for this operation Small pieces may even be cooked still frozen directly from the freezer in this case cooking will take longer Fan function The fan function let food cool quickly and a more uniform...

Страница 8: ...rtight containers or wrapped in aluminium foil or polythene bags to exclude as much air as possible Bottles these need a cap and should be stored on the door bottle shelf or if equipped on the bottle rack Bananas potatoes onions and garlic if not packed must not be kept in the refrigerator Hints for freezing To help you make the most of the freezing process here are some important hints the maximu...

Страница 9: ...ide and accessories with lukewarm water and some neutral soap 2 Regularly check the door seals and wipe clean to ensure they are clean and free from debris 3 Rinse and dry thoroughly 4 If accessible clean the condenser and the compressor at the back of the appliance with a brush This operation will improve the performance of the appliance and save electricity consumption Defrosting of the refriger...

Страница 10: ...lug to the mains socket correctly There is no voltage in the mains socket Connect a different electrical appliance to the mains socket Contact a qualified electrician The appliance is noisy The appliance is not sup ported properly Check if the appliance stands stable The lamp does not work The lamp is in stand by Close and open the door The lamp does not work The lamp is defective Contact the near...

Страница 11: ...r Shop ping Function manually or wait until the function resets auto matically to set the tempera ture Refer to FastFreeze or Shopping Function function The temperature in the appli ance is too low too high The temperature regulator is not set correctly Set a higher lower temperature The door is not closed cor rectly Refer to Closing the door The food products tem perature is too high Let the food...

Страница 12: ...e range If you have any doubts regarding where to install the appliance please turn to the vendor to our customer service or to the nearest Authorised Service Centre Electrical connection Before plugging in ensure that the voltage and frequency shown on the rating plate correspond to your domestic power supply The appliance must be earthed The power supply cable plug is provided with a contact for...

Страница 13: ...old i e in Winter the gasket may not fit perfectly to the cabinet In that case wait for the natural fitting of the gasket In case you do not want to carry out the above mentioned operations contact the nearest Authorised Service Centre The Authorised Service specialist will carry out the reversibility of the doors at your cost Installing the appliance CAUTION Make sure that the mains cable can mov...

Страница 14: ...es bag makes sure that the distance between the appliance and the kitchen furniture is correct Make sure that the clearance between the appliance and the cupboard is 4 mm 6 Open the door Put the lower hinge cover in position 4 mm 44 mm 7 Attach the appliance to the niche with 4 screws I I 8 Remove the correct part from the hinge cover E Make sure to remove the part DX in the case of right hinge SX...

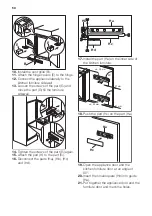
Страница 15: ...crews of the part G again 15 Attach the part H to the part G 16 Disconnect the parts Ha Hb Hc and Hd Hb Ha Hc Hd 17 Install the part Ha on the inner side of the kitchen furniture ca 50 mm ca 50 mm 21 mm 90 90 21 mm 18 Push the part Hc on the part Ha Ha Hc 19 Open the appliance door and the kitchen furniture door at an angle of 90 20 Insert the small square Hb into guide Ha 21 Put together the appl...

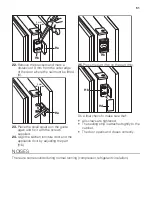
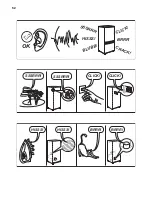
Страница 16: ... with the screws supplied 24 Align the kitchen furniture door and the appliance door by adjusting the part Hb Hb 25 Press the part Hd on the part Hb Hb Hd Do a final check to make sure that All screws are tightened The sealing strip is attached tightly to the cabinet The door opens and closes correctly NOISES There are some sounds during normal running compressor refrigerant circulation 51 ...

Страница 17: ...BRRR HISSS CLICK BLUBB CRACK SSSRRR OK CLICK CLICK SSSRRR SSSRRR BRRR BRRR HISSS HISSS 52 ...

Страница 18: ...on the external or internal side of the appliance and in the energy label ENVIRONMENT CONCERNS Recycle the materials with the symbol Put the packaging in applicable containers to recycle it Help protect the environment and human health and to recycle waste of electrical and electronic appliances Do not dispose appliances marked with the symbol with the household waste Return the product to your lo...

Отзывы: