background image

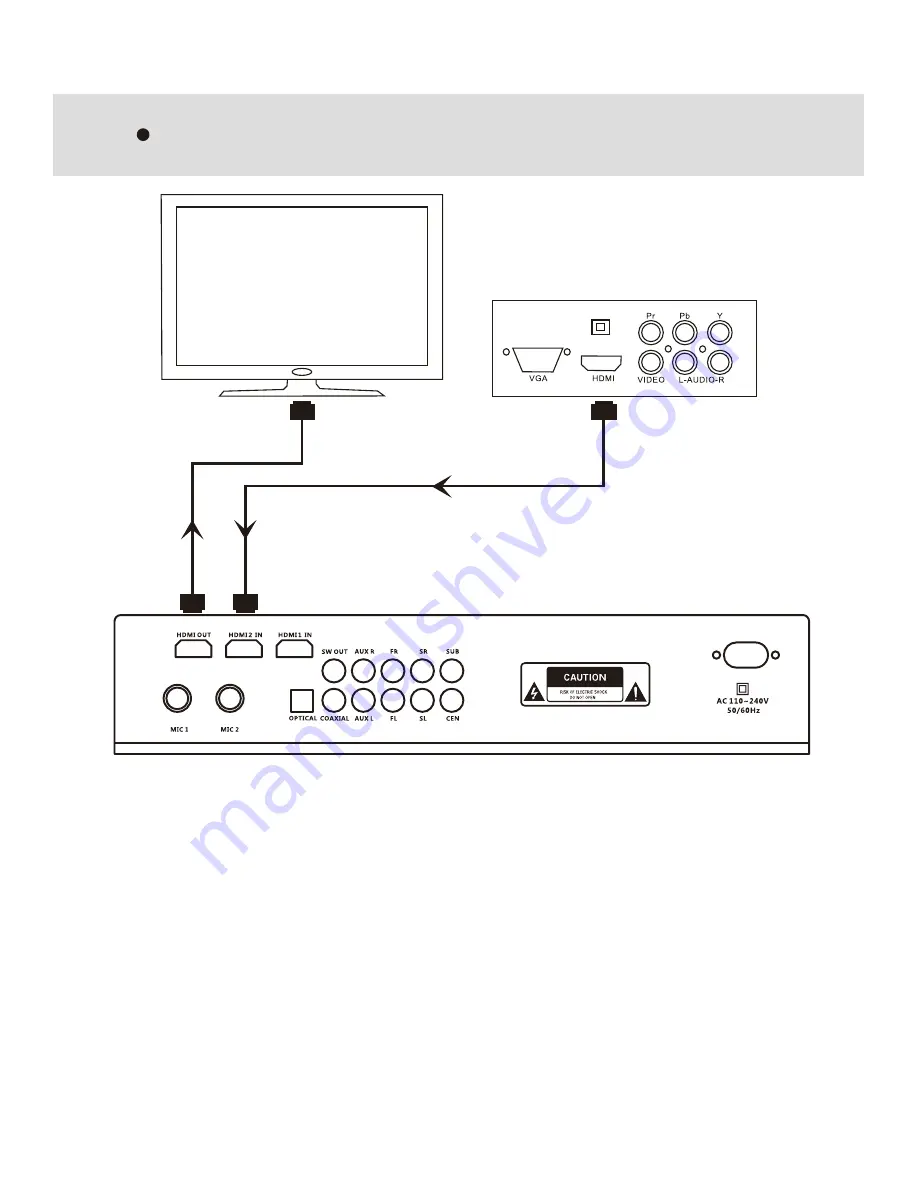
HDMI Operation

HDMI INPUT

HDMI OUTPUT

TV

HD 

Player

14

1. Connect your device with HDMI cable as per above picture to external device or TV
2. Change "input" to "ARC”
3. Adjust the volume for each channel separately

Please note: 

1) Connect a suitable ARC enabled HDMI cable to ARC enable HDMI port on your TV. Please 

turn on/enable the ARC function on your TV

2) When connecting other HDMI devices to the soundbar input, please select relevant source 

HDMI from TV (which is connected to the soundbar) and change soundbar input to relevant 
HDMI source (HDMI 1/2)

3) Depending on your TV model & settings you may find all sound defaults to the soundbar and 

you may or may not be able to use TV remote control for controlling the sound. Use soundbar 
remote for controlling the sound, if all sound defaults to the soundbar and TV remote is not 
usable for controlling sound.

Содержание SM2SB5.1TH150KINMA

Страница 1: ...MODEL NO SM2SB5 1TH150KINMA Note Please read the instructions carefully before operating the set and retain it for further reference SMATE Theatre Series Soundbar USER MANUAL ...

Страница 2: ......

Страница 3: ...5 Ampli ed board 06 USB Operation 06 Bluetooth Operation 07 Aux Operation 08 Subwoofer Output Operation 09 5 1CH AC 3 Operation 10 Wired Mic Operation 11 Optical Operation 12 Coaxial Operation 13 HDMI Operation 14 Installation Steps 15 Accessories 16 Trouble Shooting 16 Installing Batteries to the Remote Control 17 Support 18 ...

Страница 4: ... surrounds Please do not place the product in a sealed box without any ventilation Ventilation is required for preventing excessive heat and any damage to the unit from it D Slots and openings in the unit cabinet are provided for ventilation and to ensure reliable operation of the product preventing any damage from excessive heating The openings should never be blocked E To prevent fire or shock ha...

Страница 5: ...ion The appliance should be situated so that its location or position does not interfere with its proper ventilation Do not use the appliance on a bed sofa rug or similar surface that may block the ventilation openings 09 Heat Keep the appliance away from heat sources such as radiators heat registers stoves or other appliances including amplifiers that produce heat 10 Non use Periods The power cord...

Страница 6: ...ofer is designed to operate at low frequency which produces punchy bass The centre and front loudspeaker are designed to operate on full frequency range which produces the centre and front channel sounds The surround sound loudspeaker is designed to operate on full frequency ranges and its phase control crossover to the centre front phase control enhances the surround sound effect Meanwhile the so...

Страница 7: ...volume separately 7 Previous channel previous song 8 Memory indicator for pre setting the volume level 9 Master Volume 10 INPUT Change input signal sources 11 Next channel next song 12 Play Pause The soundbar power switch is located under the LED display panel as shown in the picture above When turned on the display will light up automatically OFF ON ...

Страница 8: ...NNEL 5 MASTER VOLUME 6 SURROUND VOLUME 7 CENTER VOLUME 8 SUBWOOFER VOLUME 9 MIC VOLUME 10 MEMORY 11 INPUT change input signal sources 12 NEXT CHANNEL 13 PLAY PAUSE 14 SURROUND VOLUME 15 CENTER VOLUME 16 SUBWOOFER VOLUME 17 MUTE 18 MIC VOLUME 19 MIC VOLUME SETTINGS set up echo or volume ...

Страница 9: ...0 11 04 05 06 03 02 01 07 07 Power Input 08 MIC 1 Input 09 MIC 2 Input 10 OPTICAL Input 11 COAXIAL Input 06 USB Operation USB Ports 1 Turn on the power switch 2 Select USB function by pressing the INPUT button 3 Plug the USB flash drive to the USB port 4 The USB mode supports most mainstream audio file formats like MP3 WMA APE FLAC ...

Страница 10: ... bluetooth mode on your device and search for bluetooth device KINMA9 and select for connection 3 No password is required for connection 4 A beep sound from the soundbar will confirm the device is connected successfully 5 You may now listen to your preferred content music from your device ...

Страница 11: ...A cable audio cable 3 5mm 2 rca cable audio cable 08 1 Connect your device with the soundbar via RCA cable as per any of the two methods shown above in the picture 2 Change input to AUX 3 Adjust volume for each channel separately ...

Страница 12: ...Subwoofer Output Operation 09 1 Connect active subwoofer input to the soundbar SW OUT port via RCA cable as per the connection diagram shown above ...

Страница 13: ...5 1CH AC 3 Operation 10 1 Connect your device with the soundbar by RCA cable as per the picture shown above 2 Change input to 5 1 3 Adjust the volume for each channel separately ...

Страница 14: ...Wired Mic Operation 6 5mm Wired Microphone Wireless Microphone receiver MIC input jack 11 ...

Страница 15: ...eration Player device Optical audio signal cable 12 1 Connect your device with Optical cable to the ports marked OPTICAL as per above picture 2 Change input to OPT 3 Adjust the volume for each channel separately ...

Страница 16: ...eration Player device Coaxial audio signal cable 13 1 Connect your device with Coaxial cable to the ports marked COAXIAL as per above picture 2 Change input to COAX 3 Adjust the volume for each channel separately ...

Страница 17: ...he ARC function on your TV 2 When connecting other HDMI devices to the soundbar input please select relevant source HDMI from TV which is connected to the soundbar and change soundbar input to relevant HDMI source HDMI 1 2 3 Depending on your TV model settings you may find all sound defaults to the soundbar and you may or may not be able to use TV remote control for controlling the sound Use soundb...

Страница 18: ...ppropriately on the wall 2 Drill the holes fix the mounting bracket as supplied to the wall 3 Screw the mounting plate to the soundbar if not pre fitted 4 Mount the soundbar to the installed brackets on the wall Note Please ensure its a two person lift to prevent any injury or harm to yourself or damage to the soundbar Please contact us at support smate com au for professional installation of your s...

Страница 19: ...is working or not Check INPUT signal source The remote control is too far away from the speaker Operating the remote control within 7m There is am obstacle between speaker and remote control Remove obstacle The battery of remote control runs out Replace this with new battery 1 Manual x1 2 RCA cables x2 3 Optical cable x1 4 HDMI cable x1 5 Remote Control x1 6 Power Cord x1 7 Screws x1 set ...

Страница 20: ...ote control has a range of up to approximately five metres 7m from the soundbar at an angle of up to 30 degrees each to the right and left of the sensor The remote control will not operate if its path is blocked NOTE Do not drop step on or otherwise impact the remote control as this may damage the parts or lead to a malfunction The operating distance may vary according to the brightness of the room...

Страница 21: ... Table 1 commencing from the date of purchase Special Conditions apply under the Standard Warranty to some products as identified in Table 1 1 3 To make a claim under the Standard Warranty you will need to a provide proof of purchase to Smart Group Technologies Australia showing the date of purchase of the products provide a description of the Products and the price paid for the Products by sending...

Страница 22: ...e failure is not a failure of the product to perform in accordance with its specifications 2 7 To service of any product whilst it is outside Australia 2 8 To any wear and tear if the product is used in commercial industrial educational or rental applications 2 9 To the normal incidence of off coloured or dark pixels in LCD and LED screens as described in the User Manual for the product Smate will ...

Страница 23: ...e of service 3 The company decision on identification of the defects due to faulty defective spare parts or faulty workmanship or misuse abuse shall be final and you shall agree to abide by such decision 4 The defective parts material shall be replaced with a functionally working equivalent part material and defective part material will become the property of the company Product Model No Serial No D...

Страница 24: ... or parts that are due to normal customer use Claim for damaged missing parts after seven days from the original date of purchase If any part or parts of the unit are replaced with a part or parts not supplied or approved by company or unit has been dismantled or repaired by any person other than authorized technician Product which has serial number removed or tampered If the warranty card is bein...

Отзывы: