background image


10 


SVC400L - Installation Instructions 


Please Note:

  If only the POWER LED is on and there is no live view output after SVA400L has started up, then please check 

if the SD card has been locked properly. 

9. SETUP 

9.1 System Login 

System Login for Setup: 


DEVICE NO.: The unit ID of MDVR, which is the number in the right bracket.  


PASSWORD: Enter the admin password or user password. 


Please move the cursor to “123” to change the input mode, such as numeric key, capital letter, small letter and/or 
characters. 


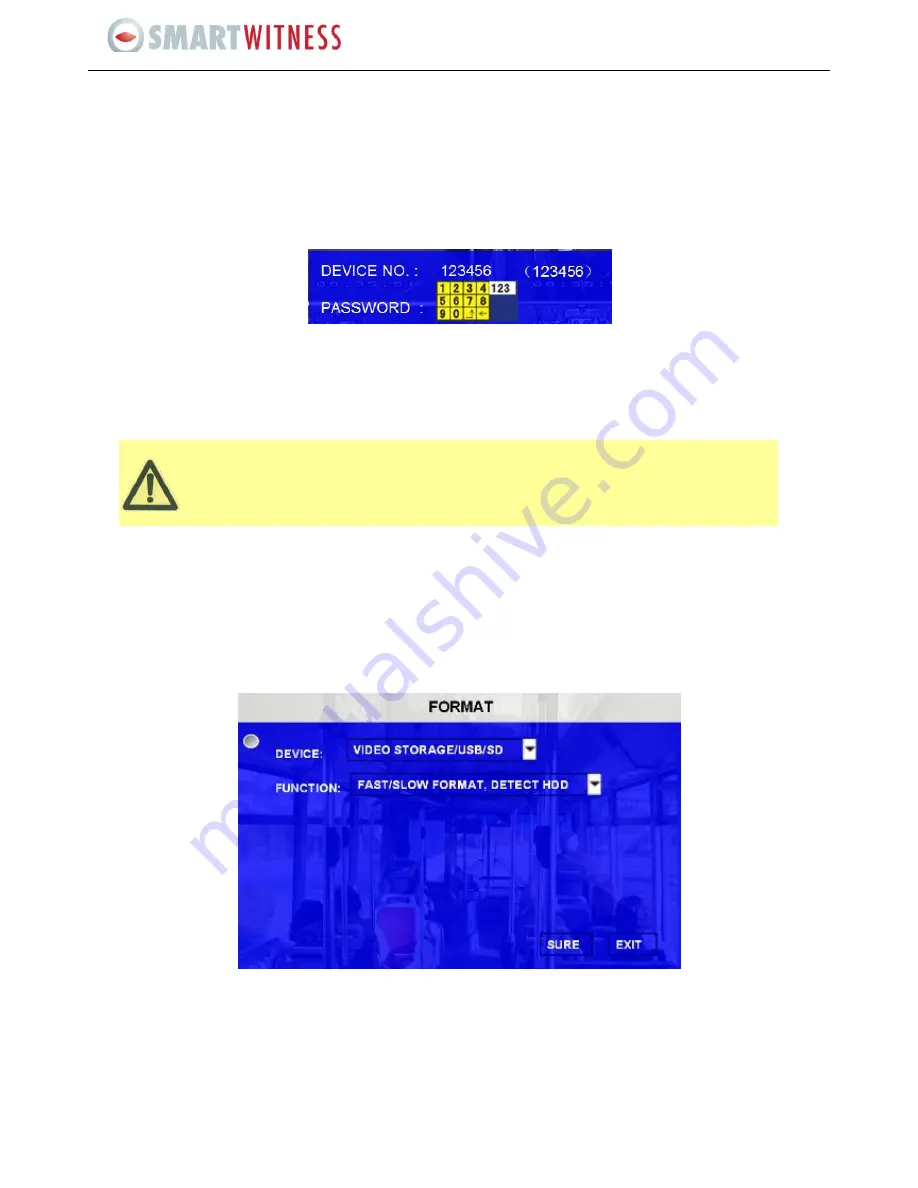
9.2 SD Card Format 

After you have installed a new SD card enter Graphical User Interface (GUI) to format the SD: 

SETUP

 > 

SYSTEM

 > 

FORMAT

, and 

then select the device you would like to format: SD card and/or external storage device.  

It is extremely essential and important to format SD, as the formatting ensures that HDD would have the required file system 
format. Normally, select FAST FORMAT to format HDD. The unit will restart automatically after successful formatting. 


FAST FORMAT

 is the same as quick format on PC. 


SLOW FORMAT

 means checking the existence of bad sectors in HDD, the system will remember if there are bad ones 

and will not write data in this place again.  


DETECT HDD

 means it will make sure not to lose data when the HDD has physical damage(s). 

Please Note:

 For HDD installation, follow the guidelines attached in the accessory box. 


  User default password is 22222222, and Admin password is 88888888. 

  OPERATOR PASSWORD CORRECT indicates permission is limited to video and sensor menu. 

  ADMIN PASSWORD CORRECT indicates full access to SVA400L.  

  SUPER PASSWORD CORRECT indicates full access to SVA400L under the circumstances of lost 

password and/or the MAC address has been modified. 


Содержание SVC400L

Страница 1: ...SVC400L 4 Camera Live Tracking Vehicle DVR Installation Manual Version 1 0 ...

Страница 2: ... 6 4 7 Injury 6 4 8 Maintenance 6 5 INSTALLATION TOOLS 6 6 INSTALLATION INSTRUCTIONS 6 7 HOW TO CONNECT INPUTS AND OUTPUTS 7 7 1 The A V Cable Definition Video Input AV output 7 7 2 Specifications for the SENSOR BOX sensor inputs and outputs 8 7 3 Specifications for 485 and 232 serial ports 9 8 WORKING STATUS 8 9 SETUP 10 9 1 System Login 10 9 2 SD Card Format 10 9 3 Record Setup 11 9 4 Playback a...

Страница 3: ... as recovery data monitoring and backup for all its critical data 2 PRODUCT OVERVIEW 2 1 Front View Items Name Description Video Output VIDEO_OUT Video output LED LED lights up or flashes indicate the same signal it can be setup based on customer needs the table details the message each LED conveys when it is lit up or flashing SD 1 For recording SD 2 For station announcement in the wireless modul...

Страница 4: ...er input DC8 48V For connecting power input Network port RJ45 Network port ensures MDVR can go online A V Integrated input A V A V input and output I O Input and Output I O I O sensor input and output EXTEND Interface Fn EXTEND For extend function such as RS485 and RS232 serials port System Information DEBUG Testing serial port for MDVR MCU debug port MCU The port for MCU hardware debug 2 2 Dimens...

Страница 5: ... on areas that are free of electromagnetic interference Keep SVA400L away from direct sunlight and or other sources of heat during installation Do not install the unit on a surface that is vulnerable to excessive vibration 4 2 Power SVA400L supports power supply ranges from 8v 36v DC Handle all electrical equipments with caution to avoid injuries Turn off the power before connecting disconnecting ...

Страница 6: ...electrical equipments Do not use unspecified chemicals or household cleansers 5 INSTALLATION TOOLS Please ensure that you have the following tools available prior to commencing an installation Drill and bids Screws Wire cutters and wire connectors Test for voltage and electric current 6 INSTALLATION INSTRUCTIONS Follow these guidelines when installing SVC400L Unpack all components provided in the ...

Страница 7: ...e Explanation A V INPUT VIN1 VIN4 A V input is a 4 pin female connector 4CH machine has 4 A V inputs 8CH machine has 8 A V inputs Feet 1 is for 12V power input feet 2 is for GND feet 3 is for audio input and feet 4 is for video input A V OUTPUT AV OUT A V output is a 4 pin male connector feet 1 is for 12V power input feet 2 is for GND feet 3 is for audio input and feet 4 is for video input ...

Страница 8: ... SETUP EVENT SENSOR then enable the sensor switch and make sure the alarm switch is ON as shown below The SVA400L has 6 Alarm inputs and 2 Alarm outputs All alarm inputs are I O PWL which can reflect various vehicle statuses such as braking turning left etc A schematic diagram of the alarm input braking is shown below when the brake is applied the SVA400L will detect the I O PWL the alarm LED will...

Страница 9: ...ries purchased from Shenzhen Streaming Video Technology such as the inertia sensor acceleration control panel PTZ station announcement and the card reader etc Please Note 485A means 485 485B means 485 8 WORKING STATUS Check all the LEDs when the device starts up POWER is ON means the power is normal ERR is ON means there is no SD card or there are some other hardware errors NET is ON means the net...

Страница 10: ...ntial and important to format SD as the formatting ensures that HDD would have the required file system format Normally select FAST FORMAT to format HDD The unit will restart automatically after successful formatting FAST FORMAT is the same as quick format on PC SLOW FORMAT means checking the existence of bad sectors in HDD the system will remember if there are bad ones and will not write data in ...

Страница 11: ...or each channel RES Resolution standard is optional it can be D1 HD1 and or CIF D1 HD1 and CIF refers to DVD standard super VCD standard and VCD standard respectively FR Frame rate frames per second the unit is fps The frame rate for 4CH D1 4CH HD1 and 4CH CIF is 48fps 60fps and 100fps respectively QUALITY Image quality is measured in 4 levels with Level 1 being the best Please Note The recording ...

Страница 12: ...ack The user can playback one channel at a time You can move the cursor to SEL select the recorded files you would like to backup and then press EXPORT to backup the files The following screen will pop up Please Note the recorded file that is being exported to an external USB storage drive is in a H 264 format and can be viewed using the playback software Playback can also be carried out by connec...

Страница 13: ...d connect the control panel to serial port 1 for it to run properly Please Note COM1 means 232TXD1 COM2 means 485 2 COM3 means 485 3 and COM4 means 485 4 PTZ is recommended to connect to either COM3 or COM4 Take inertia sensor for example if an inertia sensor is connected to SVA400L then you can find the values for the sensor in GUI SYSTEM SENSOR ACCELERATION and then press CHECK After installing ...

Страница 14: ...rding should be inserted at the front panel of SVA400L Carefully insert the SIM card in place put on the SIM card cover and screw all parts together Then insert the 3G GPS module into the SVC400P unit and please make sure that it is properly connected to the 3G antenna Follow the steps of GUI SETUP NETWORK MOBILE NETWORK select the mode type for the wireless module you have got as well as APN and ...

Страница 15: ... status Finally we can check the status of the SIM card by pressing ENTER in the live view after unit has restarted You will find the status information for unit see the screen below which includes signal network dial up status and CMS connection status ...

Отзывы: