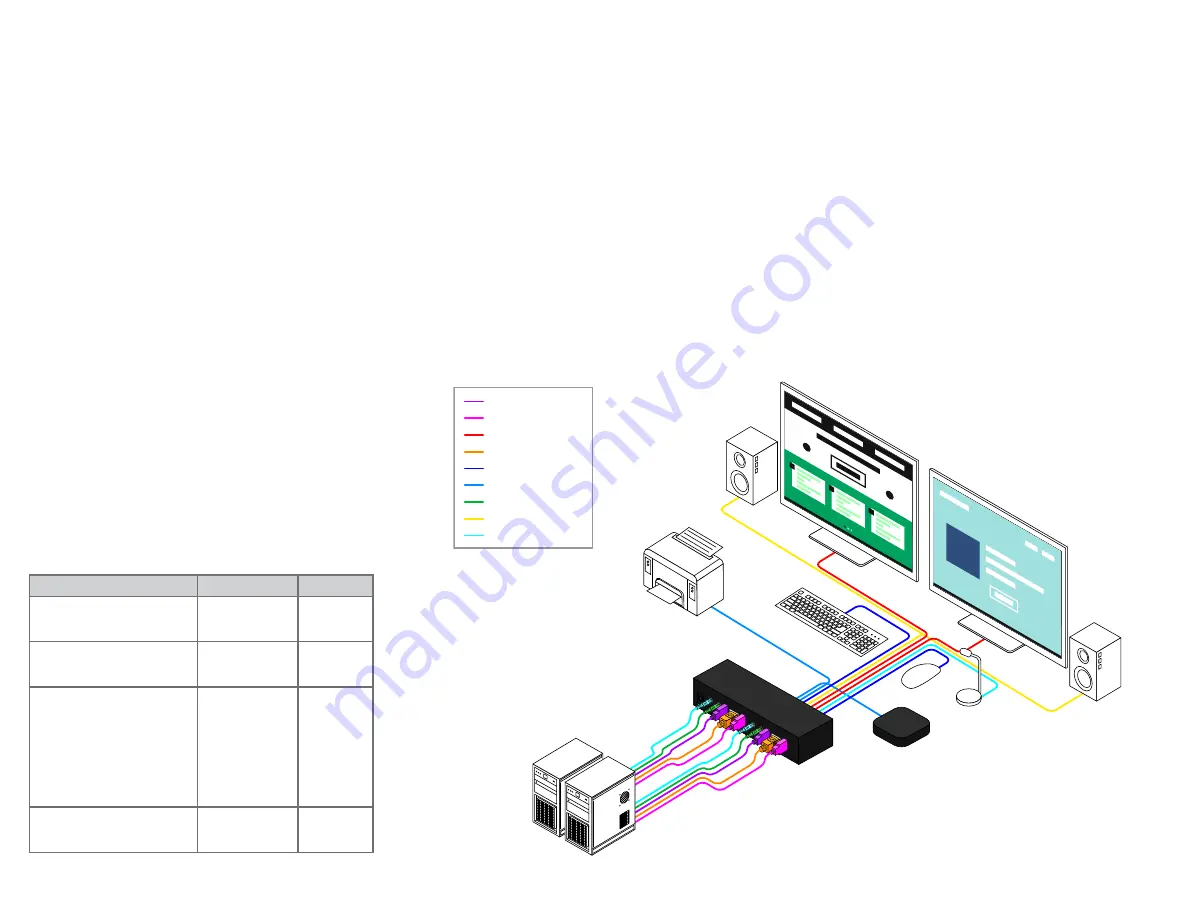
HARDWARE INSTALLATION
1. Connect HDMI monitor to the “HDMI Out” console ports on the front panel of the KVM
switch.
2. Connect your USB keyboard and USB mouse directly to the USB keyboard and mouse ports
on the front panel of the KVM switch.
3. Connect the microphone and speaker to the corresponding 3.5 mm Mini Stereo console
jacks on the front panel of the KVM switch.
4. Connect your USB devices into the USB ports. (Optional).
5. Be prepared with the related cables, plug the HDMI, USB, microphone, and speaker
connectors into their corresponding sockets on the back panel of the KVM switch
6. At the other end of the cable set, plug the HDMI, USB, microphone, and speaker connectors
into their respective ports on the first computer (PC-1).
7. Repeat above steps to add the second computer (PC-2).
8. Connect the power supply to the KVM switch, and then plug it into an appropriate power
source.
9. Turn on the power to all connected devices.
PC Port Switching
There are two ways of accessing computers
and devices connected to the KVM switch:
• Manual Push-button
• Hotkey
Manual Pushbutton
• Press the push-button once to switch
the selected PC port between the two
connected computers cyclically
Hotkey
• Hotkeys are executed using the keyboard
• The following describes the hotkey
functionality availability
Hotkey Execution Procedure:
1. Press [Scroll Lock] key twice continuously
to enter “Hotkey” mode. When entering or
exiting from “Hotkey” mode, the buzzer of
the KVM switch sounds with beep.
2. Pressing [Scroll Lock] key twice
continuously MUST be completed within 5
seconds.
3. Keying hotkey command MUST be
completed with 10 seconds, or it will be
aborted if exceeding
ScLk
- Scroll Lock,
ENT
- Enter
Hotkey Command
Description
Function
[ScLk][ScLk][ENT]
or
[Ctrl][Ctrl][ENT]
PC-1 ◄ ► PC-2
PC port cyclic
switching
[ScLk][ScLk][B][Num]
or
[Ctrl][Ctrl][B][Num]
Number : 0 / 1
0 : Disable
1 : Enable (Default)
Buzzer switch
ON/OFF
[ScLk][ScLk][S]
or
[Ctrl][Ctrl][S]
How to stop Auto-
Scan when it’s on:
1. Press any key.
2. Press once the
pushbutton.
When Auto-Scan
stops, PC port is
switched to the one
being scanned.
Auto-Scan
enabling
[ScLk][ScLk][I][Num][ENT]
or
[Ctrl][Ctrl][I][Num][ENT]
Number : 5~99
(Default : 8)
Auto-Scan
time interval
setting
OPERATION
HDMI IN
HDMI OUT
DP IN
USB IN
USB K/M OUT
USB 2.0 OUT
AUDIO IN
AUDIO OUT
MICROPHONE IN


