

When unpacking, check whether the components as per the description are present.
Dispose of the packaging in accordance with the applicable regulations of your country.
1.
Normally the battery compartment is already open, the cover with screws
is contained in an accessory bag. Otherwise, open the battery compart-
ment by unscrewing the two M3x6 screws.
2.
Remove the battery from the blister pack.
3.
Insert the battery into the battery compartment. Observe correct polarity.
4.
Screw on the battery case cover with the M3x6mm screws provided.
The device is ready for programming.
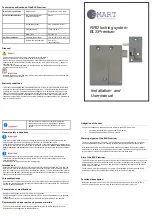
ELS Premium installation
Insert battery
ELS Premium general survey
Latch
Programming button
Special
programming
connector
Screwing holes
Card reader panel
Note!
Handling and use of the programming connector is designed for
special applications and only to be used in connection with the
programming modules. Ask your dealer or manufacturer for the
products.
Program the ELS Premium
On delivery, the lock is neutral. Programming can be carried out/altered at any time, as described in
the following. Standard configuration means wheater the programming card nor the data carrier is
programmed. The audible signal is „on“ and the mode „standard“ is activated (automatically closing
of the latch).
The programming procedure as described in the following, can be done/changed at every time.
1.) Store programming card: press the programming button of the lock for 3 seconds, until a long
signal tone and immediately afterwards a ticking is audible for approx. 7 seconds. During the
ticking, you must hold the programming card against the card reader panel, until a confirmation
signal is audible.
The programming card is now stored.
Note:
When using a new programming card the memory will be erased (long signal).
2.) Store data carrier: hold the stored program card once against the card reader panel. A ticking is
audible for approx. 7 seconds. During the ticking, hold the data carrier (key fob) against the card
reader panel to read it in, until a confirmation signal is sounded (2 x 3 short beeps).
The data carrier is now stored.
3.) Check data carrier for function: hold the data carrier once against the card reader panel.
The confirmation signal is sounded again, the latch moves back and the lock opens. Repeat
the process 2 to 3 times to store further data carriers. You can teach at maximum 1 programming
card and 50 data carrier at once. The programming card and the data carrier can be teached in
at several other locks.
4.) Delete stored data carriers
individually
: hold the programming card once against the card
reader panel. A ticking is heard for approx. 7 seconds. During the ticking, hold the data carrier
against the card reader panel to delete it, until a confirmation signal is sounded.
The data carrier is deleted.
5.) Open the latch e.g. with programming card and hold the latch in this position: Put the program-
ming card 4x to the card reader panel. The latch will hold open until a authorised data carrier will
reset the hold open function.
6.) Delete all stored data carriers: hold the programming card against the card reader panel until
after a few short signals a long confirmation signal is sounded.
All saved data carriers are deleted, the latch is moved into the open position.
7.) Switch signal tone on or off: keep the programming button pressed for max. one second.
The signal tone is switched off/on.
EEC Declaration of Conformity
in accordance with the directives
89/336/EEC 1993
Directive on electro-magnetic compatibility (EMC)
1999/5/EC 1999
Directive on radio systems and telecommunication end-devices
and mutual recognition of their conformity (R&TTE)
2002/96/EC 2003
Directive on waste electric and electronic equipment (WEEE)
76/769/EEC 2005
Directive for restrictions on the marketing and use of certain
hazardous substances and preparations (RoHS)
for the product:
ELS Premium
The following harmonised standards are applied:
EN 33330-2 V1.3.1 : 04 2006
Electromagnetic compatibility and Radio spectrum Matters
(ERM); Short Range Devices (SRD); Radio equipment in the
frequency range 9 kHz to 25 MHz and inductive loop systems in
the frequency range 9 kHz to 30 MHz; Part 2: Harmonized EN
under article 3.2 of the R&TTE Directive
EN 301489-3 V1.4.1 : 2002
Electromagnetic compatibility and Radio spectrum Matters
(ERM); Electromagnetic compatibility standard for radio equip-
ment and services; Part 3: Specific conditions for Short-Range
Devices (SDR) operating on frequencies between 9kHz and
40GHz
EN ISO 12100-1 : 2003
Safety of machinery – basic terminology, general design princi-
ples – part 1: general terminology, methodology
EN ISO 12100-2 : 2003
Safety of machinery – basic terminology, general design princi-
ples – part 2: technical principles
EN 1050 : 1996
Safety of machinery – principles for risk assessment
EN 50364 : 2001
Restriction of exposure of persons to electromagnetic fields of
equipment which is operated in the frequency range from 0 Hz to
10 GHz and used in electronic article surveillance (EAS), radio
frequency identification (RFID) and similar applications
Picture1:Lock and strike plate installation with flush closing door*
and strike plate installation with door closing onto frame*
*
(Fuge = joint, Türstärke = door thickness, Abstand = distance, Überschlag = overlap)
Install ELS Premium on furniture body and door