Smart Technologies PMWT-660 Скачать руководство пользователя страница 9

PMWT-660/680 Installation Guide

7

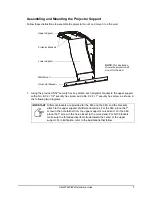
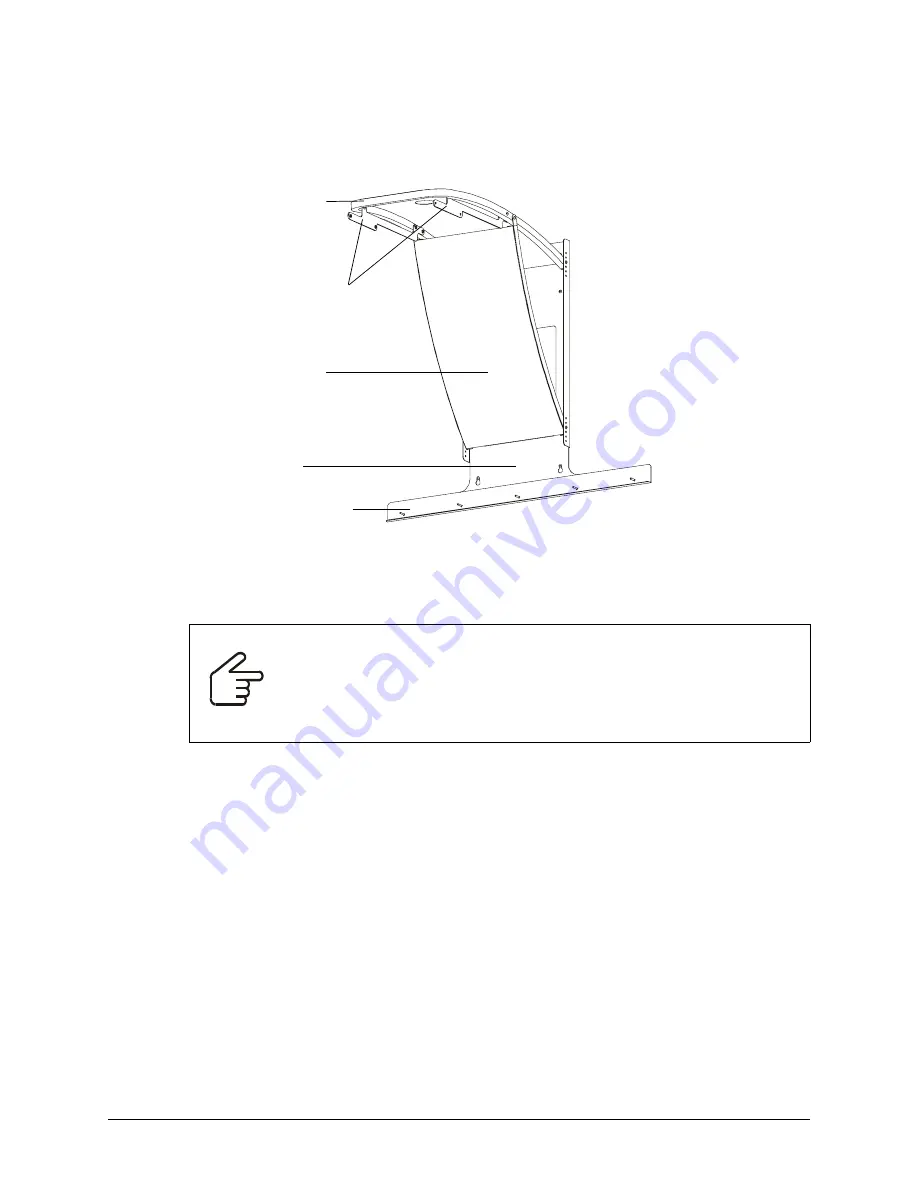
Assembling and Mounting the Projector Support

Follow these instructions to assemble the projector mount and mount it on the wall.

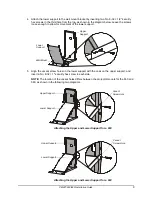
1. Using the provided 5/32" security hex key, attach each projector bracket to the upper support 

with a No. 8-32 × 1/2" security hex screw and a No. 8-32 × 1" security hex screw, as shown in 
the following two diagrams.

IMPORTANT

Different brackets are provided for the 660 and the 680, and the brackets 
attach to the upper support at different locations. For the 660, place the 1" 
screw in the hole farther from the upper support’s curved end. For the 680, 
place the 1" screw in the hole closest to the curved end. For both brackets, 
make sure the threaded inserts protrude toward the center of the upper 
support. For clarification, refer to the illustrations that follow.
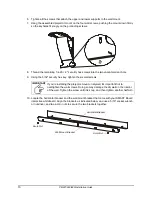
Upper Support

Lower Support

Projector Brackets

Wall Mount

NOTE: 

This illustration 

shows the projector wall 
mount for the 680. 

Horizontal Bracket

Содержание PMWT-660

Страница 1: ...Installation Guide PMWT 660 680 Projector Wall Mount for the SMART Board Interactive Whiteboard...

Страница 2: ...nologies ULC All rights reserved No part of this publication may be reproduced transmitted transcribed stored in a retrieval system or translated into any language in any form by any means without the...

Страница 3: ...ately 53 1 2 lb 24 3 kg Before installing make sure the wall can support such weight A qualified service technician and an assistant should install the projector mount For example your SMART reseller...

Страница 4: ...s You will instead attach the wall mount bracket to the assembled projector mount as described on page 11 This accessory kit contains a hole placement template a wall mount a horizontal bracket six 1...

Страница 5: ...the interactive whiteboard page 16 If you re installing the projector mount above an existing SMART Board interactive whiteboard you must first remove the interactive whiteboard Follow the instructio...

Страница 6: ...r carefully remove the seven wall anchors from the wall Save at least two of the anchors as you ll reuse them to secure the interactive whiteboard to the wall as described on page 14 Finding a Suitabl...

Страница 7: ...from the ceiling if you re installing a 660 5 12 7 cm from the ceiling if you re installing a 680 2 Using an electric drill with a 1 2 bit drill holes in the drywall at the six anchor hole locations...

Страница 8: ...0 If the room s ceiling is lower than recommended see the Important Note on page 5 you must measure down from the ceiling rather than up from the floor This guarantees that there s enough clearance be...

Страница 9: ...T Different brackets are provided for the 660 and the 680 and the brackets attach to the upper support at different locations For the 660 place the 1 screw in the hole farther from the upper support s...

Страница 10: ...rity hex key attach the upper support to the wall mount bracket by inserting two No 8 32 1 2 security hex screws in the third hole from the top as shown in the diagram below Leave the screws loose eno...

Страница 11: ...nt screw holes on the lower support with the ones on the upper support and insert a No 8 32 1 security hex screw in each side NOTE The location of the vacant holes differs between the projector mounts...

Страница 12: ...tighten the six wall screws 10 Locate the horizontal bracket and the wall mount bracket that came with your SMART Board interactive whiteboard Align the brackets as indicated below and use a 5 16 soc...

Страница 13: ...ecure them Attaching the Projector Plate to the Projector 1 Close and lock the projector s mirror cover 2 Turn the projector over 3 Remove the projector s feet 4 Align the projector plate with the fee...

Страница 14: ...t extend from the upper support of the projector wall mount Position the projector so that each bracket s screw holes are visible through the slots in the projector plate s vertical flanges CAUTION Do...

Страница 15: ...ctive whiteboard and then gently lower it onto the wall mount bracket until the brackets on the interactive whiteboard and wall mount engage TIP If you insert the next screw in the projector s diagona...

Страница 16: ...whiteboard into the wall at the locations you marked in step 4 NOTE Do not use a hammer to tap these anchors into the wall 7 Put the interactive whiteboard back on the wall mount bracket and then move...

Страница 17: ...rough the cable management channel and insert the connector into port 1 11 Connect the interactive whiteboard to your computer Consult the installation instructions that came with your interactive whi...

Страница 18: ...away from the interactive whiteboard by sliding it along the slots in the projector plate Be sure to tighten the screws in those slots when you re finished Use the projector s feet to make adjustments...

Страница 19: ...lty with your SMART product you may want to contact your local reseller first Your local reseller may be able to resolve the issue without delay All SMART products include online telephone fax and e m...

Страница 20: ...ty Product warranty is governed by the terms and conditions of SMART s Limited Equipment Warranty that shipped with the SMART product at the time of purchase Registration To help us serve you register...

Страница 21: ......

Страница 22: ...Technologies 1207 11 Avenue SW Suite 300 Calgary AB T3C 0M5 CANADA www smarttech com support www smarttech com contactsupport Support 1 403 228 5940 Toll Free 1 866 518 6791 U S Canada 99 00545 01 RE...

Отзывы: