April 15, 2008
Rev C
April 15, 2008
Rev C
April 15, 2008
Rev C
Receive Power LED Indicators
The receiver power LEDs indicate the receiver is getting power. It
does not actually recognize if the receiver is getting the 5V it should
get.
Optional Failsafe-switch
Warning: Always make sure the failsafe-switch is off
before charging through the PowerExpanerPro.
Failure to do so may result in the servos getting a
voltage too high for them resulting in servo failure.
The failsafe-switch and charge jacks can only be used
when batteries are plugged directly into the
PowerExpander.
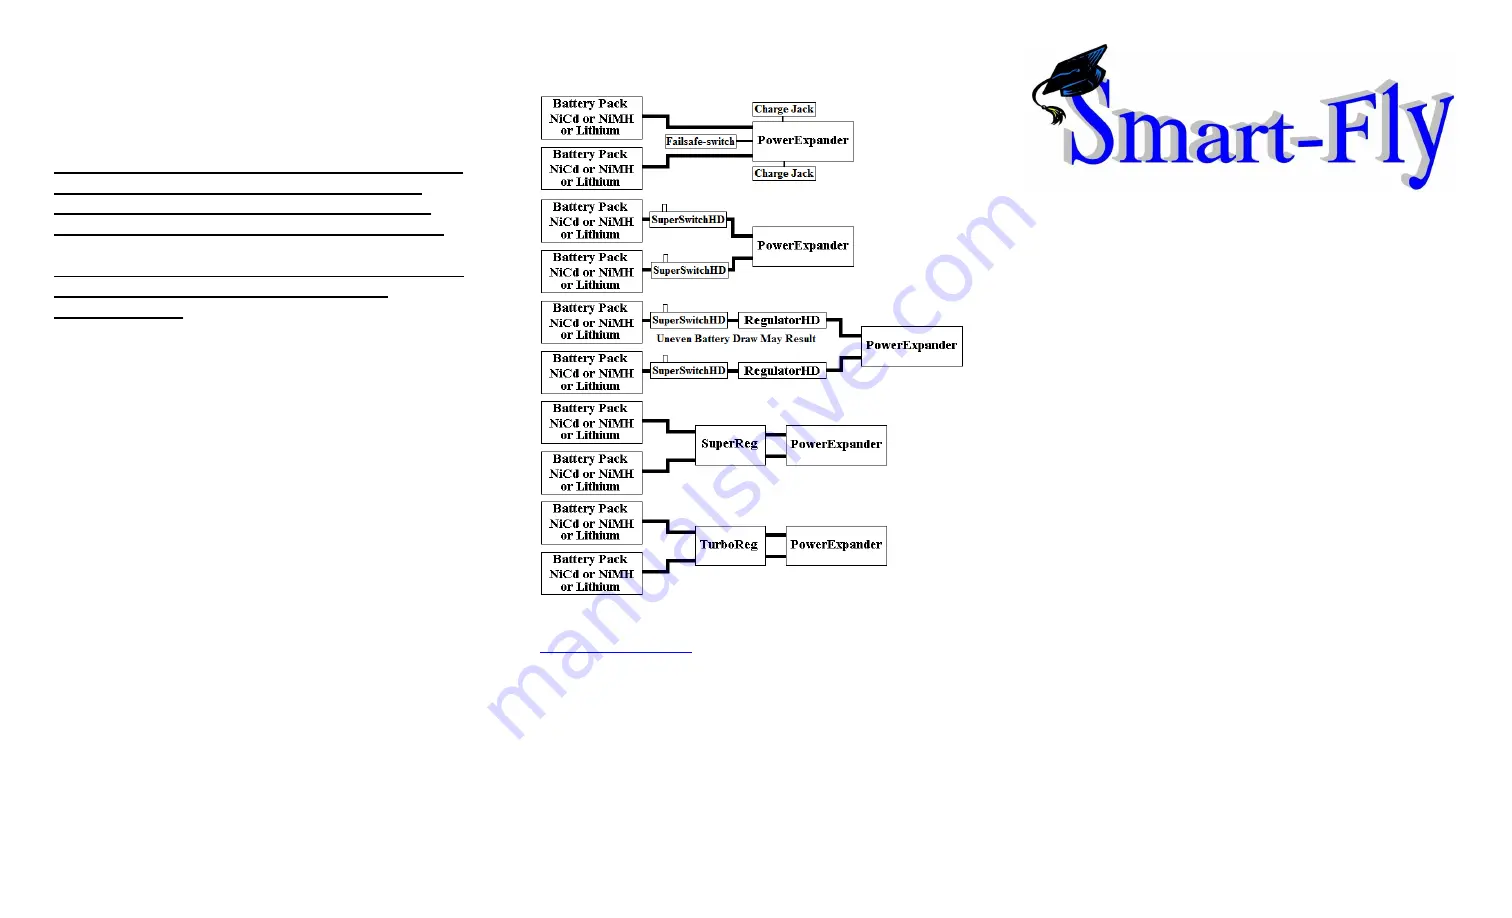
The PowerExpander Pro supports the addition of a failsafe switch
(optional package) for use when batteries are being used without
regulators. The PowerExpander Pro supports 5-cell NiCd or NiMH or
2-cell lithium packs, ion or poly. When using the failsafe-switch, the
switch lead is plugged into the input marked “Sw” near the bottom
right of the servo connections as shown on the reference drawing.
Smart-Fly provides two types of failsafe switches. First is the standard
slide switch that most people are familiar with. This is a small slide
switch with out a charge jack. The second failsafe-switch is the
Pin&Flag switch, where a pin, with a flag on in, is inserted into the
switch to turn the system off. To fly, the pin is pulled out of the switch.
The advantage of the Pin&Flag switch is that the system cannot
accidentally be turned off, as can be the case with a slide switch. The
failsafe switch lead can be extended using a standard Futaba extension.
The PowerExpander Pro also supports charging the batteries through
the two “Chg” connections, one on the bottom of each servo output rail
as shown on the reference drawing. The optional failsafe-switch
package includes two charge leads and two Ernst charge jack mounts.
The charge leads have a Futaba male on one end and a JR male on the
other end. You may use these by plugging either end into the
PowerExpander Pro and the other end into the charge jack holder.
The charge jacks on the PowerExpander Pro can also be used to
connect to a battery meter. One thing to keep in mind when using a
battery meter and the failsafe-switch is that the jacks are not switched
off when the unit is off so the battery meter will continue to draw
power when the unit is turned off.
Typical Installation Configurations
Additional information and technical help can be found at
www.Smart-Fly.com
Quest Engineering & Development, Inc.
6125 South Ash Avenue, Suite B-8
Tempe, AZ 85283
Ph: (480) 460-2652 Fax: (480) 460-2653
P
P
P
P
P
P
P
P
o
o
o
o
o
o
o
o
w
w
w
w
w
w
w
w
e
e
e
e
e
e
e
e
rrrr
rrrr
EEEE
EEEE
xxxx
xxxx
p
p
p
p
p
p
p
p
a
a
a
a
a
a
a
a
n
n
n
n
n
n
n
n
d
d
d
d
d
d
d
d
e
e
e
e
e
e
e
e
rrrr
rrrr
P
P
P
P
P
P
P
P
rrrr
rrrr
o
o
o
o
o
o
o
o
User Guide
Thank you for purchasing the
Smart-Fly PowerExpander Pro!
This manual takes you through the installation and operation of
the Smart-Fly PowerExpander Pro unit. The unit is a power
distribution unit that supplies full power to your servos while
supplying a clean, regulated voltage to your receiver. Features
of the PowerExpander Pro are:
Light weight, 2.6oz, 74g
Compact design, footprint is 4” x 3”
End-loading and top-loading receivers supported
Filtered and regulated 5.0V power to the receiver
1-amp receiver regulator
“Smart-Sense” inputs for error detection
Long servo lead line matching
LED power indicators for input and receiver power
Fully buffered outputs on all channels
Full RF filtering of all signals in and out of the unit
High-current Deans UltraPlug power input
connectors
Optional failsafe-switch and charge jack package
available
Compatible with 8.4V lithium packs direct input (for
use with Hitec 5995 servos)


