background image

Locating serial numbers

Before contacting SMART Technical Support, make note of your interactive whiteboard and projector

serial numbers.

For the location of the SMART Board 600 series interactive whiteboard serial number, see the

SMART Board 600 and D600 series Interactive Whiteboard Installation and User’s Guide

(

smarttech.com/kb/001414

).

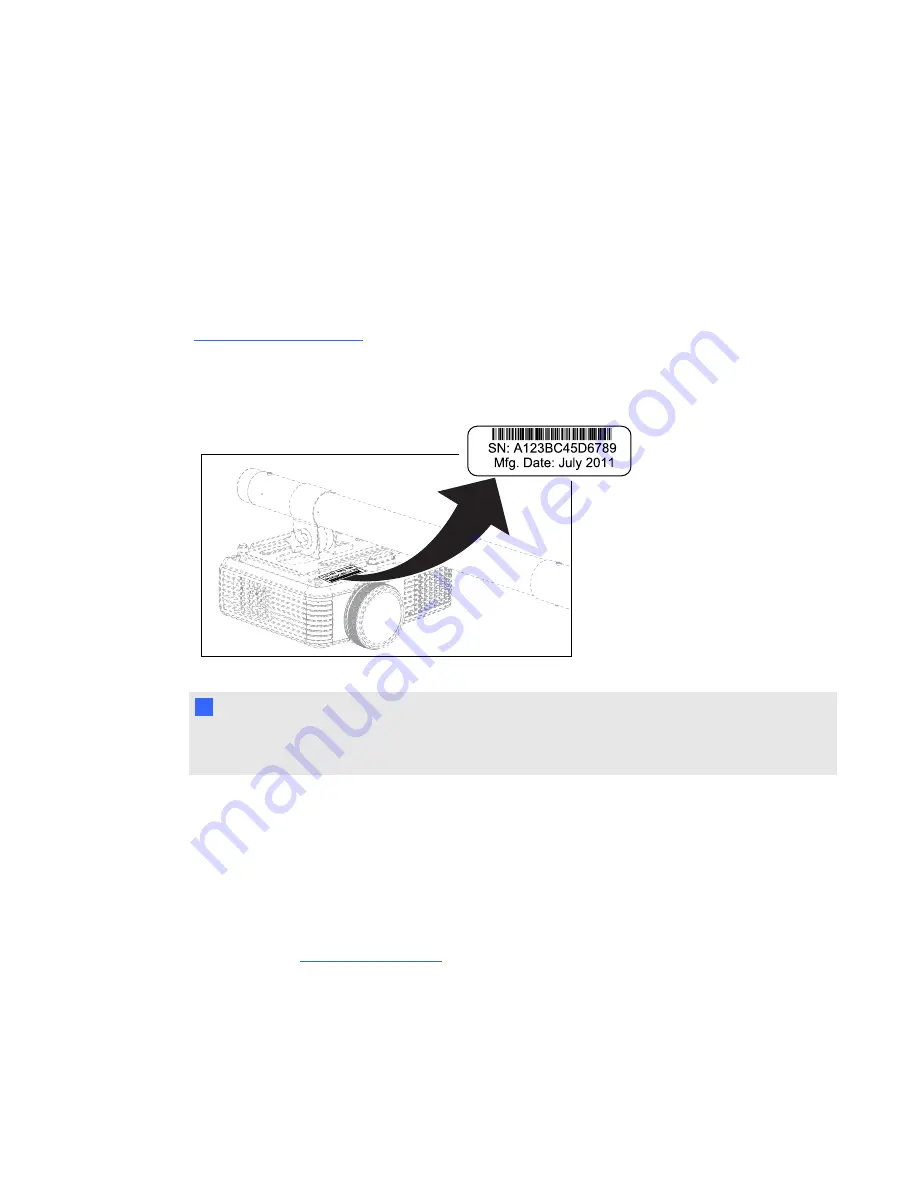
The SMART V25 projector serial number is located on the top of the projector under the projector

mounting plate.

T

  T I P

You can also access the projector’s serial number through the on-screen menu. For more

information, see

Information menu

on page 21.

Transporting your interactive whiteboard system

Save your original SMART Board interactive whiteboard packaging so that it’s available if you need to

transport your interactive whiteboard system. When required, repack it with all of the original

packaging. This packaging was designed to provide optimal shock and vibration protection. If you no

longer have your original packaging, purchase the same packaging directly from your authorized

SMART reseller (

smarttech.com/where

).

If you prefer to use your own packaging materials, make sure you adequately protect your unit. Ship

your interactive whiteboard in an upright position to deter shippers from placing heavy objects on it.

C H A P T E R 6

Troubleshooting your interactive whiteboard system

55

Содержание 680iv

Страница 1: ...SMART Board 680iv Interactive whiteboard system Configuration and user s guide...

Страница 2: ...tech the SMART logo and all SMART taglines are trademarks or registered trademarks of SMART Technologies ULC in the U S and or other countries DLP Texas Instruments BrilliantColor and DLP Link are tra...

Страница 3: ...ur authorized SMART reseller smarttech com where for more information Safety warnings cautions and important information W W A R N I N G l Failure to follow the installation instructions shipped with...

Страница 4: ...boom could result in personal injury or product damage l There are no user serviceable parts inside the pen tray Only qualified personnel should disassemble the pen tray s printed circuit boards and t...

Страница 5: ...ere the air is thin and cooling efficiency is reduced use the projector with the fan mode set to High l Cycling power to the projector repeatedly can lock or damage your SMART product After you put th...

Страница 6: ...eral devices that do not use a 4 pin mini DIN connector or an RCA composite video jack or if your device has an audio connection that does not use RCA jacks you may need to purchase third party adapte...

Страница 7: ...quids directly onto your interactive whiteboard the SMART V25 projector or any of its sub components Dust l Intended for use in office and classroom environments Not for industrial use where heavy dus...

Страница 8: ......

Страница 9: ...board system 13 Using your projector 13 Using your interactive whiteboard 25 Chapter 4 Integrating other devices 27 Video format compatibility 27 Connecting peripheral sources and outputs 29 Chapter 5...

Страница 10: ...ctor programming commands 64 Simple Network Management Protocol SNMP 74 Appendix B Hardware environmental compliance 75 Waste Electrical and Electronic Equipment regulations WEEE directive 75 Restrict...

Страница 11: ...ed accessories 4 Remote control 4 Pens 4 Eraser 4 Optional accessories 5 Your SMART Board 680iv interactive whiteboard system combines the wall mounted short throw SMART V25 projector with a SMART Boa...

Страница 12: ...features of earlier SMART Board interactive whiteboards such as a resistive touch screen and a pen tray Other features of your interactive whiteboard include the following l A pen tray that automatic...

Страница 13: ...or that uses DLP technology by Texas Instruments providing BrilliantColor performance and Gamma 2 2 correction with SMART Presentation Bright Room Dark Room sRGB and User modes l PAL PAL N PAL M SECAM...

Страница 14: ...een and blue You can use dry erase markers to replace the included pens as long as they re a similar shape don t scratch or mark your interactive whiteboard surface and reflect infrared light If the s...

Страница 15: ...best meet your specific needs Purchase these items from your authorized SMART reseller smarttech com where when you order your interactive whiteboard system or later For more information on accessorie...

Страница 16: ......

Страница 17: ...teractive whiteboard system installation document included with your product for instructions on how to install your product and use the mounting template I I MP OR TA N T Use the instructions include...

Страница 18: ...hiteboard system If you lose this template contact your authorized SMART reseller smarttech com where Using this template ensures that you can do the following l Mount the projector at a safe height f...

Страница 19: ...your audio system to your interactive whiteboard and projector Before you connect the audio system to the projector you must install the speaker brackets speakers and speaker cable clips Mount the spe...

Страница 20: ...that all cables pass along the top of the interactive whiteboard wall mounting bracket and then down the side of the interactive whiteboard N N OTE Don t connect the power cable to a power outlet unti...

Страница 21: ...om software These pages list the minimum hardware requirements for each software version If SMART software is already installed on your computer take this opportunity to upgrade your software to ensur...

Страница 22: ......

Страница 23: ...options and integrate your interactive whiteboard system with peripheral devices Using your projector This section explains how to use your projector and its included remote control Using your remote...

Страница 24: ...f the exhausted battery and product components in accordance with applicable regulations g To access or replace the remote control battery 1 Hold down the side release on the left side of the battery...

Страница 25: ...isplay the image l Press once to freeze the image For example you can display a question on the screen while you check your e mail l Press again to hide the image that is to display a black screen l P...

Страница 26: ...ition Moves the projected image s horizontal position left or right from 0 to 100 Don t adjust this setting unless you re advised to by SMART Techincal Support smarttech com contactsupport You can app...

Страница 27: ...olume Increases and decreases the projector s volume from 0 to 40 The default is 20 Mute Mutes the projector s audio output If you mute the projector s audio output and then increase or decrease the v...

Страница 28: ...ion in one input Lamp Reminder Turns the lamp replacement reminder on or off This reminder appears 100 hours before the recommended lamp replacement Lamp Mode Adjusts lamp brightness to Standard or Ec...

Страница 29: ...Preview Startup Screen This screen displays when the projector lamp is starting and an image isn t displayed SMART displays the default SMART logo on a blue background Capture User Startup Screen clos...

Страница 30: ...ys the projector s subnet mask number in values between 0 0 0 0 and 255 255 255 255 Gateway Displays the projector s network gateway in values between 0 0 0 0 and 255 255 255 255 DNS Displays the proj...

Страница 31: ...se lamp service reminders are based on the current hours of use See Resetting the lamp timer on page 39 for details on the lamp hours reset procedure Input Displays the current input source VGA1 Compo...

Страница 32: ...To focus the projected image adjust the focus ring on the projector lens g To focus the image Rotate the focus ring right or left until the image is in focus C H A P T E R 3 Using your interactive wh...

Страница 33: ...ing screw too much or the projector won t hold the adjustments l As you tilt the projector up or lower its mounting boom to raise the image the entire projected image increases or decreases in size es...

Страница 34: ...ght RCA audio input S video source optional 8 RJ45 Network for web page management and SNMP access N N OTE S l To connect your SMART Board 600 series interactive whiteboard see the SMART Board 600 and...

Страница 35: ...r more information on this software press the Help button on your interactive whiteboard pen tray For additional resources go to smarttech com click the flag icon to the right of the SMART logo and th...

Страница 36: ......

Страница 37: ...MART Board 680iv interactive whiteboard system with peripheral devices Video format compatibility SMART V25 projectors have a native video format and various video format compatibility modes You can c...

Страница 38: ...3 72 Full screen 800 600 SVGA 75 4 3 75 Full screen 800 600 SVGA 85 4 3 85 Full screen 832 624 MAC 16 4 3 75 Full screen 1024 768 XGA 60 4 3 60 Full screen 1024 768 XGA 70 4 3 70 Full screen 1024 768...

Страница 39: ...video system signal compatibility particularly for signals delivered over S Video and Composite video connectors which you can adjust by using the aspect ratio commands described in Default menu on pa...

Страница 40: ...and can be placed safely in your room without presenting a trip hazard g To connect a peripheral source or output to your projector 1 Connect your peripheral device s input cables to the projector 2 S...

Страница 41: ...cleaning and preventing damage to your SMART Board 680iv interactive whiteboard system Maintaining your interactive whiteboard For information on maintaining your interactive whiteboard see the SMART...

Страница 42: ...he following procedure l Two people are required to remove the projector from the boom and then replace it after replacing the projector lamp module N N OTE Make sure that you have a replacement proje...

Страница 43: ...n the screw from the boom end cap and then remove and set aside the boom end cap and screw 5 Loosen the locking screw and the knob on the projector mounting plate C H A P T E R 5 Maintaining your inte...

Страница 44: ...cables 7 Fold the clamp Alternatively use the M3 hex wrench to remove the three screws connecting the projector mounting plate to the projector and then set aside the projector mounting plate and scr...

Страница 45: ...s from the lamp cover 2 Remove the lamp cover and then set it and the two screws aside in a safe place 3 Remove the lamp protection film and then set it in a safe place 4 Using the screwdriver loosen...

Страница 46: ...f the lamp module according to your local waste authority 7 Remove the replacement lamp module from its packaging C C A U TI ON Do not touch any part of the lamp module except the housing 8 Lower the...

Страница 47: ...amp cover and then replace the screws holding the cover to the projector g To place the projector on the boom 1 Turn over the projector 2 If required replace the projector mounting plate on the projec...

Страница 48: ...and projector onto the boom N N OTE Take care when sliding the projector mounting plate over the cables 4 Tighten the knob and the locking screw 5 Replace the boom end cap C H A P T E R 5 Maintaining...

Страница 49: ...sting the image on page 23 Resetting the lamp timer After you replace the lamp you need to access the projector service menu and reset the lamp hour counter To prevent accidental errors only a system...

Страница 50: ...ting the lamp hour counter on an old lamp can damage your projector as a result of lamp failure N N OTE You re unable to reset the Display Hour value because it s the running total of hours the projec...

Страница 51: ...ears 45 The Lamp Failure message appears 46 The projector Power light isn t lit 46 Resolving network communication issues 47 Resolving audio issues 47 Resolving video issues 48 Resolving image issues...

Страница 52: ...s for the SMART Board 480iv and 680iv interactive whiteboard system smarttech com kb 153153 to eliminate most image alignment issues Diagnosing issues using the interactive whiteboard system indicator...

Страница 53: ...Off The projector is off but still receiving power Standby mode Press the Power button on the remote control to turn it on Flashing green Off The projector is in the powering startup state Wait for th...

Страница 54: ...e the time of a support call Your projector doesn t respond to commands If your projector doesn t respond to commands or if it starts to display code after you enter a command perform the following pr...

Страница 55: ...ed error on the previous page 2 If the lamp doesn t illuminate put the projector into Standby mode and wait 30 minutes for it to cool down 3 Disconnect the power cable and then contact your authorized...

Страница 56: ...en contact your authorized SMART reseller smarttech com where The projector Power light isn t lit If the projector Power light isn t lit one of the following issues is occurring l There was a power ou...

Страница 57: ...network administrator If your administrator is unable to resolve the issue contact your authorized SMART reseller smarttech com where Resolving audio issues You can connect an audio system to the audi...

Страница 58: ...ower cable and then turn on the projector 7 If the previous steps don t resolve the issue contact your authorized SMART reseller smarttech com where Resolving image issues Computers peripherals source...

Страница 59: ...wer outlet 2 Ensure that your cables are correctly and securely connected as described in the included installation instructions for the SMART Board 480iv and 680iv interactive whiteboard system smart...

Страница 60: ...elect Standard monitor types from the list 7 In the Models list select the resolution you need 8 Verify that the resolution setting of the monitor display is lower than or equal to 1024 768 The image...

Страница 61: ...rocedure g To resolve the vertical flickering bar issue 1 Adjust the Frequency setting in the on screen display See Image Adjustment menu on page 16 2 Check the display mode of your computer s graphic...

Страница 62: ...there are no obstructions behind the projector s wall mounting bracket and that the bracket is firmly secured to the wall according to the installation instructions l Make sure that the knob and lock...

Страница 63: ...are the service menu access code with casual users of your interactive whiteboard system l Do not adjust any settings in the service menu other than those listed in this guide Changing other settings...

Страница 64: ...assword appears on the screen 3 Write down the password 4 Scroll to Exit and then press Enter on the remote control to exit the projector service menu Resetting the projector At some point during trou...

Страница 65: ...mation menu on page 21 Transporting your interactive whiteboard system Save your original SMART Board interactive whiteboard packaging so that it s available if you need to transport your interactive...

Страница 66: ......

Страница 67: ...inventory 64 Value based command methods 64 Absolute values and adjustment values 64 Video source specification values 65 Power state controls 65 Source selection controls 66 General source controls...

Страница 68: ...etwork settings on page 60 g To use the management web page 1 Start your Internet browser 2 Type the IP address in the address line field and then press ENTER The SMART V25 Projector Settings window a...

Страница 69: ...l Select On to enable volume adjustment and select Off to disable volume adjustment if you prefer to use your audio system or speaker not included controls Source Adjusts the input source to VGA1 Comp...

Страница 70: ...projector s workgroup name maximum 12 characters Projector Name Displays the projector s name maximum 12 characters Location Displays the projector s location maximum 16 characters Contact Displays th...

Страница 71: ...then press Submit N N OTE The projector sends an alert e mail SMART Alert to your e mail address Press E mail Alert Test to confirm your e mail address by sending a test e mail SMART Alert Test Mail...

Страница 72: ...on so that a straight through male to female RS 232 serial cable connects to the projector s serial interface in the following arrangement Pin number Projector s female RS 232 connector 2 Transmit 3 R...

Страница 73: ...inal emulation program 2 Connect your computer to the serial connection cable you previously connected to the projector 3 Configure your serial interface settings using the values in the table in the...

Страница 74: ...ase sensitive Type commands exactly as they appear in the left column of the tables with the proper value or setting in the center column l Check your entries carefully before entering your commands l...

Страница 75: ...ctive but the source device must be connected or you receive an invalid command response The operational parameters are VGA1 Composite or S Video The following examples set the brightness of VGA1 rega...

Страница 76: ...sequence Idle The projector is off but still receiving power Standby mode Source selection controls These commands switch input sources The source type determines which commands can be accepted Comman...

Страница 77: ...w color setting get videofreeze videofreeze current video freeze setting These commands control the appearance of your source These settings are unavailable when the projector is in Standby mode or wh...

Страница 78: ...rance of your VGA source These settings are unavailable when the projector is in Standby mode or when the VGA source is disconnected See Value based command methods on page 64 for setting absolute and...

Страница 79: ...dio system not included Audio output controls aren t defined by the video source These settings are unavailable when the projector is in Standby mode These commands inform you of the current audio out...

Страница 80: ...ted netstatus disconnected netstatus disabled get dhcp dhcp current DHCP status get ipaddr ipaddr current IP address get subnetmask subnetmask current subnet mask number get gateway gateway current ne...

Страница 81: ...age current language setting get groupname groupname current projector group name get projectorname projectorname current projector name get locationinfo locationinfo current projector location get co...

Страница 82: ...brightness target on off highbrightness target set autopoweroff value 0 to 240 autopoweroff value set zoom value 0 to 30 zoom value set projectorid value 0 to 99 projectorid value set hposition value...

Страница 83: ...description set locationinfo description Enter a descriptor no more than 16 characters long locationinfo description set contactinfo description Enter a descriptor no more than 16 characters long cont...

Страница 84: ...te these features Simple Network Management Protocol SNMP SMART V25 projectors support a list of SNMP commands as described in the management information base MIB file You can download this file by br...

Страница 85: ...ire further information please contact your reseller or SMART Technologies for information on which recycling agency to contact Restriction of Certain Hazardous Substances RoHS directive This product...

Страница 86: ...ducts complies with applicable packaging laws China s Electronic Information Products regulations China regulates products that are classified as EIP Electronic Information Products SMART Technologies...

Страница 87: ...r wheel 45 composite video connections 29 66 68 connection diagrams projector 23 consumer product safety 76 contact person 60 D DHCP 60 70 DNS 70 document cameras 29 dual user capabilities 2 dust v DV...

Страница 88: ...ess 70 MAC support 28 mounting template 8 mute control 15 69 N native video formats 27 network communication 24 47 60 70 O options 5 original packaging 55 P packaging 76 passwords 54 61 pen tray about...

Страница 89: ...oard SMART V25 projector See projector SMTP 61 SNMP 74 sound See audio subnet mask 60 70 SVGA support 28 SXGA support 28 T temperatures operating and storage v transportation 55 trap destination addre...

Страница 90: ......

Страница 91: ......

Страница 92: ...SMART Technologies smarttech com support smarttech com contactsupport...

Отзывы: