Installation
SMA
Technologie AG
Page 22
SB25_30-11:SE0307
Installation Guide
1.
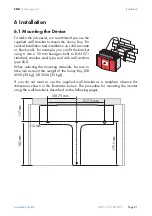
Mount the wall bracket (1). To mark the
positions to drill the holes, you can use the wall
bracket as a drilling template.
2.
Now hang the Sunny Boy onto the wall bracket
(2) using its upper mounting plate so that it
cannot be moved sideways.
3.
Secure the Sunny Boy in position by screwing
the supplied M6x10 bolt into the central
threaded hole at the bottom of the bracket (3).
4.
Make sure that the Sunny Boy is positioned
securely on the bracket.
6.2 Electrical Installation
The wiring for the Sunny Boy is shown schematically in the following figure:
Warning!
Make sure to check the polarity of the strings before connecting them.
String 1
String 2
String 3
AC connection, max. 2.5 mm²
Содержание Sunny Boy SB 2500
Страница 2: ......
Страница 6: ...Explanation of the Symbols Used SMA Technologie AG Page 6 SB25_30 11 SE0307 Installation Guide...
Страница 10: ...Safety Instructions SMA Technologie AG Page 10 SB25_30 11 SE0307 Installation Guide...
Страница 20: ...Installation Requirements SMA Technologie AG Page 20 SB25_30 11 SE0307 Installation Guide...
Страница 34: ...Opening and Closing the Sunny Boy SMA Technologie AG Page 34 SB25_30 11 SE0307 Installation Guide...
Страница 58: ...Rating for a Line Circuit Breaker SMA Technologie AG Page 58 SB25_30 11 SE0307 Installation Guide...
Страница 62: ...The Communication Interface SMA Technologie AG Page 62 SB25_30 11 SE0307 Installation Guide...
Страница 65: ......

