SMA Sunny Boy 2400 Скачать руководство пользователя страница 6

GB

The following instructions for
installation will help you to
commission the Sunny Boy
2400. They do not replace
the Sunny Boy 2400 Manual.
You will find a complete des-
cription of all functions as
well as information on
communication equipment
and all definable parameters
in the Sunny Boy 2400
Technical Description. 
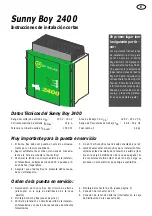
Please read first

Sunny Boy 2400

Quick Installation Guide

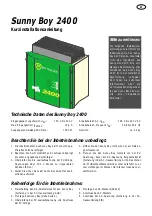
Sunny Boy 2400 Technical Data

Input voltage range UPV: 

150 V - 300 V

Max. input current IPVmax: 12.6 

A

Nominal output power PACnom:

1500 W

Output voltage range VAC: 

196 V - 253 V AC

Frequency range fAC: 

49.8 - 50.2 Hz

Weight: 

approx. 24 kg

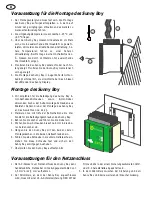
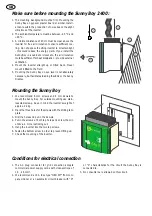
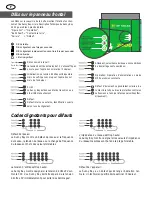
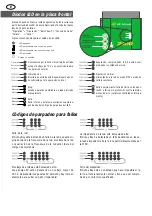
To commission the Sunny Boy please make sure:

1. The Sunny Boy may only be commissioned by qualified

personnel.

2. Follow the order below when establishing the electrical

connection!

3. Check the open circuit voltage of the PV strings. Voltages

above 300 V can cause non-repairable damage!

4. Check the Sunny Boy for any transport damage.

5. Do not open the Sunny Boy when it is connected to the

grid.

6. Never disconnect the Sunny Boy from the PV voltage be-

fore the AC voltage has been disconnected (remove the
fuse in the house distribution). Pulling the Multi-Contact
plug connectors while under load results in an electric
arc in the connector which consequently has to be re-
placed.

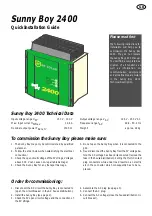
Order for commissioning:

1. Disconnect the AC circuit the Sunny Boy is connected to

(open the circuit breaker in the AC house distribution).

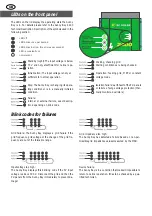
2. Install the Sunny Boy (see page 2). 
3. Check the PV open circuit voltage and the connection of

the PV strings.

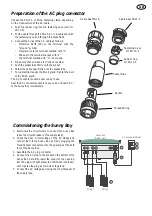
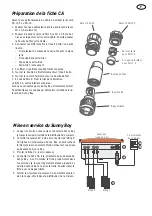
4. Assemble the AC plug (see page 3).
5. Connect the AC plug.
6. Connect the AC voltage (close the house distribution cir-

cuit breaker).

Содержание Sunny Boy 2400

Страница 1: ......

Страница 2: ...urch qua lifiziertes Personal erfolgen 2 Beachten Sie beim elektrischen Anschluss unbedingt die unten angegebene Reihenfolge 3 berpr fen Sie die Leerlaufspannung der PV Strings Spannungen ber 300 V k...

Страница 3: ...delstahl Denken Sie bei der Montage des Sunny Boy an das Gewicht von ca 24 kg 2 Markieren Sie mit Hilfe der Bohrschablone die drei Punkte f r die Befestigungsschrauben des Sunny Boy 3 Bohren Sie die L...

Страница 4: ...schlie en Sie den Buchseneinsatz mit der ebenfalls im Beipack enthaltenen Verschlusskappe 1 Schalten Sie den Stromkreis ab an dem Sie den Sunny Boy anschlie en wollen Sicherung in der Hausverteilung...

Страница 5: ...t rung Der Sunny Boy hat eine St rung die den normalen Betrieb verhindert Eine Elektrofachkraft muss das Ger t berpr fen 3 s 1 s 1 s 1 s 1 s 5 s 3 x Betrieb Erdschluss St rung 3 s 1 s 1 s 1 s 1 s 1 s...

Страница 6: ...e order below when establishing the electrical connection 3 Check the open circuit voltage of the PV strings Voltages above 300 V can cause non repairable damage 4 Check the Sunny Boy for any transpor...

Страница 7: ...he LEDs or the Sunny Display 1 We recommend 6 mm screws and 8 mm dowels to mount the Sunny Boy For outside mounting use stain less steel screws Keep in mind the inverter s weight of approx 24 kg 2 Mar...

Страница 8: ...eal the AC connector socket in case you do not insert it in to the Sunny Boy immediately 1 Disconnect the circuit where to connect the Sunny Boy open the circuit breaker of the supply lead 2 Check the...

Страница 9: ...immediately to prevent da mage Device failure The Sunny Boy is in a condition that makes it impossible to return to normal operation It has to be checked by a qua lified technician LED off LED blinks...

Страница 10: ...par du per sonnel qualifi 2 Lors de la connexion lectrique suivre l ordre ci dess sous 3 Examiner la tension vide des lignes de modules PV strings Les tensions au del de 300 V peuvent r sulter en domm...

Страница 11: ...acier sp cial lors d un montage en de hors Lors du montage tenir compte du poids du Sunny Boy d environ 24 kg 2 Marquer les trois points pour les vis de fixation du Sunny Boy l aide du gabarit de per...

Страница 12: ...ec le chapeau d obturation inclut dans la liv raison du Sunny Boy 1 Couper le circuit o vous voulez connecter le Sunny Boy enlever le coupe circuit dans la distribution de maison 2 Contr ler la tensio...

Страница 13: ...s dommages D faut de l appareil Le Sunny Boy a un d faut qui d range l op ration nor male Un technicien qualifi doit examiner l onduleur DEL teinte DEL clignotant une fois par seconde DEL clignotant r...

Страница 14: ...r estrictamente el orden mencionado m s ade lante a la hora de conectar el Sunny Boy 3 Controlar la tensi n en circuito abierto de la instalaci n fotovoltaica Voltajes de m s de 300 V pueden pro ducir...

Страница 15: ...tornillos de cabeza hexagonal de 6 mm y tacos de 8 mm Para montajes a la intemperie utilizar tornillos de acero inoxidable Considerar un pe so de aprox 24 Kg 2 Marcar los tres agujeros para los torni...

Страница 16: ...onecta el Sunny Boy directamente cerrar el orificio de enchufe con el capuch n tambi n incluido en el env o 1 Desconectar el circuito al que quiere conectar el Sunny Boy fusible en la caja de distribu...

Страница 17: ...evitar un da o irreparable Fallo del dispositivo El Sunny Boy est en un estado que hace imposible el re torno al funcionamiento normal y tiene que ser compro bado por un t cnico cualificado LED apaga...

Страница 18: ...SB2400 10 QX2601...

Отзывы: